Exploring runtime styling with the Native Window Explorer in Adobe AIR
by 8 June, 2009 1:00 pm22
In this Adobe AIR tutorial you will use runtime styling to create a dynamic native window in Adobe AIR.
We will show you how to load and unload styles, performance concerns and best practice while also showing you the value of knowing your environment.
Requirements
- Flex SDK
- AppWindow class found in the source code
- WIN & MAC SWF skins found in the source code


Pre-Requesites
You should feel comfortable working with Adobe Flex Builder and Adobe AIR.
When creating an AIR application, I suggest using ADM from David Deraedt – makes managing your application settings file too easy.
What is the Native Window Explorer?
To give a quick definition, it is a project to create the native look and feel of the hosting operating system in AIR. Leveraging a native UX experience in AIR is the next step in making truly enterprise level applications that are built on top of current user expectations. We want to go beyond that utility window and really be in control of all aspects of the application, including layout and design that is un-inhibited by system chrome restrictions.
Step 1: Create the Project
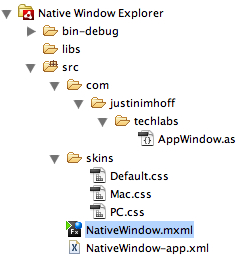
The first thing we want to do is create a new Adobe AIR application from Flex Builder named “Native Window Explorer”. After creating the project, add the AppWindow class to the source (src) folder and add the WIN & MAC skins to a new folder called skins. Your project structure should be similar to below:

Step 2: Creating the default application skin
To create the default application style in Flex Builder, select File > New > CSS File. Name the file “Default.css” and save it to the skins directory. The Default.css file will act as our global skin contains the type selectors the application will use. Since we want this to be the default style for the application, we will compile the style in the main SWF file by using:
Any value you define in the Default.css file should consist of global styles that are not overwritten by other styles. The goal of the Default.css file is to handle the global skinning that is specifically for your application. If you are not leveraging Flex’s default Halo theme, you can create your own theme that defines type selectors for such components as Buttons or Lists. In this tutorial I am simply setting the global text, and leveraging Halo for the datagrid. Instead of loading this file remotely, we will embed it in the main SWF. I would suggest using this file for setting type selectors (Button, HSlider), compared to class selectors (.newButton, .coolSlider) witch is specific and would not be globally applied. The class selectors should be loaded in remotely if it will be defined and used in multiple style SWFs, or just to keep initial download size down and promote a fast user experience.
Our goal in implementing runtime styling is first identifying a reason. In this case we are going to load different styles / skins for the current host operating system. Other reasons for dynamic skinning could be for providing different experience per use case, allow users to pick their own skin / environment, and for just increasing application performance and initial download size. Even though this tutorial is using AIR, you can leverage the same code in the browser.
Step 3: Its all about the StyleManager
When using runtime skinning, we will be leveraging the StyleManager.loadStyleDeclarations(). The StyleManager is exactly what it sounds like – it manages style inheritance for all visual objects. The StyleManager lets you apply inheritable and non-inheritable styles globally, but one thing to remember is dealing with styles is extremely resource intensive.
So the problem is that we want to leverage the StyleManager.loadStyleDeclarations to apply a remote skin to our application. When this is called, the Flash Player will reapply all styles to the display list which will degrade performance. The solution is the display list, what if you apply the style before anything is added to the display list? To do this, we are going to remotely load the style SWF on pre-initialization, and not until the style SWF is loaded will we let the application continue its initialization. So we want to first attach the handler for preinitialize on the application:
preinitialize="onPreinitialize(event)"
So our onPreinitialize function looks like this:
   private function onPreinitialize(event:FlexEvent):void {
     var findPlatform:Array=Capabilities.version.split(" ", 1);
	  platform=findPlatform[0];
	  if (platform != "MAC") {
	     platform="WIN"
	  }
	  var eventDispatcher:IEventDispatcher;
	  eventDispatcher=StyleManager.loadStyleDeclarations("skins/" + platform + ".swf");
	  eventDispatcher.addEventListener(StyleEvent.COMPLETE, onStyleComplete);
   }
The first thing we are going to do is find the current operating system. For this we read the System Capabilities from the Flash Player, more specifically, the version of the Flash Player. We split after the first space and take that value as our current platform. We now check to see if we are on a Mac, if we are not we will treat the platform asWindows and set the platform to WIN. Author note: In this code I am being biased and I know that I am treating everything as Mac or not Mac – I apologize to those who I offended.
   var findPlatform:Array=Capabilities.version.split(" ", 1);
   platform=findPlatform[0];
   if (platform != "MAC") {
     platform="WIN"
   }
Moving on, we are creating an EventDispatcher to handle the loading of the remote style SWF. One thing to keep in mind when leveraging the loadStyleDeclarations – the Flash Player will apply new style only once – it caches loaded styles, so if you load the style again it will be loading it from player cache and apply the current style where necessary. We now attach a style event of complete to the dispatcher in order to notify the onStyleCompete method that the style SWF is loaded and ready.
   var eventDispatcher:IEventDispatcher;
   eventDispatcher=StyleManager.loadStyleDeclarations("skins/" + platform + ".swf");
   eventDispatcher.addEventListener(StyleEvent.COMPLETE, onStyleComplete);
But wait, you gave me these style SWFs, how do I make my own? Easy – right click on the css file and choose “Compile CSS to SWF” and you can now load your own skin file dynamically. Not only does this decrease size on your initial download, but now you can manage your skins separately from your application and keep your designers happy.
Step 4: The style is loaded, now what?
We have now been notified that the style is ready and has been added to the StyleManager.
   private function onStyleComplete(event:StyleEvent):void {
	 event.stopImmediatePropagation();
	 super.initialized=true;
   }
The first thing we want to do is allow the Flash Player to continue in its life-cycle. We tell the application that it has initialized and is can now add display objects. In most cases, if you know an event will not be used in another method or in by a child object in your application, you can stop the propagation of that event from traversing further through the application, but more on this in another tutorial.
Step 5: The application has style, know lets manage the UI
We have added a handler to notify us when the application has created and added all display object, we now want to manipulate those objects.
applicationComplete="setWindow()"
This is where the real customization begins. We want to tell our AppWindow what OS we are on so it can make the necessary changes to its own layout, but we also want to tell our application what current state it must be in. When we change the state of the application, we are using states to dynamically apply changes to the style selector for a specific component. Anything that is a setStyle can be embeed in a style sheet and be applied as a styleName. We now want to center our application and add event listeners to notify our AppWindow that it is either the current window or a background window. The final instructions of the method is to printCapabilities, which takes the Flash Player Capabilities class and dumps it into our datagrid.
   private function setWindow():void {
	 appWindow.os=platform;
	 currentState=platform;
	 nativeWindow.x=Capabilities.screenResolutionX / 4;
	 nativeWindow.y=Capabilities.screenResolutionY / 4;
	 addEventListener(AIREvent.APPLICATION_ACTIVATE, setApplicationFoucs);
	 addEventListener(AIREvent.APPLICATION_DEACTIVATE, setApplicationFoucs);
	 printCapabilities(Capabilities);
   }
Step 6: Show me the States, the Script and the Results
<?xml version="1.0" encoding="utf-8"?>
<mx:WindowedApplication xmlns:mx="http://www.adobe.com/2006/mxml" preinitialize="onPreinitialize (event)" applicationComplete="setWindow()" showFlexChrome="false" width="600" height="500" layout="absolute" xmlns:techlabs="com.justinimhoff.techlabs.*">
<mx:states>
<!---
When using states you are calling setStyle on object directly
Notice the difference between the setStyle and setProperty, anything that say setStyle can be embedded
in the styleSheet and then the object's style can be applied through the object's styleName
-->
<mx:State name="MAC">
<mx:RemoveChild target="{button1}"/>
<mx:SetStyle target="{userPlatformControl}" name="top" value="50"/>
<mx:SetStyle target="{techLabsFooter}" name="bottom" value="79"/>
<mx:SetStyle target="{techLabsFooter}" name="left" value="40"/>
<mx:SetStyle target="{techLabsFooter}" name="right" value="40"/>
<mx:SetStyle target="{capabilitiesList}" name="top" value="79"/>
<mx:SetStyle target="{capabilitiesList}" name="right" value="40"/>
<mx:SetStyle target="{capabilitiesList}" name="bottom" value="129"/>
<mx:SetStyle target="{capabilitiesList}" name="left" value="40"/>
<mx:SetStyle target="{capabilitiesList}" name="left" value="40"/>
<mx:SetStyle target="{userPlatformControl}" name="left" value="48"/>
<mx:SetStyle target="{label1}" name="fontSize" value="16"/>
<mx:SetStyle target="{label1}" name="fontWeight" value="bold"/>
<mx:SetStyle target="{label1}" name="horizontalCenter" value="0"/>
<mx:SetStyle target="{label1}" name="top" value="40"/>
<mx:SetStyle target="{label1}" name="color" value="#333333"/>
<mx:SetStyle target="{techLabsFooter}" name="verticalAlign" value="middle"/>
<mx:SetProperty target="{techLabsFooter}" name="height" value="51"/>
<mx:SetProperty target="{button2}" name="styleName" value="toolBarButtons"/>
<mx:SetProperty target="{button2}" name="label"/>
</mx:State>
<mx:State name="WIN">
<mx:RemoveChild target="{button2}"/>
<mx:SetStyle target="{userPlatformControl}" name="left" value="40"/>
<mx:SetStyle target="{userPlatformControl}" name="right" value="40"/>
<mx:SetStyle target="{userPlatformControl}" name="top" value="78"/>
<mx:SetStyle target="{techLabsFooter}" name="bottom" value="79"/>
<mx:SetStyle target="{techLabsFooter}" name="left" value="40"/>
<mx:SetStyle target="{techLabsFooter}" name="right" value="40"/>
<mx:SetStyle target="{capabilitiesList}" name="top" value="107"/>
<mx:SetStyle target="{capabilitiesList}" name="right" value="40"/>
<mx:SetStyle target="{capabilitiesList}" name="bottom" value="129"/>
<mx:SetStyle target="{capabilitiesList}" name="left" value="40"/>
<mx:SetStyle target="{capabilitiesList}" name="left" value="40"/>
<mx:SetStyle target="{techLabsFooter}" name="verticalAlign" value="middle"/>
<mx:SetStyle target="{label1}" name="horizontalCenter" value="0"/>
<mx:SetStyle target="{label1}" name="top" value="40"/>
<mx:SetStyle target="{label1}" name="fontSize" value="16"/>
<mx:SetStyle target="{label1}" name="fontWeight" value="bold"/>
<mx:SetStyle target="{label1}" name="color" value="#FFFFFF"/>
<mx:SetProperty target="{userPlatformControl}" name="styleName" value="toolBar"/>
<mx:SetProperty target="{button1}" name="styleName" value="toolBarButtons"/>
<mx:SetProperty target="{userPlatformControl}" name="height" value="30"/>
<mx:SetProperty target="{button1}" name="height" value="25"/>
<mx:SetProperty target="{techLabsFooter}" name="height" value="51"/>
</mx:State>
</mx:states>
<techlabs:AppWindow width="100%" height="100%" id="appWindow">
<mx:Label text="Native Window Explorer" id="label1"/>
<mx:DataGrid id="capabilitiesList"/>
<mx:HBox id="techLabsFooter" backgroundColor="#333333">
<mx:Image source="@Embed(source='images/logo-trans1.png')" id="techLabsLogo" left="15"/>
</mx:HBox>
<mx:HBox id="userPlatformControl">
<mx:Button label="MAC Style" click="switchPlatform('MAC')" enabled="{platform == 'WIN'}" id="button1"/>
<mx:Button label="PC Style" click="switchPlatform('WIN')" enabled="{platform == 'MAC'}" id="button2"/>
</mx:HBox>
</techlabs:AppWindow>
<!--- This compiles the global style in the SWF -->
<mx:Style source="skins/Default.css"/>
<mx:Script>
import mx.core.Container;
import mx.controls.Text;
import flash.utils.describeType;
import mx.collections.ArrayCollection;
import mx.events.StyleEvent;
import mx.events.FlexEvent;
import mx.managers.SystemManager;
import mx.events.AIREvent;
import flash.utils.*;
[Bindable]
private var platform:String;
//We are not overriding preinitialization, but are instead adding on to the cycel
private function onPreinitialize(event:FlexEvent):void {
var findPlatform:Array=Capabilities.version.split(" ", 1);
platform=findPlatform[0];
if (platform != "MAC") {
platform="WIN"
}
var eventDispatcher:IEventDispatcher;
//Dispatch a styleEvent that the remote style SWF has been successfully loaded
eventDispatcher=StyleManager.loadStyleDeclarations("skins/" + platform + ".swf");
eventDispatcher.addEventListener(StyleEvent.COMPLETE, onStyleComplete);
}
// We do not want Flex to continue onto initialization until the style SWF is loaded and we are ready to initialize
override public function set initialized(value:Boolean):void {
// wait until the style swf is done loading!
}
private function onStyleComplete(event:StyleEvent):void {
//Tell the app that we are ready to initialize
event.stopImmediatePropagation();
super.initialized=true;
}
//This is used to set the state of the application and set the view of the AppWindow
private function setWindow():void {
appWindow.os=platform;
currentState=platform;
//Center the window on the desktop
nativeWindow.x=Capabilities.screenResolutionX / 4;
nativeWindow.y=Capabilities.screenResolutionY / 4;
//In the native OS environment we will have multiple window open and we need to notify the user that they have or donot have
// focuse on the window
addEventListener(AIREvent.APPLICATION_ACTIVATE, setApplicationFoucs);
addEventListener(AIREvent.APPLICATION_DEACTIVATE, setApplicationFoucs);
// Take the current Flash Player Capabilities class and dump it into a datagrid
printCapabilities(Capabilities);
}
private function setApplicationFoucs(event:AIREvent):void {
event.stopImmediatePropagation();
if (event.type == "applicationDeactivate") {
appWindow.active=false;
} else {
appWindow.active=true;
}
}
//Dump the Capabilites to a datagrid
private function printCapabilities(o:Object):void {
var def:XML=describeType(o);
var props:XMLList=def..variable.@name;
props+=def..accessor.@name;
var capArray:Array=new Array();
for each (var prop:String in props) {
var capObj:Object=new Object();
capObj.propName=prop;
capObj.propValue=o[prop]
capArray.push(capObj);
}
capabilitiesList.dataProvider=capArray;
}
//User defined switch of the current platform
private function switchPlatform(os:String):void {
StyleManager.loadStyleDeclarations("skins/" + os + ".swf");
appWindow.os=os;
platform=os;
currentState=os;
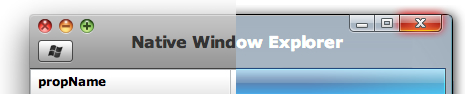
}This is what you get:
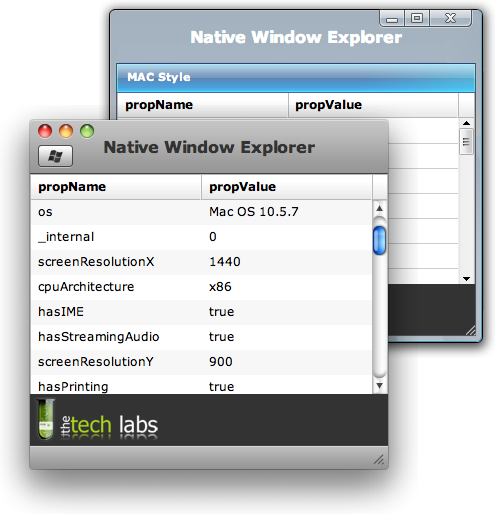
Notice the difference in the headers, the experience generated by each one is very specific and vastly different
If you are reading this, you must be a ninja
I told you I would go over unloading stylse and performance improvements, so that is what i am going to do. Unloading your style is just the opposite as removing it. For this example I chose not to unload my styles because I had two rather small skins, but for larger projects it should be a consideration. When you unload a style SWF, you are removing all the style selectors set by the specific style SWF.
Usage:
StyleManager.unloadStyleDeclarations("style SWF name");The great thing about unloading the style is that the global or next level style is not reapplied, but instead objects now inherit the next selector values.
What about performance?
One of the best ways to apply style in Flex 3 is by applying style on pre-initialzation as described in this tutorial. The main reason for this is that there are no object to be notified of changes, instead the object apply the style once it has been created. Most large application are broken up into modules and loaded as need, this same structure that should be used with styles.
You should really read this part – only use setStyle when you are dynamically setting the style on existing objects, but even then you can just use the style name and reuse that style in multiple places. The best way to leverage the setStyle is through using styleDeclarartions:
     import mx.styles.StyleManager;

     private var newDynamicStyle:CSSStyleDeclaration;

     private function addDynamicStyle():void {
        newDynamicStyle = new CSSStyleDeclaration('coolButton');
        newDynamicStyle.setStyle('color', 'blue');
        newDynamicStyle.setStyle('themeColor', 'blue');
        newDynamicStyle.setStyle('fontSize', 16);

        /* Apply the new style to all Buttons. By using a type
           selector, this CSSStyleDeclaration object will replace
           all Button style properties, causing potentially unwanted
           results. */

        StyleManager.setStyleDeclaration("Button", coolButton);

        /* Apply the CSSStyleDeclaration to a specific object.
           If the type or class selector does not currently exist, it is added - if it does,
           it then will replace the current selector.
			You are now applying a specific selector class to the button and only requesting one lookup*/

        StyleManager.setStyleDeclaration(".newButtonStyle", coolButton);

        daButton.stylename = ".newButtonStyle";
     }
Any time you are using styleDeclarations, you have the ability to tell the Flash Player to not update the styles immediately, but instead wait till styleChanged() is called. This would allow you to call the setStyleDeclaration, followed by the clearStyleDeclaration and force Flash to store the style selector, but not apply it until selectors are removed. By default, Flash Player will update the style immediately. Any time you call a styleDeclaration method, you are telling Flash to re-compute the style for every visual component in the application, so use sparingly.
   StyleManager.setStyleDeclaration(".newButtonOne", buttonOneStyle, false);
   StyleManager.setStyleDeclaration(".newButtonTwo", buttonTwoStyle, false);
   StyleManager.setStyleDeclaration(".oldButton", true);
Now take what i have published, impliment, check and ask questions – Thanks for reading
Related posts

Latest / by - 4 February, 2016 1:04 pm
Some of the more popular alternatives to point of sale checkout
Decades ago we were all used to queueing at the traditional point of sales (POS). The high street cash register was king when it came to paying for purchases, in…

Effects / by - 14 January, 2012 5:55 pm
Learn Digital Painting in Photoshop
It’s impossible for everyone to become an artist, but many of them have a will to become an artist, to draw beautiful paintings but again due to lack of command…

Effects / by - 28 December, 2011 2:28 pm
How to Make a New Year Greeting Card in Photoshop
This is so much easy to go in a market and by paying some bucks; purchasing a New Year Greeting Card or any other festival card for your loving person…

Flash / by - 10 August, 2011 4:13 pm
Creating a Gallery in Flash Using the Moto CMS Component
In this tutorial we will create a gallery with the help of the Moto CMS Component. I think many of you have heard about (or even worked with) Moto Flash…

3D / by - 24 July, 2011 5:21 pm
Visualize Your Web Page in 3D
Ever wondered if you could visualize your website in 3D? Well, here’s one such Firefox extension that allows you to do so. Tilt is a Firefox add-on that lets you visualize any web page DOM and provides the relationship between various parts of a website in 3D.

Interfaces / by - 1 March, 2011 2:18 pm
Beginners Guide To User Interface Design in C#
User Interface Design in C# Windows Form Application From Scratch In this C Sharp tutorial you will learn user interface design in C# application. This step-by-step tutorial will help you deeply understand…
Effects / by - 1 December, 2010 2:34 pm
Create an intelligent XML image Gallery & Slideshow in Flash CS4 (+PHP) – Part II/II
In this second part article you will learn how to build an image gallery that will load images from a web server. I decide to call it “Intelligent” because you don’t need to configure any XML or flash file. Just put the Flash movie and the images on a server and they will be loaded automatically. Nice ah?
Flex / by - 29 May, 2010 2:56 pm
Connecting Flex Calendar With Database Using AMF-PHP
Connecting Flex Calendar with Database using AMF-PHP Part I: Create a Dynamic Event Calendar in Flex Builder 3 with Actionscript 3.0 This is Part II of Create a Dynamic Event…
Server Side / by - 13 April, 2010 2:39 pm
CodeIgniter Tutorial – CodeIgniter Explained
Hello everyone, and welcome to the first CodeIgniter tutorial. What will you learn? 1. What is a PHP Framework? 2. What is CodeIgniter? 3. What is MVC? 4. MVC Pattern…

3D / by - 20 March, 2010 10:00 am
Away3D Shoot’em’Up Tutorial – Powerups
In this article we add some powerups to the game.

3D / by - 15 February, 2010 3:59 pm
Away3D Shoot’em’Up Tutorial – Sound Effects
In this article we add some sound effects to the game.
3D / by - 28 July, 2009 1:00 pm
Create from Scratch a Away3D Shoot’em’Up Game: Part 4
Now that we have the player and some enemies we need for them to be able to interact. This is done through collision detection which you will learn in this fourth part.

Effects / by - 21 July, 2009 1:00 pm
Getting Started With BetweenAS3
There are many popular open source tweening engines in the Flash community today. Numbered among these are Tweener, TweenLite/Tweenmax, Tweensy, and GTween. This is a short look at the capabilities of newcomer to the scene: BetweenAS3. BetweenAS3 is the tweening engine brainchild of Yoshihiro (yossy) Shindo and is available as part of the Spark project (i.e. it is brought to us by one of the same group that brought the world the FLARToolkit for Augmented Reality in Flash and countless other goodies).
3D / by - 15 July, 2009 12:50 pm
Create from Scratch a Away3D Shoot’em’Up Game: Part 3
After you have created the 3D level, in the part 3 of this Away3D series, we will show you how to add the player spacecraft and enemies.
Effects / by - 13 July, 2009 12:30 pm
Create an intelligent XML image Gallery & Slideshow in Flash CS4 (+PHP) – Part I/II
In this article you will learn how to build an image gallery that will load images from a web server. I decide to call it “Intelligent” because you don’t need to configure any XML or flash file. Just put the Flash movie and the images on a server and they will be loaded automatically. Nice ah?
3D / by - 8 July, 2009 1:45 pm
Create from Scratch a Away3D Shoot’em’Up Game: Part 2
In the part 1 of these tutorial series articles we created a framework that we could build off to start making the actual game. Now it’s time to create a 3D level for the player to fly through.
3D / by - 6 July, 2009 12:50 pm
Create from Scratch a Away3D Shoot’em’Up Game: Part 1
Today we start a 9 part tutorial series on creating a Shoot’em’Up game. We will cover all the necessary topics to create it from scratch, which will help you to understand and apply these guidelines to other projects. Ath this first part. we look at getting the Away3D engine up and running by creating a UIComponent that will contain and initialize the necessary Away3D components.
Effects / by - 1 July, 2009 1:00 pm
Build a Creative “Swirl Animated Menu” with Flash CS4
Flash it’s a powerful application and can be really complex, but even beginners can create a cool menu for demonstration or for use in a personal site. The menu that we will create is simple, but the swirl animation is something that you don’t see everywhere, for that I’ve decided to explain one way to make an animation of growing swirls without any Action Script code.You will also learn how to import artwork from illustrator where I’ve pre-made the graphics, the work is very simple and the result will be very cool.
Flash / by - 29 June, 2009 12:00 pm
SWFObject and Best Practice Implementation
With more and more full screen Flash web sites appearing on the internet, it’s important to understand how to properly embed the Flash movie in the browser window.
In this tutorial we will cover best practice embedding of SWF movies using SWFObject with a custom function for adding browser scrollbars for smaller browser windows.
3D / by - 24 June, 2009 12:30 pm
Create a 3D Bowling Game with JiglibFlash and Papervision 3D
Possibly the hottest thing to hit the Flash community since the advent of several excellent 3D engines is the recent debut of 3D physics engines. Here we’ll examine a way of using one of the more popular 3D engines, JiglibFlash, in conjunction with the prominent 3D engine Papervision3D to create a bowling game.


