Create an intelligent XML image Gallery & Slideshow in Flash CS4 (+PHP) – Part II/II
by 1 December, 2010 2:34 pm2
Create an intelligent XML image Gallery & Slideshow in Flash CS4 (+PHP) – Part I/II
Here is the first part: Create an intelligent XML image Gallery & Slideshow in Flash CS4 (+PHP) – Part I/II
Create an intelligent XML image Gallery & Slideshow in Flash CS4 (+PHP) – Part II/II
In the second part you will transform your gallery made on the first part of this two-part tutorial into a gallery with some polaroid distributed thumbnails. You will also learn how to auto-create those thumbs in php, load them randomly into flash and use the same animation style to show the gallery.
We will add also a simple button to swap from thumbnails gallery (part two) to slideshow (part one).
First let’s take a look to this second part final result.
Final Result:
https://www.thetechlabs.com/wp-content/uploads/2010/11/gallery.swf
This gallery will have some cool final result features, let’s take a brief look:
- Auto-find images in folder (works with PNG, JPEG, JPG)
- Write an XML file automatically
- Can work only with an XML file and without php
- Have a full screen option
- Fits automatically the screen center
- Can customize the speed of slideshow
- Automatically generate thumbnails of images in folder *
- Spread the thumbnails automatically on the screen *
- Make the slideshow static (only opens in thumbnail click) *
This tutorial is be divided into two parts, the first one is available here.

Requirements
- Have Flash CS4.
- An amp server (or similar like wampserver), any online hosting with php support works to.
- The TweenLite engine that you can download here.
- The first part of this tutorial, that can be downloaded here.
- The open source thumb creation class available here. Can be downloaded directly here.
- Have this polaroid image to add a better look and feel to our loaded thumb.
Pre Requirements
- Know a little of PHP.
- Understand the concept of constraint layout in flash (auto position content).
- A good knowledge of Flash, especially Action Script 3.
Getting started
It’s highly recommended that you go through the first part of tutorial first. Explore the code a little and understand the php part of it. A good knowledge of constraint layouts is a must.
This second part is easier to follow and achieve than the first part, but pay attention to all steps, they are most of them in action script code, so I recommend that you write them and not copy. This is great to practice. Remember; Write instead Copy & Paste!
Step 1 – Updating PHP files
All the php files are supposed to be in the c:/www/wamp folder, so we will continue with this. Grab the thumbnail files (the class.files.php and class.thumbs.php) form this archive and put them on the previously created folder called gallery. Then just open the imageHandler.php file, find the ary2xml() function and inside it, got to the line:
$data.="<image nameI="".$arr[$h]."" thumb="".$arr[$h]."" />rn";
and replace it by this one:
$data.="<image nameI="".$arr[$h]."" thumb="thumbs/".$arr[$h]."" />rn";
This will update your gallery thumbnails path to the folder thumbs so the flash searches this folder for thumbnails. This will do nothing for now because the main thumbnail generation job will be made by those two files we had added on the folder. Just save the file.
Step 2 – Creating the thumbnails with PHP
This step is quite easy because those two classes are ready to use. Just open your discover.php file and do the following changes:
Add this line after the <?php to call your thumb generation class:
include_once("class.thumbs.php");
and before this:
print_r($tm->ary2xml($data,0,'',"images.xml"));
add these two lines:
$thumbs = new thumbs("./", 0, "thumbs/", false, 0, 100, false, 125, 125);

  $thumbs->creates_thumbs();
And that’s all! This will create thumbnails with 125x125px in the thumbs folder with the same image name. Our thumbs are ready to use. Save the file and open the previous flash project.
Step 3 – Creating a polaroid thumbnail
With your flash project open, just go to menu Insert->New Symbol and create a movieClip with polaroidMC name and export it to action script, like this: (please note that my ui language is French, but should be easy to understand when you have this window on flash)
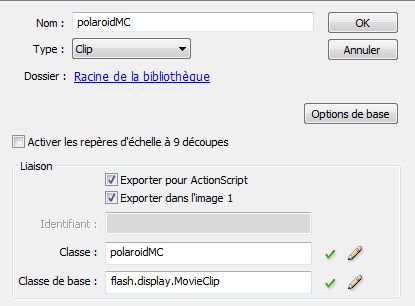
This will create a movieClip that can be loaded from action script to create multiple instances of it. Is the fast way to duplicate items on stage. All the regular MovieClip properties will be available in this movieClip also.
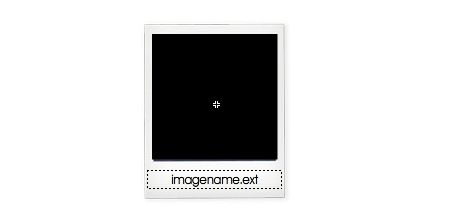
Now, just import into stage our polaroid.png image and center in on stage. File->Import->Import into stage and select our polaroid image. Make it similar to this:

Then we just need to put a text input into the bottom part to display the image name and a empty and masked movieclip to load the thumb picture. This is quite easy, create 3 more layers over the existing one, name the first one Text, the second Image Loader and the third Mask.
Now, on the first one draw a text field, center the text and make the field with +- the same with of the image. Then , on the Image Loader draw a rectangle with the same area than the blue part of the polaroid image, something like this:
Now Right Click on it, and convert it into a movieClip Symbol… name this instance img. Name the text Field instance to “lbl” and now just create another rectangle with the same area of the one in black but do draw it on the Mask layer.
Now, just mask that layer: Right Click-> Mask.
Our Thumbnail loader is created and ready to load our picture.
Step 4 – Make changes on the trigger command
Go to our main stage, on the first frame actions and open actions panel. On this panel we need to make some changes to our movie.
The first thing to have in mind is that we will load our movieclip with all the thumbnails distributed over the screen area, and we will also have a button to play a slide show with those pictures. This is already made, so we need only to create a button to load the slide show, and on the very first start it will be stopped. So, for that we will add a variable called SLIDE_ON to control the slide state. Just add this on the top of the script declarations:
var SLIDE_ON:Boolean=false;

var THUMBS_HIDDEN=false;
The we need to avoid slid to start, just go to the function onXmlComplete() and replace this:
onTime(new TimerEvent(TimerEvent.TIMER)); //load first;
with this:
if(SLIDE_ON) onTime(new TimerEvent(TimerEvent.TIMER)); //load first;
This will stop slide from loading, but the lines and the loader will appear, we just want them to disappear, for that just do this function:
Step 5 – Code a function to hide/stop the slide
 function hideSlide():void {
	LT.alpha=0;
	LB.alpha=0;
	preloader.alpha=0;
}
and call it on the onXmlComplete function on the else instruction, making it appear like this:
function onXmlComplete(evt:Event):void {
 IMAGES = xml2Array(evt.target.data); //load images into array
 if(SLIDE_ON) onTime(new TimerEvent(TimerEvent.TIMER)); //load first;
 else hideSlide();
 }
Step 6 – Create a button to switch between slide/thumbnails presentation
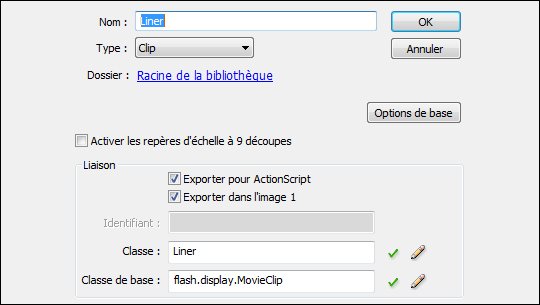
Now the slide is ready to load our pictures into the thumbs and spread the randomly overt the screen, but first lets create a start/stop slide button. Grab this archive and extract those two pictures some place, then in flash create a new MovieClip name it slideControl and the import those two extracted images to stage: File-> Import -> Import to stage. Create two frames and on the first frame put the “screen” image and on the second one the “folder/thumbs” image. Make sure they are placed on the exactly same position: x=0 and y=0. On the first layer actions write down
stop();
Now, just go back to stage, double click on the galControls movieClip and then just drop from the library our recently created slideControl movie clip. Put it on the left aligned with the existing ones.
Name it’s instance as btnSlide and go back to main stage. The in the actions write this down on bottom of the existing code:
Step 7 – Code the slide switch button actions
galControls.btnSlide.buttonMode=true;
galControls.btnSlide.useHandCursor=true;
galControls.btnSlide.addEventListener(MouseEvent.CLICK, switchSlide);
After this we will need to create this switchSlide function but not for now…
Step 8 – Creating the thumb loader function
Now, we need to create a function to load all our thumbnails and spread them over the screen, just create these functions:
		var thumb:polaroidMC;
      var thumbLoader:Loader;function loadThumbs():void {
      //let's define stage container size to distribute thumbs
     for(var h:int=0; h<IMAGES.length; h++) {

      thumb=new polaroidMC();
      thumb.lbl.text=IMAGES[h].imageName;
      thumb.x=-70;
      thumb.y=stage.stageHeight+100;
      thumb.name="thumb-"+IMAGES[h].imageName;
      thumb.id=IMAGES[h].imageName; thumbLoader=new Loader();
      thumbLoader.x=0;
      thumbLoader.y=0;

      thumb.img.addChild(thumbLoader);

      thumbLoader.name="loader-"+h;

      addChild(thumb);

      thumbLoader.contentLoaderInfo.addEventListener(Event.COMPLETE, onThumbDone);
      var link:String=HOST+IMAGES[h].imageThumb;
      thumbLoader.load(new URLRequest(link));

      loadEvents(thumb, true);

      /*****************************************************/
      //var tmb:polaroidMC = (evt.target as polaroidMC);
      var max_x:Number=stage.stageWidth-70;
      var max_y:Number=stage.stageHeight-70;
      var min_x=0;
      var min_y=0; var rndX:Number=Math.ceil(Math.random() * (max_x - 0 + 1)) + (0 - 1);
      var rndY:Number=Math.ceil(Math.random() * (max_y - 0 + 1)) + (0 - 1);
   var rot:Number=Math.ceil(Math.random() * (45 - 0 + 1)) + (0 - 1)
      thumb.rotation=rot;

      TweenLite.to(thumb,1,{x:rndX, y:rndY});

      }
      }
This function will load all thumbs as polaroidMC’s, and add them a Loader as child to load the thumbnail image.
Step 9 – The thumb load complete event
When the thumb image is finished downloading, just open it and spread it over the screen:
function onThumbDone(evt:Event):void {
   var tmb:polaroidMC = (evt.target as polaroidMC);
   var max_x:Number=stage.stageWidth;
   var max_y:Number=stage.stageHeight;
   var min_x=0;
   var min_y=0;
	 var rndX:Number=Math.ceil(Math.random() * (max_x - 0 + 1)) + (0 - 1);
   var rndY:Number=Math.ceil(Math.random() * (max_y - 0 + 1)) + (0 - 1);

 	TweenLite.to(tmb,1,{x:rndX, y:rndY});
   }
Step 10 – Thumb Mouse Interaction Switcher
It calls also a function to load the events on it. It will act as a switcher allowing to load/unload these properties on each polaroidMC:
function loadEvents(mc:polaroidMC, opt:Boolean):void {
 if(opt==true) {
 mc.buttonMode=true;
 mc.useHandCursor=true;
 mc.addEventListener(MouseEvent.MOUSE_OVER, onThumbOver);
 mc.addEventListener(MouseEvent.MOUSE_OUT, onThumbOut);
 mc.addEventListener(MouseEvent.CLICK, onThumbClick);
 }
 else {
 mc.buttonMode=false;
 mc.useHandCursor=false;
 mc.removeEventListener(MouseEvent.MOUSE_OVER, onThumbOver);
 mc.removeEventListener(MouseEvent.MOUSE_OUT, onThumbOut);
 mc.removeEventListener(MouseEvent.CLICK, onThumbClick);
 }
 }
Step 11 – The thumb event handlers
Now we need to create the events for the thumbs, just add some fade in/out effects and call the image to open when thumb is clicked:
function onThumbOver(evt:MouseEvent):void {
   (evt.currentTarget as polaroidMC).alpha=0.75;
   }
   function onThumbOut(evt:MouseEvent):void {
   (evt.currentTarget as polaroidMC).alpha=1;
   }
When a user click on the thumb we will hide all the existing thumbs and make the animation to load the selected image:
function onThumbClick(evt:MouseEvent):void {
   hideThumbs(loadImage, HOST+"/"+(evt.currentTarget as polaroidMC).id);
   ldr.addEventListener(MouseEvent.CLICK, onLDRClick);
   }
Step 12 – The hide thumbs function
For hide the thumbs we will code this that will search for all the stage child this the thumb name and hide them:
function hideThumbs(onComplete:Function=null, arg:String=null):void {
   for(var g:int=0; g<numChildren; g++) {
 if(getChildAt(g).name.toString().indexOf("thumb-")>-1)  {
 TweenLite.to(getChildAt(g),1,{alpha:0, onComplete:hiden, onCompleteParams:[getChildAt(g)] });
 loadEvents((getChildAt(g) as polaroidMC), false);
 }
 }
 THUMBS_HIDDEN=true;
 if(onComplete!=null && arg!=null) onComplete(arg);
 else if(onComplete!=null) onComplete();
 }
This function is a little special, it will receive as argument a new function and it’s function arguments, meaning the is possible to call any specific function that we can input to act as a onComplete function, this is very useful cause after all the thumbs are hidden we need to open the selected image.
The function acts like this:
Find all the stage children’s that have on it’s name the “thumb” word, then Tween them alpha=0; then call the function loadEvents() that will unload the thumb mouse interaction and on the end of this tween call the function provided by the function arguments.
function hiden(mc:polaroidMC):void {
   mc.visible=false;
   }
We need this function also to make visible=false all the thumbs because if they have only the alpha=0; they will still clickable and we do not want this.
Step 13 – The show thumbs function
We need also to create a function to show our thumbs again when the loader is licked and the displayed picture closed, write this down:
function showThumbs():void {
 trace("showing thumbs");
 for(var g:int=0; g<numChildren; g++) {
 if(getChildAt(g).name.toString().indexOf("thumb-")>-1 && getChildAt(g).visible==false )  {
 TweenLite.to(getChildAt(g),1,{alpha:1});
 getChildAt(g).visible=true;
 loadEvents((getChildAt(g) as polaroidMC), true);
 }
 }
 THUMBS_HIDDEN=false;
 }
Step 14 – The loader click handler
This is the listener of loader clicks (when user click on the main photo loaded the image will close and the thumbs will appear again):
function onLDRClick(evt:MouseEvent):void {
 resetLines();
 ldr.removeEventListener(MouseEvent.CLICK, onLDRClick);
 preloader.visible=false;
 LT.alpha=0;
 LB.alpha=0;
 IMAGE_LOADED=false;
  }
Step 15 – The slide Switcher
Well it’s almost done, just need to create a function to switch to slide mode:
function switchSlide(evt:MouseEvent=null):void {
 if(SLIDE_ON==false) {
 hideThumbs();
 SLIDE_ON=true;
 LT.visible=true;
 LB.visible=true;
 preloader.visible=true;
 LT.alpha=1;
 LB.alpha=1;
 preloader.alpha=1;

 timex.start();
 galControls.btnSlide.gotoAndStop(2);
 }
 else {
 SLIDE_ON=false;
 timex.stop();
 resetLines();
 LT.alpha=0;
 LB.alpha=0;
 preloader.alpha=0;
 preloader.visible=false;
 //preloader.alpha=0;
 galControls.btnSlide.gotoAndStop(1);
 }
   }
function swapThumbs(evt:MouseEvent):void {
 if(THUMBS_HIDDEN==true) showThumbs();
 else hideThumbs();
 }
Step 16 – Replacing thumbs on screen resize
And it’s almost done, just need to create a function to reload all the thumbs into new screen positions when the user switch’s to full screen. Write this function down:
function reloadPos():void {
 for(var g:int=0; g<numChildren; g++) {
 if(getChildAt(g).name.toString().indexOf("thumb-")>-1)  {
 getChildAt(g).x=stage.stageWidth+150;
 getChildAt(g).y=stage.stageHeight+150;

 var max_x:Number=stage.stageWidth-70;
 var max_y:Number=stage.stageHeight-70;
 var min_x=0;
 var min_y=0;
 var rndX:Number=Math.ceil(Math.random() * (max_x - 0 + 1)) + (0 - 1);
   var rndY:Number=Math.ceil(Math.random() * (max_y - 0 + 1)) + (0 - 1);
   var rot:Number=Math.ceil(Math.random() * (45 - 0 + 1)) + (0 - 1)
   getChildAt(g).alpha=1;
   if(IMAGE_LOADED==false) getChildAt(g).visible=true;

   getChildAt(g).rotation=rot;

   TweenLite.to(getChildAt(g),1,{x:rndX, y:rndY});

   loadEvents((getChildAt(g) as polaroidMC), true);
   }
   }
   }
A function to reload thumbs position, this will be called on screen resize.
function replaceThumbs():void {
   hideThumbs(reloadPos);
   }
Step 17 – Updating the code
Now just need to make some minor changes to the part I tutorial code;
On the onXmlComplete() function write on bottom:
loadThumbs();
then on function resetLines() replace the bottom line :
else TweenLite.to(preloader, 1, {alpha:1});
with this one:
else TweenLite.to(preloader, 1, {alpha:1, onComplete:showThumbs});
On the reloadLines() function, write on bottom:
if(SLIDE_ON==false) replaceThumbs();
On the animateToImage() function just replace the
timex.start()
with
if(SLIDE_ON==true) timex.start();
And finally on the onImageComplete() function, find the lines:
if(FIRST_RUN==true) { //if is the first run
 timex.start(); //if it's first run, activate the timer to load next images.
 FIRST_RUN=false; //now it's not the first run
 }
And replace them with
if(FIRST_RUN==true) { //if is the first run
   if(SLIDE_ON==true) timex.start(); //if it's first run, activate the timer to load next images.
   FIRST_RUN=false; //now it's not the first run
   }
This will avoid loading slideshow on first movie run.
Well, that’s all… save your project and run it! Nice ha?
So, I hope you liked this tutorial! Don’t forget to comment, subscribe to our RSS feed and follow us on Twitter. If you have any doubts, just sign up on our forum and ask for help.
Related posts

Effects / by - 14 January, 2012 5:55 pm
Learn Digital Painting in Photoshop
It’s impossible for everyone to become an artist, but many of them have a will to become an artist, to draw beautiful paintings but again due to lack of command…

Effects / by - 28 December, 2011 2:28 pm
How to Make a New Year Greeting Card in Photoshop
This is so much easy to go in a market and by paying some bucks; purchasing a New Year Greeting Card or any other festival card for your loving person…

Flash / by - 10 August, 2011 4:13 pm
Creating a Gallery in Flash Using the Moto CMS Component
In this tutorial we will create a gallery with the help of the Moto CMS Component. I think many of you have heard about (or even worked with) Moto Flash…

3D / by - 24 July, 2011 5:21 pm
Visualize Your Web Page in 3D
Ever wondered if you could visualize your website in 3D? Well, here’s one such Firefox extension that allows you to do so. Tilt is a Firefox add-on that lets you visualize any web page DOM and provides the relationship between various parts of a website in 3D.

Interfaces / by - 1 March, 2011 2:18 pm
Beginners Guide To User Interface Design in C#
User Interface Design in C# Windows Form Application From Scratch In this C Sharp tutorial you will learn user interface design in C# application. This step-by-step tutorial will help you deeply understand…
Flex / by - 29 May, 2010 2:56 pm
Connecting Flex Calendar With Database Using AMF-PHP
Connecting Flex Calendar with Database using AMF-PHP Part I: Create a Dynamic Event Calendar in Flex Builder 3 with Actionscript 3.0 This is Part II of Create a Dynamic Event…
Server Side / by - 13 April, 2010 2:39 pm
CodeIgniter Tutorial – CodeIgniter Explained
Hello everyone, and welcome to the first CodeIgniter tutorial. What will you learn? 1. What is a PHP Framework? 2. What is CodeIgniter? 3. What is MVC? 4. MVC Pattern…

3D / by - 20 March, 2010 10:00 am
Away3D Shoot’em’Up Tutorial – Powerups
In this article we add some powerups to the game.

3D / by - 15 February, 2010 3:59 pm
Away3D Shoot’em’Up Tutorial – Sound Effects
In this article we add some sound effects to the game.
3D / by - 28 July, 2009 1:00 pm
Create from Scratch a Away3D Shoot’em’Up Game: Part 4
Now that we have the player and some enemies we need for them to be able to interact. This is done through collision detection which you will learn in this fourth part.

Effects / by - 21 July, 2009 1:00 pm
Getting Started With BetweenAS3
There are many popular open source tweening engines in the Flash community today. Numbered among these are Tweener, TweenLite/Tweenmax, Tweensy, and GTween. This is a short look at the capabilities of newcomer to the scene: BetweenAS3. BetweenAS3 is the tweening engine brainchild of Yoshihiro (yossy) Shindo and is available as part of the Spark project (i.e. it is brought to us by one of the same group that brought the world the FLARToolkit for Augmented Reality in Flash and countless other goodies).
3D / by - 15 July, 2009 12:50 pm
Create from Scratch a Away3D Shoot’em’Up Game: Part 3
After you have created the 3D level, in the part 3 of this Away3D series, we will show you how to add the player spacecraft and enemies.
Effects / by - 13 July, 2009 12:30 pm
Create an intelligent XML image Gallery & Slideshow in Flash CS4 (+PHP) – Part I/II
In this article you will learn how to build an image gallery that will load images from a web server. I decide to call it “Intelligent” because you don’t need to configure any XML or flash file. Just put the Flash movie and the images on a server and they will be loaded automatically. Nice ah?
3D / by - 8 July, 2009 1:45 pm
Create from Scratch a Away3D Shoot’em’Up Game: Part 2
In the part 1 of these tutorial series articles we created a framework that we could build off to start making the actual game. Now it’s time to create a 3D level for the player to fly through.
3D / by - 6 July, 2009 12:50 pm
Create from Scratch a Away3D Shoot’em’Up Game: Part 1
Today we start a 9 part tutorial series on creating a Shoot’em’Up game. We will cover all the necessary topics to create it from scratch, which will help you to understand and apply these guidelines to other projects. Ath this first part. we look at getting the Away3D engine up and running by creating a UIComponent that will contain and initialize the necessary Away3D components.
Effects / by - 1 July, 2009 1:00 pm
Build a Creative “Swirl Animated Menu” with Flash CS4
Flash it’s a powerful application and can be really complex, but even beginners can create a cool menu for demonstration or for use in a personal site. The menu that we will create is simple, but the swirl animation is something that you don’t see everywhere, for that I’ve decided to explain one way to make an animation of growing swirls without any Action Script code.You will also learn how to import artwork from illustrator where I’ve pre-made the graphics, the work is very simple and the result will be very cool.
Flash / by - 29 June, 2009 12:00 pm
SWFObject and Best Practice Implementation
With more and more full screen Flash web sites appearing on the internet, it’s important to understand how to properly embed the Flash movie in the browser window.
In this tutorial we will cover best practice embedding of SWF movies using SWFObject with a custom function for adding browser scrollbars for smaller browser windows.
3D / by - 24 June, 2009 12:30 pm
Create a 3D Bowling Game with JiglibFlash and Papervision 3D
Possibly the hottest thing to hit the Flash community since the advent of several excellent 3D engines is the recent debut of 3D physics engines. Here we’ll examine a way of using one of the more popular 3D engines, JiglibFlash, in conjunction with the prominent 3D engine Papervision3D to create a bowling game.
Flex / by - 22 June, 2009 1:00 pm
Create a Dynamic Event Calendar in Flex Builder 3 with Actionscript 3.0
This tutorial will allow readers to create an Event Calendar application using Flex. The final user will be able to plan over a daily, weekly or monthly plan.
You will learn on this step by step Flex tutorial, to create from scratch those Graphic User Interfaces, integrate them, and create a complete Rich Internet Application with a professional look.
Flash / by - 17 June, 2009 1:00 pm
Build a Dynamic Accordion Menu in Flash CS4 with ActionScript 3.0 and XML
In this tutorial you will learn how to build an accordion style menu from scratch that can be configured by using an external file.
The menu items can bet totally configured in XML with label and can load text, image or swf on it’s open “state”. Just follow the tutorial, it’s quite simple. At the end you will see a secon example achieved by this procedure.


