Connecting Flex Calendar With Database Using AMF-PHP
by 29 May, 2010 2:56 pm15
Connecting Flex Calendar with Database using AMF-PHP
Part I: Create a Dynamic Event Calendar in Flex Builder 3 with Actionscript 3.0
This is Part II of Create a Dynamic Event Calendar in Flex Builder 3 with Actionscript 3.0 tutorial. In this tutorial, we will learn how to connect Event Calendar with the database so events will be stored in the database for future reference.
Requirements
Flex Builder
WAMP (PHP, MYSQL)
AMF-PHP
Sample Files
Flex_Event_Calendar_Source.zip
Pre-Requisites
This tutorial assumes that you have a complete understanding of Part I. Apart from this you know AMF-PHP and you must have a idea to how to connect a Flex application with AMF-PHP using configuration file.
Step 1: Creating Database
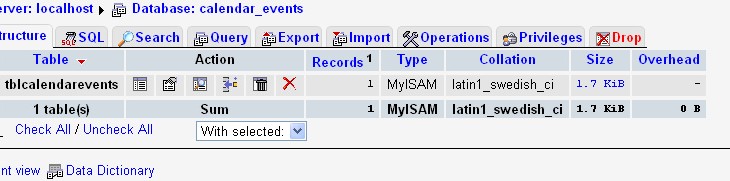
The very first step is to create database with desired table. To accomplish this, I used a MySQL database which runs very well with PHP. I have created a new database for this application named calendar_events and within this database I have created a new table called tblcalendarevents. Here is the SQL script to create this database along with a table in it.
-- Database: calendar_events
--
CREATE DATABASE calendar_events DEFAULT CHARACTER SET latin1 COLLATE latin1_swedish_ci;

USE calendar_events;

-- --------------------------------------------------------

-- Table structure for table 'tblcalendarevents'

CREATE TABLE IF NOT EXISTS tblcalendarevents (
  str_calendar_events text
);
Your database structure should look like below figure.
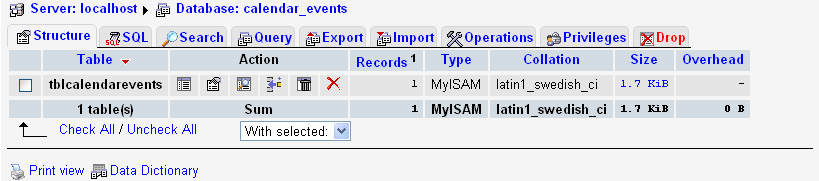
Figure 1.1 Database Structure
Similarly, your table structure within this database should look like below figure.
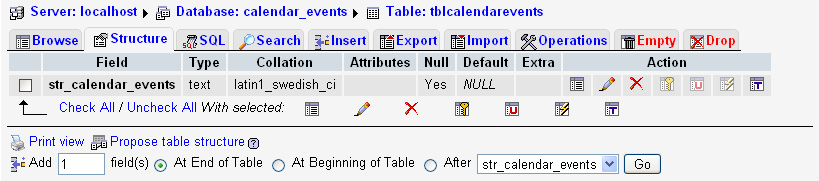
Figure 1.2 Table Structure
Step 2: Creating MySQL Database and PHP Class
Before starting anything in Flex and performing coding we need to make sure that we have our MySQL database in place. I have used WAMP to install PHP and MySQL in my Windows environment. Where I placed amfphp files under www folder of WAMP. Supposing you have installed WAMP in your C: then here is the directory structure for amfphp folder.
c:wampwwwamfphp
Under amfphp folder there is services folder where we need to create a PHP class which will connect with the database and perform insertion and retrieval process. I have named the PHP file SaveEvents.php. Here is the code within PHP file which will do data processing.
<?php
class SaveEvents
{
    function storeEvents($_strEvents)
    {
        $con = mysql_connect("YOUR-MYSQL-SERVER-ADDRESS","USERNAME","PASSWORD");
		if (!$con)
		{
			die('Could not connect: ' . mysql_error());
		}

		mysql_select_db("calendar_events", $con);
		mysql_query("delete FROM tblCalendarEvents");
		mysql_query("INSERT INTO tblCalendarEvents VALUES ('" . $_strEvents . "');");

		mysql_close($con);

		return "success";
    }

	function getEvents()
	{
		$con = mysql_connect("YOUR-MYSQL-SERVER-ADDRESS","USERNAME","PASSWORD");
		if (!$con)
		{
			die('Could not connect: ' . mysql_error());
		}

		mysql_select_db("calendar_events", $con);

		$result = mysql_query("SELECT * FROM tblCalendarEvents");
		$strEvents = "";
		while($row = mysql_fetch_array($result))
		{
			$strEvents = $strEvents . $row['str_calendar_events'];
		}

		mysql_close($con);

		if($strEvents == "")
		{
			return "empty";
		}
		else
		{
			return $strEvents;
		}

	}
}
?>
In the above code we have 2 functions named storeEvents() and getEvents(). storeEvents function is used to store calendar events in the database and similarly getEvents is used to retrieve those values. Now to make it more easier I have used storing/retrieval of XML rather than a long list of multiple values.
Step 3: Creating services-config.xml file
Moving to Flex, the first step we need to do is to create services-config.xml file. The services-config.xml file is an Extensible Markup Language (XML) document that specifies the properties of the remote services our application will use. To create this file, right click the src folder of your Flex project, then choose New > File. Name the file services-config.xml, then click Finish. You will be presented with the new empty file. The default editor is the built-in XML editor, but you need to open it in the plain text editor by right clicking the file and choosing Open with > Text Editor. Next, paste the following code into the file:
<?xml version="1.0" encoding="UTF-8"?>
<services-config>
    <services>
        <service id="sabreamf-flashremoting-service"
                 class="flex.messaging.services.RemotingService"
                 messageTypes="flex.messaging.messages.RemotingMessage">
            <destination id="amfphp">
                <channels>
                    <channel ref="my-amfphp"/>
                </channels>
                <properties>
                    <source>*</source>
                </properties>
            </destination>
        </service>
    </services>

    <channels>
        <channel-definition id="my-amfphp" class="mx.messaging.channels.AMFChannel">
            <endpoint uri="http://YOUR-SERVER-ADDRESS/amfphp/gateway.php" class="flex.messaging.endpoints.AMFEndpoint"/>
        </channel-definition>
    </channels>
</services-config>
The above XML block contains two key pieces of information specific to this application. The first is the id attribute of the <destination> node. You will use this ID to connect to the remote service in the Flex application. The other important attribute is the uri property of the <endpoint> node. Here, you need to place the path to your amfphp gateway file on your web server. The class attributes correspond to the method of communication: you will be using “remoting” to communicate with your services in AMF.
Next, you need to tell the Flex compiler about your services-config.xml file. You do so using the compiler flag -services. To add this flag, click Project > Properties. A new window appears with a list on the left side. From that list, choose Flex Compiler. At the end of the existing text in the Additional compiler arguments box, add the following:
-services "services-config.xml"
The result should look like Figure 1.1

Figure 1.1 Adding compiler arguments
Click Finish, and the workspace refreshes. When complete, you will have access to your amfphp gateway from the client application.
Step 4: Creating Service Connector class
Next step is to create a Service Connector class which will be a singleton class and allow our application to connect with amfphp and process various data calls. To achieve this I have created a new class file under classes.remoting package. I have named this class/file as ServiceConnector.as. Let’s first have a look at the code of this class thereafter we will have description of the code.
package classes.remoting
{
	import classes.events.CustomEvents;

	import flash.events.EventDispatcher;

	import mx.controls.Alert;
	import mx.rpc.events.FaultEvent;
	import mx.rpc.events.ResultEvent;
	import mx.rpc.remoting.RemoteObject;

	public class ServiceConnector extends EventDispatcher
	{
		private var m_objRemote:RemoteObject;
		private static var m_objServiceConnector:ServiceConnector;

		public static function getInstance():ServiceConnector
		{
			if(m_objServiceConnector == null)
				m_objServiceConnector = new ServiceConnector();

			return m_objServiceConnector;
		}

		public function connect():void
		{
			m_objRemote = new RemoteObject();
			m_objRemote.source = "SaveEvents";
			m_objRemote.destination = "amfphp";

			m_objRemote.storeEvents.addEventListener("result", onStoreResult);
			m_objRemote.getEvents.addEventListener("result", onFetchResult);
			m_objRemote.addEventListener("fault", onServiceFault);

		}

		public function storeEvents(_strEvents:String):void
		{
			if(_strEvents == null || _strEvents == "")
				_strEvents = "<calendar />";

			m_objRemote.getOperation("storeEvents").send(_strEvents);

		}

		public function getEvents():void
		{
			m_objRemote.getOperation("getEvents").send();
		}

		private function onStoreResult(evt:ResultEvent):void
		{
			trace("Data  Stored");
		}

		private function onFetchResult(evt:ResultEvent):void
		{
			var obj:Object = new Object();
			obj.data = evt.result.toString();
			dispatchEvent(new CustomEvents(CustomEvents.FETCH_DB_DATA, obj));
		}

		private function onServiceFault(evt:FaultEvent):void
		{
			Alert.show("Cannot connect to Web service, Please check your configuration settings!", "Event Calendar");
		}

	}
}
ServiceConnector is a singleton class which allows to connect remote service i.e. amfphp through connect() method. If you see in connect() method we are calling SaveEvents as a source to Remote Object which is the class name in our PHP file. Similarly we have destination as amfphp which we defined as ID in services-config.xml file. We have also result and fault listeners with-in the connect() method which get invoked whenever a result or fault event occurred. Apart from that we have 2 public methods in this class storeEvents() and getEvents() which allows to send and retrieve data respectively to SaveEvents php class. After creating above 2 new files your directory structure should look like this.
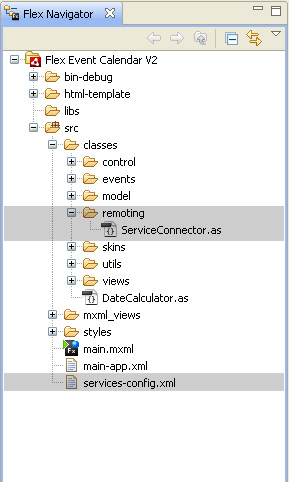
Figure 4.1 Directory Structure
Step 5: Changes in main.mxml
I have added couple of new methods and codes in order to achieve the functionality of connecting this application with the database. Let’s start with the main.mxml file because that is the first file which is used by the application as the main file.
Previously we had a method called onApplicationStart() which get executes on creation complete of the main application file. In other words this method is the very first method which gets invoked and starts the application. I have added couple of new code with in this method plus I also removed couple of lines. Let’s have a look:
private function onApplicationStart():void
{
    var objDate:Date = new Date();
    dtPicker.selectedDate = objDate;

    // create events
    monthView.addEventListener(CustomEvents.MONTH_VIEW_CLICK, onMonthViewClick);
    DataHolder.getInstance().addEventListener(CustomEvents.ADD_NEW_EVENT, onNewEventAdded);

    onDateChange();
}
private function onApplicationStart():void
{
    monthView.addEventListener(CustomEvents.MONTH_VIEW_CLICK, onMonthViewClick);
    DataHolder.getInstance().addEventListener(CustomEvents.ADD_NEW_EVENT, onNewEventAdded);


    DataHolder.getInstance().addEventListener(CustomEvents.DP_CHANGED, onDataProviderChanged);


    m_objServiceConnector = ServiceConnector.getInstance();
    m_objServiceConnector.addEventListener(CustomEvents.FETCH_DB_DATA, onFetchDBData);

    m_objServiceConnector.connect();
    m_objServiceConnector.getEvents();
}
There is a new variable in above method which has to be declared at top level of main.mxml file. Something like this:
private var m_objServiceConnector:ServiceConnector;
As per current version I have added a new listener which will listen to “data provider change” event. I have also added a code to create ServiceConnector object and as well as called connect() method of ServiceConnector class. Afterwards I have invoked getEvents() which allows the application to load data from the database and behave accordingly.
Another method named onDateChange has been modified, let’s go through that as well.
private function onDateChange():void
{
    m_intCurrentDate = new Date(dtPicker.displayedYear, dtPicker.displayedMonth, dtPicker.selectedDate.date);
}
private function onDateChange():void
{
    var currentDate:int;
    if(dtPicker.selectedDate == null)
        currentDate = new Date().date;
    else
        currentDate = dtPicker.selectedDate.date;

    m_intCurrentDate = new Date(dtPicker.displayedYear, dtPicker.displayedMonth, currentDate);
}
I have just added a validation of the date in this method so it won’t come as null at any point of time.
Next method which will get invoked is onFetchDBData which is being fired from the event listener in onApplicationStart method. Basically when we call getEvents from ServiceConnector class it dispatched FETCH_DB_DATA event which further listened by main.mxml class. Let’s have a look at onFetchDBData method:
private function onFetchDBData(_event:CustomEvents):void
{
    if(_event.object.data == "empty")
    {
        var objDate:Date = new Date();
        dtPicker.selectedDate = objDate;
        onDateChange();
    }
    else
    {
        dataProvider = _event.object.data;
    }
}
I have just added a validation of the date in this method so it won’t come as null at any point of time.
Next method which will get invoked is onFetchDBData which is being fired from the event listener in onApplicationStart method. Basically when we call getEvents from ServiceConnector class it dispatched FETCH_DB_DATA event which further listened by main.mxml class. Let’s have a look at onFetchDBData method.
private function onFetchDBData(_event:CustomEvents):void
{
    if(_event.object.data == "empty")
    {
        var objDate:Date = new Date();
        dtPicker.selectedDate = objDate;
        onDateChange();
    }
    else
    {
        dataProvider = _event.object.data;
    }
}
Now onFetchDBData method is the one which will either render the views with blank data otherwise if it has any data for a particular date it will list out that and render the view.
If you see in else condition of above method I’m storing all values(returned by our php class) in a property called dataProvider. This dataProvider property which is a getter/setter takes a XML string and converts it into a array which is further used by DataHolder class. Similarly dataProvider takes an array from DataHolder and converts it as per the requirement of the php to store it in the database. Here is the code for dataProvider property.
public function set dataProvider(_strEvents:String):void
{
    var objDataXML:XML = new XML(_strEvents);
    var objArr:Array = new Array();
    for(var i:int=0; i<objDataXML.event.length(); i++)
    {
        var obj:Object = new Object();
        var xml:XML = objDataXML.event[i];

        obj.date = new Date(Date.parse(xml.date));
        obj.hour = String(xml.hour);
        obj.meridiem = String(xml.meridiem);
        obj.mins = String(xml.mins);
        obj.desc = String(xml.desc);

        objArr.push(obj);
    }

    DataHolder.getInstance().dataProvider = objArr;
}


public function get dataProvider():String
{
    var objCalendarData:XML = <calendar />;
    for(var i:int=0; i<DataHolder.getInstance().dataProvider.length; i++)
    {
        var obj:Object = DataHolder.getInstance().dataProvider[i];
        var xml:XML = <event />
        xml.date = obj.date;
        xml.hour = String(obj.hour);
        xml.meridiem = String(obj.meridiem);
        xml.mins = String(obj.mins);
        xml.desc = String(obj.desc);

        objCalendarData.appendChild(xml);
    }

    return objCalendarData.toString();
}
We have stored values retrieved from the php class into this dataProvider but we didn’t yet sent this dataProvider to the php class. To accomplish that we need to add a new line of code under onNewEventAdded method so, whenever a new event is added in the calendar it should send that value to the php class. We need to add the below line at the end of this method.
m_objServiceConnector.storeEvents(dataProvider);
One last change in the main.xml file is to create a listeners method for DP_CHANGED event. This event occurs whenever there is a change in the dataProvider in DataHolder. In other words, it only executes for once, when this application load the data from the php class. Have a look at the content of this method.
private function onDataProviderChanged(_event:CustomEvents):void
{
    trace("Data Updated");
    onDateChange();
}
We are through with the necessary changes in main mxml file. Now let’s jump on to the next step where we will modify couple of other files.
Step 6: Changes in CommonUtils and CustomEvents
There are very small changes in both of these classes. I have added a 2 lines with-in the method called createRightHourStrip(). I’m not writing the entire body of that method instead I’m just writing a condition with in which these lines are written.
if(ObjectUtil.dateCompare(obj.date, _savedDate) == 0)
{

	obj.hour = String(obj.hour);
	obj.hour = (obj.hour.length < 2) ? ("0" + obj.hour) : obj.hour;

    if(obj.hour == strLabel && obj.meridiem == objHourCell.data.meridiem)
    {
        if(obj.mins == 0)
        {
            objHourCell.btnFirstHalf.label = obj.desc;
        }
        else
        {
            objHourCell.btnSecondHalf.label = obj.desc;
        }
    }
}
In case if a value for the hour is stored as a single digit the below line will allow the program to convert it in to double digit.
Apart from this we have declared couple of new constants which are being used in the code. These constants are decal red in CustomEvents class. Here:
public static const FETCH_DB_DATA:String = "fetchDBData";
public static const DP_CHANGED:String = "dpChanged";
Step 7: Final Changes in DataHolder class
There is a single line change in DataHolder class and that is only to dispatch an event of DP_CHANGED when we update dataProvider property with in it. To accomplish this we need to call below code under the setter of dataProvider property. This line has to at last position with in this setter method.
dispatchEvent(new CustomEvents(CustomEvents.DP_CHANGED));
Conclusion
Now you all know how to connect Flex Event Calendar with the Database to store calendar events in the database. In case any help is required feel free to contact me either by commenting or via my website http://www.ankur-arora.com
Related posts

Effects / by - 14 January, 2012 5:55 pm
Learn Digital Painting in Photoshop
It’s impossible for everyone to become an artist, but many of them have a will to become an artist, to draw beautiful paintings but again due to lack of command…

Effects / by - 28 December, 2011 2:28 pm
How to Make a New Year Greeting Card in Photoshop
This is so much easy to go in a market and by paying some bucks; purchasing a New Year Greeting Card or any other festival card for your loving person…

Flash / by - 10 August, 2011 4:13 pm
Creating a Gallery in Flash Using the Moto CMS Component
In this tutorial we will create a gallery with the help of the Moto CMS Component. I think many of you have heard about (or even worked with) Moto Flash…

3D / by - 24 July, 2011 5:21 pm
Visualize Your Web Page in 3D
Ever wondered if you could visualize your website in 3D? Well, here’s one such Firefox extension that allows you to do so. Tilt is a Firefox add-on that lets you visualize any web page DOM and provides the relationship between various parts of a website in 3D.

Interfaces / by - 1 March, 2011 2:18 pm
Beginners Guide To User Interface Design in C#
User Interface Design in C# Windows Form Application From Scratch In this C Sharp tutorial you will learn user interface design in C# application. This step-by-step tutorial will help you deeply understand…
Effects / by - 1 December, 2010 2:34 pm
Create an intelligent XML image Gallery & Slideshow in Flash CS4 (+PHP) – Part II/II
In this second part article you will learn how to build an image gallery that will load images from a web server. I decide to call it “Intelligent” because you don’t need to configure any XML or flash file. Just put the Flash movie and the images on a server and they will be loaded automatically. Nice ah?
Server Side / by - 13 April, 2010 2:39 pm
CodeIgniter Tutorial – CodeIgniter Explained
Hello everyone, and welcome to the first CodeIgniter tutorial. What will you learn? 1. What is a PHP Framework? 2. What is CodeIgniter? 3. What is MVC? 4. MVC Pattern…

3D / by - 20 March, 2010 10:00 am
Away3D Shoot’em’Up Tutorial – Powerups
In this article we add some powerups to the game.

3D / by - 15 February, 2010 3:59 pm
Away3D Shoot’em’Up Tutorial – Sound Effects
In this article we add some sound effects to the game.
3D / by - 28 July, 2009 1:00 pm
Create from Scratch a Away3D Shoot’em’Up Game: Part 4
Now that we have the player and some enemies we need for them to be able to interact. This is done through collision detection which you will learn in this fourth part.

Effects / by - 21 July, 2009 1:00 pm
Getting Started With BetweenAS3
There are many popular open source tweening engines in the Flash community today. Numbered among these are Tweener, TweenLite/Tweenmax, Tweensy, and GTween. This is a short look at the capabilities of newcomer to the scene: BetweenAS3. BetweenAS3 is the tweening engine brainchild of Yoshihiro (yossy) Shindo and is available as part of the Spark project (i.e. it is brought to us by one of the same group that brought the world the FLARToolkit for Augmented Reality in Flash and countless other goodies).
3D / by - 15 July, 2009 12:50 pm
Create from Scratch a Away3D Shoot’em’Up Game: Part 3
After you have created the 3D level, in the part 3 of this Away3D series, we will show you how to add the player spacecraft and enemies.
Effects / by - 13 July, 2009 12:30 pm
Create an intelligent XML image Gallery & Slideshow in Flash CS4 (+PHP) – Part I/II
In this article you will learn how to build an image gallery that will load images from a web server. I decide to call it “Intelligent” because you don’t need to configure any XML or flash file. Just put the Flash movie and the images on a server and they will be loaded automatically. Nice ah?
3D / by - 8 July, 2009 1:45 pm
Create from Scratch a Away3D Shoot’em’Up Game: Part 2
In the part 1 of these tutorial series articles we created a framework that we could build off to start making the actual game. Now it’s time to create a 3D level for the player to fly through.
3D / by - 6 July, 2009 12:50 pm
Create from Scratch a Away3D Shoot’em’Up Game: Part 1
Today we start a 9 part tutorial series on creating a Shoot’em’Up game. We will cover all the necessary topics to create it from scratch, which will help you to understand and apply these guidelines to other projects. Ath this first part. we look at getting the Away3D engine up and running by creating a UIComponent that will contain and initialize the necessary Away3D components.
Effects / by - 1 July, 2009 1:00 pm
Build a Creative “Swirl Animated Menu” with Flash CS4
Flash it’s a powerful application and can be really complex, but even beginners can create a cool menu for demonstration or for use in a personal site. The menu that we will create is simple, but the swirl animation is something that you don’t see everywhere, for that I’ve decided to explain one way to make an animation of growing swirls without any Action Script code.You will also learn how to import artwork from illustrator where I’ve pre-made the graphics, the work is very simple and the result will be very cool.
Flash / by - 29 June, 2009 12:00 pm
SWFObject and Best Practice Implementation
With more and more full screen Flash web sites appearing on the internet, it’s important to understand how to properly embed the Flash movie in the browser window.
In this tutorial we will cover best practice embedding of SWF movies using SWFObject with a custom function for adding browser scrollbars for smaller browser windows.
3D / by - 24 June, 2009 12:30 pm
Create a 3D Bowling Game with JiglibFlash and Papervision 3D
Possibly the hottest thing to hit the Flash community since the advent of several excellent 3D engines is the recent debut of 3D physics engines. Here we’ll examine a way of using one of the more popular 3D engines, JiglibFlash, in conjunction with the prominent 3D engine Papervision3D to create a bowling game.
Flex / by - 22 June, 2009 1:00 pm
Create a Dynamic Event Calendar in Flex Builder 3 with Actionscript 3.0
This tutorial will allow readers to create an Event Calendar application using Flex. The final user will be able to plan over a daily, weekly or monthly plan.
You will learn on this step by step Flex tutorial, to create from scratch those Graphic User Interfaces, integrate them, and create a complete Rich Internet Application with a professional look.
Flash / by - 17 June, 2009 1:00 pm
Build a Dynamic Accordion Menu in Flash CS4 with ActionScript 3.0 and XML
In this tutorial you will learn how to build an accordion style menu from scratch that can be configured by using an external file.
The menu items can bet totally configured in XML with label and can load text, image or swf on it’s open “state”. Just follow the tutorial, it’s quite simple. At the end you will see a secon example achieved by this procedure.


