Build a contact manager in Flex with ZendAMF; Part One – Layout; From Photoshop to Flex
by 20 May, 2009 12:30 pm9
The complete result of this 2 part Flex tutorial is a contact manager built in flex that uses ZendAMF to store data in mysql. In this first part we will learn how to build our own layout in photoshop and implement it on Adobe Flex. We will use a simple layout and you will learn some few tips to keep in mind when designing a layout in photoshop and using it in Adobe Flex.
Requirements
- Adobe Photoshop CS 3/4 – You can download free trial here
- Adobe Flex Builder 3.x – You can download a free trial at flex homepage
- My simple layout, Download it here or you will need some inspiration to design your own.


Pre-Requesites
You should feel comfortably working in photoshop and adobe flex or maybe this can be a little confused to you. In this tutorial you will not directly learn how to design a layout, but only how to organize and export all the peaces needed to use in Flex.
I use some fonts in the PSD layout, they are not important because we will not export them to flex, but just in case you will need the Lucida HandWritting font, can be downloaded here
I will use some icons, in this 2 part tutorial i will use the Orbital Icon Set, available here.
Step 0 – Getting Started
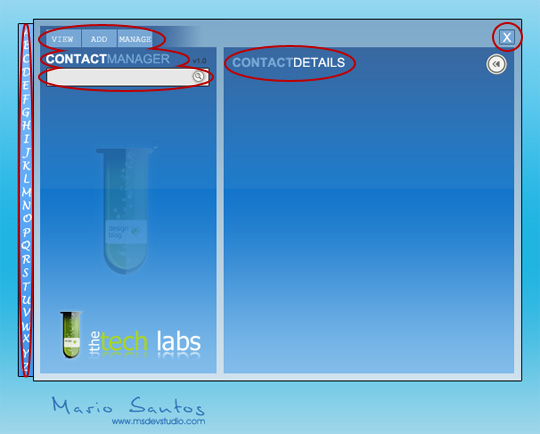
The first thing to do is open my layout.psd in photoshop CS4 and take a first look into all layers, folders and general design. If you have not the Lucida font, it will be asked a replacement font, this is not important, just use the system default. You will get something like the next image on your screen.

When opened you can see some trick that would be very useful when we import the design in Flex. I will highlight some of them:
– Separated layers into groups. Doing this we keep all in the wright place.
– Name on all layers, or at least at the most important ones. You don’t want to spend time searching for things.
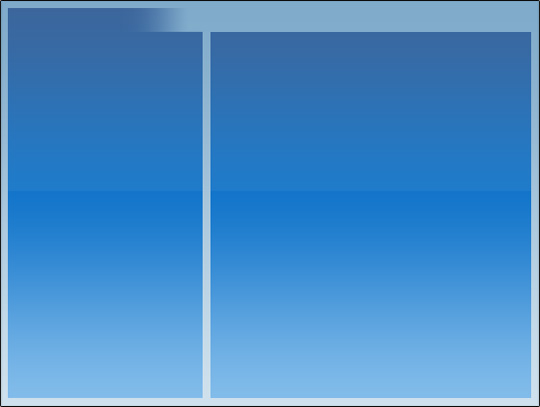
– A “skin” for two different application states, a “Skin Normal” and a “Skin Extended”. Just hide the group “Skin Extended” and you will see what i’m talking about.
– Don’t mess up the things, we got a full extended version when you open the layout.psd, and a normal version that you can see on the next image, this is only to help us to understand how the application will work:

We will use the two application “states” to give some interaction with user.
Step 1 – Identify mandatory areas
What this means?? Means that you will need to ignore some parts of the original layout to maximize the performance of your application.
Don’t get confused!! I said ignore, not delete; Let me explain. All text elements can be reproduced natively by flex also like some areas, buttons, borders e other stuff that we will create with flex controls, like the left-side contact list and the right-side contact information fields that are not created in photoshop, in the next image you can see all the stuff to hide and not export from photoshop file.
The “red” areas can be reproduced in flex, so we do not need to export them as images because that will increase our application size and slow it down. We will now hide these layers, just click on the “eye” icon on the layers list like shown on the next image. This will also remove some other elements for now.
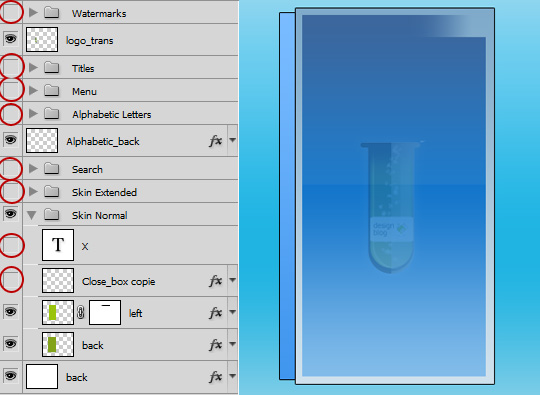
We now got our main “Normal Skin” Elements to export to our application. You need now to hide also the “back” bottom layer to get the back transparent. We are now ready to export our work. I will animate some areas, like the Alphabetic_Back, and for that i will need to export it separately.
Step 2 – Exporting layout to images
Follow these 6 simple steps:
1- Hide the layer “Alphabetic_back”.
2 – Select All from our image, just goto Selection Menu and choose Select All (CTRL+A).
3 – Goto menu Edit and select Copy with Merge (SHIFT+CTRL+S).
4 – Create a new image. Click File, then New (CTRL+N) and Click “ENTER” key.
5 – Paste clipboard contents. Click Edit, and Paste. (CTRL+V).
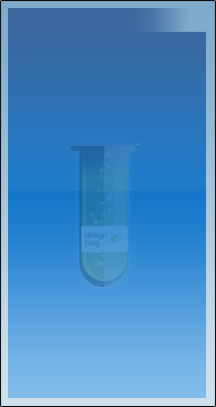
6 – Export image as .PNG; Menu File, Export for web and devices (SHIFT+CTRL+ALT+S) then select PNG-24, Transparency and export it to a folder called “images” on the desktop with the name back_normal.png.
We got our first image:
Do the same steps but just for the layer “Alphabetic_back”, just hide everything, and make visible only our layer “Alphabetic_back” and follow the same 6 steps and give the exported image the alphabetic_back.png. Wou will get the separated image:
![]()
We have now completely exported our “Normal Skin”, that produced only two images: back_normal.png and Alphabetic_back.png. For the “Extended Skin” we make the same steps only with the following layers visible that produce the back to “Extended Skin”. Leave “logo_trans” layer visible and the next ones:
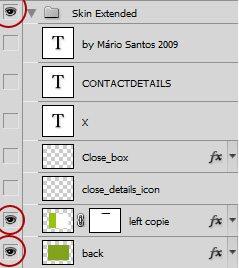
and follow the same 6 steps to export it, name it “back_extended.png”.
You now have a third image:
We have our layout ready to use in flex.
Step 3 – Placing images on Flex
Create a new Flex Builder Project, make it run on flash player, all with default values and name it ContactManager. Copy the images folder from desktop to the “scr” folder of our project, you can drag it on flex builder file explorer. When this is done you should have the following structure in the flex builder file explorer:

Now we just need to put the things in the correct place, if you copy-paste the following code on the ContactManager.mxml you will se our layout implemented.
<?xml version="1.0" encoding="utf-8"?>
<mx:Application xmlns:mx="http://www.adobe.com/2006/mxml" layout="absolute" backgroundGradientAlphas="[1.0, 1.0]" backgroundGradientColors="[#4CABC6, #4CABC6]">
	<mx:Canvas width="626" height="477" horizontalCenter="0" verticalCenter="0">
		<mx:Image x="30" y="37" source="images/Alphabetic_back.png"/>
		<mx:Image x="47" y="33" source="images/back_extended.png" />
		<mx:Image x="47" y="33" source="images/back_normal.png"/>
	</mx:Canvas>
</mx:Application>
As result you got this:
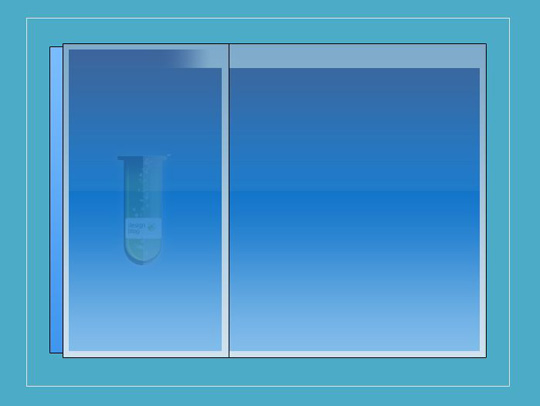
It’s really easy to put things in place, now you just need to represent the rest of controls with flex components. For Text entries, use text (obvious), for close button use a small canvas and a X in text, and put some other icons from the pack “Orbital Icons” and with some work you got a very functional layout.
Step 4 – Finishing layout with flex controls
Like i said before, we need to use some imagination to represent the rest of layout, just write the following code before the </mx:Application …> and you will get a final application layout (Note that i have already made some small functions to handle some actions from the application):
ContactManager.mxml
<?xml version="1.0" encoding="utf-8"?>
<mx:Application xmlns:mx="http://www.adobe.com/2006/mxml" layout="absolute" backgroundGradientAlphas="[1.0, 1.0]" backgroundGradientColors="[#4CABC6, #4CABC6]">
<mx:Script>
	<![CDATA[
		import mx.events.EffectEvent;
		import mx.collections.ArrayCollection;
		import mx.effects.WipeLeft;
		import mx.effects.WipeRight
		import mx.effects.Fade;

		private var DETAILS_OPEN:Boolean=false;

	[Bindable]
	private var contactsDP:ArrayCollection = new ArrayCollection([{name: "Contact 1"},{name: "Contact 2"},{name: "Contact 3"},{name: "Contact 4"},{name: "Contact 5"},{name: "Contact 6"},{name: "Contact 7"},{name: "Contact 8"},{name: "Contact 9"},{name: "Contact 10"}])

		private function filter(char:String="A"):void {
			//filter function
		}

		private function close(state:String=null):void {
			//close
		}

		private function onLabelOver(lb:Label):void {
			lb.setStyle("color",0x000000);
		}

		private function onLabelOut(lb:Label):void {
			lb.setStyle("color",0xffffff);
		}

		private function showDetails():void {
			if(DETAILS_OPEN==false) {
				toggleDetails(true);
				loadInfo(DGContacts.selectedItem);
			}
			else loadInfo(DGContacts.selectedItem);
		}

		private function toggleDetails(open:Boolean):void {
			if(open==true) {
				extended_back.addEventListener(EffectEvent.EFFECT_END, showControls);
				extended_back.visible=true;
				DETAILS_OPEN=true;

			}
			else{
				hideControls();
			}
		}

		private function hideControls():void {
			extended_lbl_1.visible=false;
			extended_lbl_2.visible=false;
			extended_close_details.visible=false;
			closeBig.visible=false;
			closeBig.addEventListener(EffectEvent.EFFECT_END, hideExtended);
			closeSmall.visible=true;

		}

		private function hideExtended(evt:EffectEvent):void {
			extended_back.addEventListener(EffectEvent.EFFECT_START, restoreNormalBack);
			extended_back.visible=false;
			closeBig.removeEventListener(EffectEvent.EFFECT_END, hideExtended);
		}

		private function restoreNormalBack(evt:EffectEvent):void {
			normal_back.visible=true;
			DETAILS_OPEN=false;
			extended_back.removeEventListener(EffectEvent.EFFECT_START, restoreNormalBack);
		}

		private function showControls(evt:EffectEvent):void {
			extended_lbl_1.visible=true;
			extended_lbl_2.visible=true;
			extended_close_details.visible=true;
			closeBig.visible=true;
			closeSmall.visible=false;
			extended_back.removeEventListener(EffectEvent.EFFECT_END, showControls);
			normal_back.visible=false;
			DETAILS_OPEN==true;
		}

		private function loadInfo(item:Object):void {
			//function to load content
		}

	]]>
</mx:Script>
	<mx:Canvas width="626" height="477" horizontalCenter="0" verticalCenter="0">
		<mx:Image x="30" y="37" source="@Embed(source='images/Alphabetic_back.png')"/>
		<mx:Image x="47" y="33" source="@Embed(source='images/back_extended.png')"  id="extended_back" showEffect="WipeRight" hideEffect="WipeLeft" visible="true"/>
		<mx:Image x="47" y="33" source="@Embed(source='images/back_normal.png')" id="normal_back"/>
		<mx:HBox x="58" y="43" width="165" height="22" horizontalGap="1">
			<mx:Button label="VIEW" fontSize="8" cornerRadius="1" fillAlphas="[1.0, 1.0]" fillColors="[#85BFDA, #85BFDA]" fontWeight="bold" useHandCursor="true" buttonMode="true" color="#FFFFFF"/>
			<mx:Button label="ADD" fontSize="8" cornerRadius="1" fillAlphas="[1.0, 1.0]" fillColors="[#85BFDA, #85BFDA]" fontWeight="bold" useHandCursor="true" buttonMode="true" color="#FFFFFF"/>
			<mx:Button label="MANAGE" fontSize="8" cornerRadius="1" fillAlphas="[1.0, 1.0]" fillColors="[#85BFDA, #85BFDA]" fontWeight="bold" useHandCursor="true" buttonMode="true" color="#FFFFFF"/>
		</mx:HBox>
		<mx:Canvas x="58" y="87" width="192" height="22" backgroundColor="#FFFFFF">
			<mx:Image x="173" y="3" source="@Embed(source='images/search.png')"/>
			<mx:TextInput x="1" y="1" width="164" height="20" fontSize="9" text="Search..." borderStyle="none" color="#0569AF"/>
		</mx:Canvas>
		<mx:Label x="58" y="67" text="CONTACT" fontWeight="bold" fontSize="11" color="#FFFFFF"/>
		<mx:Label x="118" y="67" text="MANAGER" fontWeight="normal" fontSize="11" color="#56A4C1"/>
		<mx:Label x="226" y="70" text="v1.0" fontSize="8"/>
		<mx:VBox x="30" y="37" height="397" verticalGap="1">
			<mx:Label text="A" id="lblA" rollOver="onLabelOver(lblA)" rollOut="onLabelOut(lblA)" textAlign="center" buttonMode="true" mouseChildren="false" useHandCursor="true" height="14.5" fontSize="8" fontWeight="bold" color="#FFFFFF" click="filter('A')"/>
			<mx:Label text="B" id="lblB" rollOver="onLabelOver(lblB)" rollOut="onLabelOut(lblB)" textAlign="center" buttonMode="true" mouseChildren="false" useHandCursor="true" height="14.5" fontSize="8" fontWeight="bold" color="#FFFFFF" click="filter('B')"/>
			<mx:Label text="C" id="lblC" rollOver="onLabelOver(lblC)" rollOut="onLabelOut(lblC)" textAlign="center" buttonMode="true" mouseChildren="false" useHandCursor="true" height="14.5" fontSize="8" fontWeight="bold" color="#FFFFFF" click="filter('C')"/>
			<mx:Label text="D" id="lblD" rollOver="onLabelOver(lblD)" rollOut="onLabelOut(lblD)" textAlign="center" buttonMode="true" mouseChildren="false" useHandCursor="true" height="14.5" fontSize="8" fontWeight="bold" color="#FFFFFF" click="filter('D')"/>
			<mx:Label text="E" id="lblE" rollOver="onLabelOver(lblE)" rollOut="onLabelOut(lblE)" textAlign="center" buttonMode="true" mouseChildren="false" useHandCursor="true" height="14.5" fontSize="8" fontWeight="bold" color="#FFFFFF" click="filter('E')"/>
			<mx:Label text="F" id="lblF" rollOver="onLabelOver(lblF)" rollOut="onLabelOut(lblF)" textAlign="center" buttonMode="true" mouseChildren="false" useHandCursor="true" height="14.5" fontSize="8" fontWeight="bold" color="#FFFFFF" click="filter('F')"/>
			<mx:Label text="G" id="lblG" rollOver="onLabelOver(lblG)" rollOut="onLabelOut(lblG)" textAlign="center" buttonMode="true" mouseChildren="false" useHandCursor="true" height="14.5" fontSize="8" fontWeight="bold" color="#FFFFFF" click="filter('G')"/>
			<mx:Label text="H" id="lblH" rollOver="onLabelOver(lblH)" rollOut="onLabelOut(lblH)" textAlign="center" buttonMode="true" mouseChildren="false" useHandCursor="true" height="14.5" fontSize="8" fontWeight="bold" color="#FFFFFF" click="filter('H')"/>
			<mx:Label text="I" id="lblI" rollOver="onLabelOver(lblI)" rollOut="onLabelOut(lblI)" textAlign="center" buttonMode="true" mouseChildren="false" useHandCursor="true" height="14.5" fontSize="8" fontWeight="bold" color="#FFFFFF" click="filter('I')"/>
			<mx:Label text="J" id="lblJ" rollOver="onLabelOver(lblJ)" rollOut="onLabelOut(lblJ)" textAlign="center" buttonMode="true" mouseChildren="false" useHandCursor="true" height="14.5" fontSize="8" fontWeight="bold" color="#FFFFFF" click="filter('J')"/>
			<mx:Label text="K" id="lblK" rollOver="onLabelOver(lblK)" rollOut="onLabelOut(lblK)" textAlign="center" buttonMode="true" mouseChildren="false" useHandCursor="true" height="14.5" fontSize="8" fontWeight="bold" color="#FFFFFF" click="filter('K')"/>
			<mx:Label text="L" id="lblL" rollOver="onLabelOver(lblL)" rollOut="onLabelOut(lblL)" textAlign="center" buttonMode="true" mouseChildren="false" useHandCursor="true" height="14.5" fontSize="8" fontWeight="bold" color="#FFFFFF" click="filter('L')"/>
			<mx:Label text="M" id="lblM" rollOver="onLabelOver(lblM)" rollOut="onLabelOut(lblM)" textAlign="center" buttonMode="true" mouseChildren="false" useHandCursor="true" height="14.5" fontSize="8" fontWeight="bold" color="#FFFFFF" click="filter('M')"/>
			<mx:Label text="N" id="lblN" rollOver="onLabelOver(lblN)" rollOut="onLabelOut(lblN)" textAlign="center" buttonMode="true" mouseChildren="false" useHandCursor="true" height="14.5" fontSize="8" fontWeight="bold" color="#FFFFFF" click="filter('N')"/>
			<mx:Label text="O" id="lblO" rollOver="onLabelOver(lblO)" rollOut="onLabelOut(lblO)" textAlign="center" buttonMode="true" mouseChildren="false" useHandCursor="true" height="14.5" fontSize="8" fontWeight="bold" color="#FFFFFF" click="filter('O')"/>
			<mx:Label text="P" id="lblP" rollOver="onLabelOver(lblP)" rollOut="onLabelOut(lblP)" textAlign="center" buttonMode="true" mouseChildren="false" useHandCursor="true" height="14.5" fontSize="8" fontWeight="bold" color="#FFFFFF" click="filter('P')"/>
			<mx:Label text="Q" id="lblQ" rollOver="onLabelOver(lblQ)" rollOut="onLabelOut(lblQ)" textAlign="center" buttonMode="true" mouseChildren="false" useHandCursor="true" height="14.5" fontSize="8" fontWeight="bold" color="#FFFFFF" click="filter('Q')"/>
			<mx:Label text="R" id="lblR" rollOver="onLabelOver(lblR)" rollOut="onLabelOut(lblR)" textAlign="center" buttonMode="true" mouseChildren="false" useHandCursor="true" height="14.5" fontSize="8" fontWeight="bold" color="#FFFFFF" click="filter('R')"/>
			<mx:Label text="S" id="lblS" rollOver="onLabelOver(lblS)" rollOut="onLabelOut(lblS)" textAlign="center" buttonMode="true" mouseChildren="false" useHandCursor="true" height="14.5" fontSize="8" fontWeight="bold" color="#FFFFFF" click="filter('S')"/>
			<mx:Label text="T" id="lblT" rollOver="onLabelOver(lblT)" rollOut="onLabelOut(lblT)" textAlign="center" buttonMode="true" mouseChildren="false" useHandCursor="true" height="14.5" fontSize="8" fontWeight="bold" color="#FFFFFF" click="filter('T')"/>
			<mx:Label text="U" id="lblU" rollOver="onLabelOver(lblU)" rollOut="onLabelOut(lblU)" textAlign="center" buttonMode="true" mouseChildren="false" useHandCursor="true" height="14.5" fontSize="8" fontWeight="bold" color="#FFFFFF" click="filter('U')"/>
			<mx:Label text="V" id="lblV" rollOver="onLabelOver(lblV)" rollOut="onLabelOut(lblV)" textAlign="center" buttonMode="true" mouseChildren="false" useHandCursor="true" height="14.5" fontSize="8" fontWeight="bold" color="#FFFFFF" click="filter('V')"/>
			<mx:Label text="W" id="lblW" rollOver="onLabelOver(lblW)" rollOut="onLabelOut(lblW)" textAlign="center" buttonMode="true" mouseChildren="false" useHandCursor="true" height="14.5" fontSize="8" fontWeight="bold" color="#FFFFFF" click="filter('W')"/>
			<mx:Label text="X" id="lblX" rollOver="onLabelOver(lblX)" rollOut="onLabelOut(lblX)" textAlign="center" buttonMode="true" mouseChildren="false" useHandCursor="true" height="14.5" fontSize="8" fontWeight="bold" color="#FFFFFF" click="filter('X')"/>
			<mx:Label text="Y" id="lblY" rollOver="onLabelOver(lblY)" rollOut="onLabelOut(lblY)" textAlign="center" buttonMode="true" mouseChildren="false" useHandCursor="true" height="14.5" fontSize="8" fontWeight="bold" color="#FFFFFF" click="filter('Y')"/>
			<mx:Label text="Z" id="lblZ" rollOver="onLabelOver(lblZ)" rollOut="onLabelOut(lblZ)" textAlign="center" buttonMode="true" mouseChildren="false" useHandCursor="true" height="14.5" fontSize="8" fontWeight="bold" color="#FFFFFF" click="filter('Z')"/>
		</mx:VBox>
		<mx:Canvas x="234" y="45" width="19" height="19" backgroundColor="#85BFDA" borderStyle="solid" borderColor="#13659F" id="closeSmall" showEffect="Fade" hideEffect="Fade">
		<mx:Label text="X" textAlign="center" buttonMode="true" mouseChildren="false" useHandCursor="true" height="15.5" fontSize="9" fontWeight="bold" color="#FFFFFF" click="close()" x="-1" y="0" includeInLayout="false" width="19" id="close1" rollOver="onLabelOver(close1)" rollOut="onLabelOut(close1)"/>
		</mx:Canvas>

		<mx:Canvas x="568" y="45" width="19" height="19" backgroundColor="#85BFDA" borderStyle="solid" borderColor="#13659F" id="closeBig" showEffect="Fade" hideEffect="Fade" visible="true">
		<mx:Label text="X" textAlign="center" buttonMode="true" mouseChildren="false" useHandCursor="true" height="15.5" fontSize="9" fontWeight="bold" color="#FFFFFF" click="close('BIG')" x="-1" y="0" includeInLayout="false" width="19" id="close2" rollOver="onLabelOver(close2)" rollOut="onLabelOut(close2)"/>
		</mx:Canvas>

		<mx:Label x="267" y="67" text="CONTACT" fontWeight="normal" fontSize="11" color="#56A4C1" id="extended_lbl_2" showEffect="Fade" hideEffect="Fade" visible="true"/>
		<mx:Label x="326" y="67" text="DETAILS" fontWeight="bold" fontSize="11" color="#FFFFFF" id="extended_lbl_1" showEffect="Fade" hideEffect="Fade" visible="true"/>
		<mx:Image x="562" y="405" source="@Embed(source='images/close_details.png')" buttonMode="true" useHandCursor="true" toolTip="Close Contact Details" id="extended_close_details" showEffect="Fade" hideEffect="Fade" click="toggleDetails(false)" visible="true"/>
		<mx:DataGrid x="57" y="114" id="DGContacts" width="194" height="315" backgroundAlpha="0" showHeaders="false" dataProvider="{contactsDP}" doubleClickEnabled="true" doubleClick="showDetails()">
			<mx:columns>
				<mx:DataGridColumn headerText="" dataField="name" />
			</mx:columns>
		</mx:DataGrid>

	</mx:Canvas>

</mx:Application>
The code is a little big, but you will find some trick to simplify the layout. I have write some code with some few effects, actions, and functions to handle the simple animations that i have made. You can find some eventListners that trigger other actions like visibility, i made this way because we should preserve animations and thing by order. We cannot hide the controls after the “extended” skin is closed, for that we wait that controls are hidden to animate extended skin close action. All this code will produce an almost complete application, like the image :
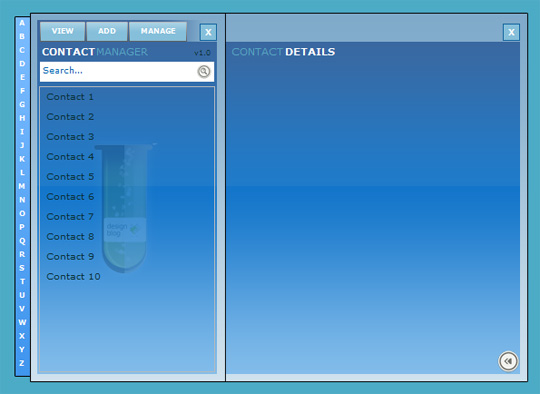
We have our extended application, and if you run the code, you will see the application working, just press the Close Details button on the right bottom of the extended screen and you will see the close animation. Double click on one item in the Contact List to open Extended Skin. This is working, but i want on the application start show only the “Normal Skin”… it’s easy, just find the next components and change its visibility to false:
<mx:Image x="47" y="33" source="@Embed(source='images/back_extended.png')"  id="extended_back" showEffect="WipeRight" hideEffect="WipeLeft" visible="false"/>

<mx:Canvas x="568" y="45" width="19" height="19" backgroundColor="#85BFDA" borderStyle="solid" borderColor="#13659F" id="closeBig" showEffect="Fade" hideEffect="Fade" visible="false">
<mx:Label text="X" textAlign="center" buttonMode="true" mouseChildren="false" useHandCursor="true" height="15.5" fontSize="9" fontWeight="bold" color="#FFFFFF" click="close('BIG')" x="-1" y="0" includeInLayout="false" width="19" id="close2" rollOver="onLabelOver(close2)" rollOut="onLabelOut(close2)"/>
</mx:Canvas>
<mx:Label x="267" y="67" text="CONTACT" fontWeight="normal" fontSize="11" color="#56A4C1" id="extended_lbl_2" showEffect="Fade" hideEffect="Fade" visible="false"/>
<mx:Label x="326" y="67" text="DETAILS" fontWeight="bold" fontSize="11" color="#FFFFFF" id="extended_lbl_1" showEffect="Fade" hideEffect="Fade" visible="false"/>
<mx:Image x="562" y="405" source="@Embed(source='images/close_details.png')" buttonMode="true" useHandCursor="true" toolTip="Close Contact Details" id="extended_close_details" showEffect="Fade" hideEffect="Fade" click="toggleDetails(false)" visible="false"/>
Step 5 – Learn from the code
Because the main purpose of this parte of the tutorial is to show how to pass an photoshop layout to a flex application, we have finished it. I will not explain step by step the code because you will have time to read and learn from the code till the next tutorial where we will create the application itself, based on an simple crud to read/wrtite data from/to an mysql database via ZendAMF. In the contact list we will use a simple item render with some icons just to make things more cool.
You can download the final flex project archive, just click here and import it to flex builder; Simply click on menu File->Import->Flex Project Archive and select the ContactManager zip file. The project will load and will be ready to use.
Related posts

Effects / by - 14 January, 2012 5:55 pm
Learn Digital Painting in Photoshop
It’s impossible for everyone to become an artist, but many of them have a will to become an artist, to draw beautiful paintings but again due to lack of command…

Effects / by - 28 December, 2011 2:28 pm
How to Make a New Year Greeting Card in Photoshop
This is so much easy to go in a market and by paying some bucks; purchasing a New Year Greeting Card or any other festival card for your loving person…

Flash / by - 10 August, 2011 4:13 pm
Creating a Gallery in Flash Using the Moto CMS Component
In this tutorial we will create a gallery with the help of the Moto CMS Component. I think many of you have heard about (or even worked with) Moto Flash…

3D / by - 24 July, 2011 5:21 pm
Visualize Your Web Page in 3D
Ever wondered if you could visualize your website in 3D? Well, here’s one such Firefox extension that allows you to do so. Tilt is a Firefox add-on that lets you visualize any web page DOM and provides the relationship between various parts of a website in 3D.

Interfaces / by - 1 March, 2011 2:18 pm
Beginners Guide To User Interface Design in C#
User Interface Design in C# Windows Form Application From Scratch In this C Sharp tutorial you will learn user interface design in C# application. This step-by-step tutorial will help you deeply understand…
Effects / by - 1 December, 2010 2:34 pm
Create an intelligent XML image Gallery & Slideshow in Flash CS4 (+PHP) – Part II/II
In this second part article you will learn how to build an image gallery that will load images from a web server. I decide to call it “Intelligent” because you don’t need to configure any XML or flash file. Just put the Flash movie and the images on a server and they will be loaded automatically. Nice ah?
Flex / by - 29 May, 2010 2:56 pm
Connecting Flex Calendar With Database Using AMF-PHP
Connecting Flex Calendar with Database using AMF-PHP Part I: Create a Dynamic Event Calendar in Flex Builder 3 with Actionscript 3.0 This is Part II of Create a Dynamic Event…
Server Side / by - 13 April, 2010 2:39 pm
CodeIgniter Tutorial – CodeIgniter Explained
Hello everyone, and welcome to the first CodeIgniter tutorial. What will you learn? 1. What is a PHP Framework? 2. What is CodeIgniter? 3. What is MVC? 4. MVC Pattern…

3D / by - 20 March, 2010 10:00 am
Away3D Shoot’em’Up Tutorial – Powerups
In this article we add some powerups to the game.

3D / by - 15 February, 2010 3:59 pm
Away3D Shoot’em’Up Tutorial – Sound Effects
In this article we add some sound effects to the game.
3D / by - 28 July, 2009 1:00 pm
Create from Scratch a Away3D Shoot’em’Up Game: Part 4
Now that we have the player and some enemies we need for them to be able to interact. This is done through collision detection which you will learn in this fourth part.

Effects / by - 21 July, 2009 1:00 pm
Getting Started With BetweenAS3
There are many popular open source tweening engines in the Flash community today. Numbered among these are Tweener, TweenLite/Tweenmax, Tweensy, and GTween. This is a short look at the capabilities of newcomer to the scene: BetweenAS3. BetweenAS3 is the tweening engine brainchild of Yoshihiro (yossy) Shindo and is available as part of the Spark project (i.e. it is brought to us by one of the same group that brought the world the FLARToolkit for Augmented Reality in Flash and countless other goodies).
3D / by - 15 July, 2009 12:50 pm
Create from Scratch a Away3D Shoot’em’Up Game: Part 3
After you have created the 3D level, in the part 3 of this Away3D series, we will show you how to add the player spacecraft and enemies.
Effects / by - 13 July, 2009 12:30 pm
Create an intelligent XML image Gallery & Slideshow in Flash CS4 (+PHP) – Part I/II
In this article you will learn how to build an image gallery that will load images from a web server. I decide to call it “Intelligent” because you don’t need to configure any XML or flash file. Just put the Flash movie and the images on a server and they will be loaded automatically. Nice ah?
3D / by - 8 July, 2009 1:45 pm
Create from Scratch a Away3D Shoot’em’Up Game: Part 2
In the part 1 of these tutorial series articles we created a framework that we could build off to start making the actual game. Now it’s time to create a 3D level for the player to fly through.
3D / by - 6 July, 2009 12:50 pm
Create from Scratch a Away3D Shoot’em’Up Game: Part 1
Today we start a 9 part tutorial series on creating a Shoot’em’Up game. We will cover all the necessary topics to create it from scratch, which will help you to understand and apply these guidelines to other projects. Ath this first part. we look at getting the Away3D engine up and running by creating a UIComponent that will contain and initialize the necessary Away3D components.
Effects / by - 1 July, 2009 1:00 pm
Build a Creative “Swirl Animated Menu” with Flash CS4
Flash it’s a powerful application and can be really complex, but even beginners can create a cool menu for demonstration or for use in a personal site. The menu that we will create is simple, but the swirl animation is something that you don’t see everywhere, for that I’ve decided to explain one way to make an animation of growing swirls without any Action Script code.You will also learn how to import artwork from illustrator where I’ve pre-made the graphics, the work is very simple and the result will be very cool.
Flash / by - 29 June, 2009 12:00 pm
SWFObject and Best Practice Implementation
With more and more full screen Flash web sites appearing on the internet, it’s important to understand how to properly embed the Flash movie in the browser window.
In this tutorial we will cover best practice embedding of SWF movies using SWFObject with a custom function for adding browser scrollbars for smaller browser windows.
3D / by - 24 June, 2009 12:30 pm
Create a 3D Bowling Game with JiglibFlash and Papervision 3D
Possibly the hottest thing to hit the Flash community since the advent of several excellent 3D engines is the recent debut of 3D physics engines. Here we’ll examine a way of using one of the more popular 3D engines, JiglibFlash, in conjunction with the prominent 3D engine Papervision3D to create a bowling game.
Flex / by - 22 June, 2009 1:00 pm
Create a Dynamic Event Calendar in Flex Builder 3 with Actionscript 3.0
This tutorial will allow readers to create an Event Calendar application using Flex. The final user will be able to plan over a daily, weekly or monthly plan.
You will learn on this step by step Flex tutorial, to create from scratch those Graphic User Interfaces, integrate them, and create a complete Rich Internet Application with a professional look.


