Make your own Flickr search engine with Flash and Actionscript 3.0
by 21 June, 2008 4:53 pm14
One of the best things about the internet is that you could search an unimaginable universe of information, text, images, videos, podcasts, blogs, newspapers.
With web 2.0, the community websites come to life, and one of the most famous web2.0 community websites is Flickr.
Flickr stores on their servers, photos form all their users around the world, and they have an open api so you could interact with it, and make your own developments, like PicNik.com, the photos online editor, where you could import your Flickr photos and make it look really cool.
Now in this tutorial I’m gonna show you how to interact with the flickr data base, making your own photo search engine, looking for tags on the photos.
Requirements
Adobe Flash CS3
Source Files
Step 1
The first thing we have to do is have a flickr account, so you could sign up fot an API key, necessary to connect with the Flickr data base.
To sign up, we have to go to http://www.flickr.com, if you already have a yahoo! account, just use it!
Once you have your account, you could start uploading your pics to share with your friends, but that another story, by now we gonna sign up for the API key!
Step 2
So, go to http://www.flickr.com/services/, where you gonna find this options:
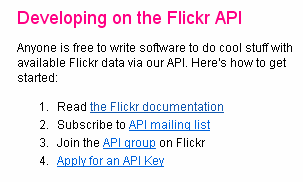
The number 4 is what we are looking for.
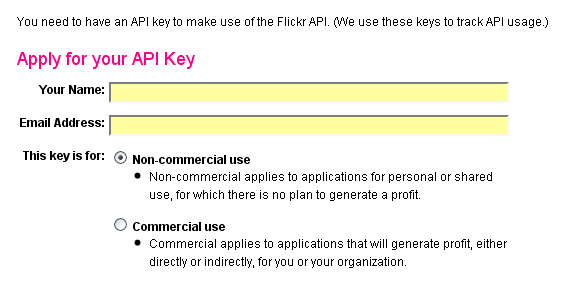
Once there we have to provide our name, email and the type of license we are applying. I recommend start with the Non commercial license. 😉
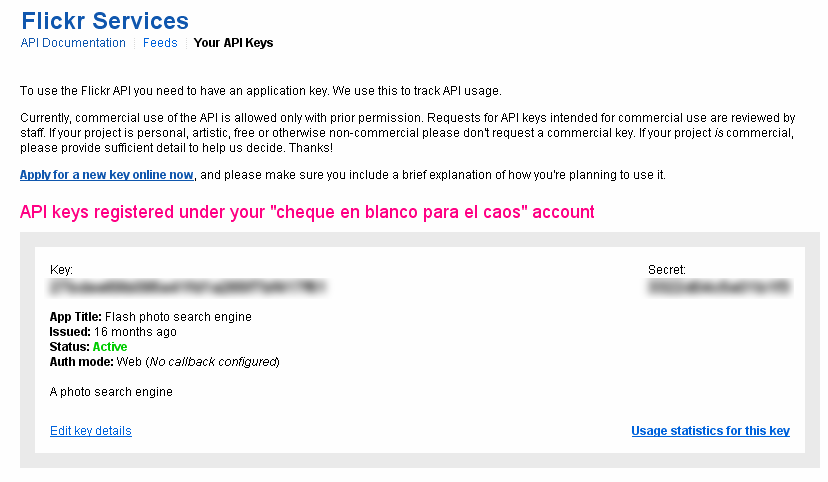
Once you sign up, you could check you API id on the Your API Keys section.
The code you need is on the Key, the secret is used for more complex stuff, like callback data from you api to the server, but for this tutorial we don’t gonna need it.
Take note of your key, we gonna use it later.
Step 3
Now we gonna interact with the flickr DB and know what kinda data we gonna read from flash.
For this we go to the Flickr API documentation http://www.flickr.com/services/api/
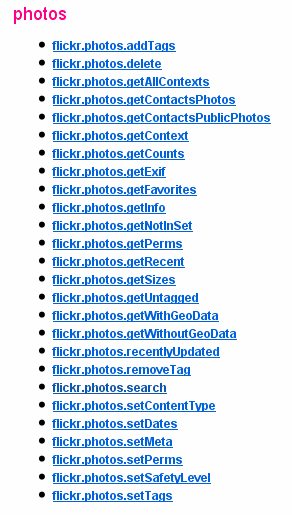
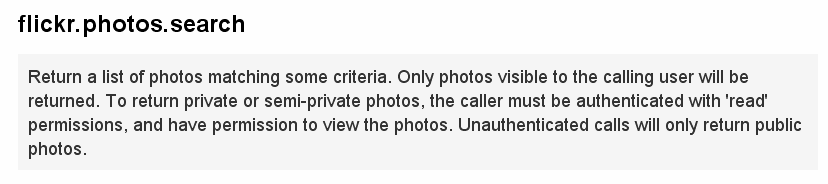
In here we gonna find all the functions have to interact with the flickr data base, we gonna use a common one, the flickr.photos.search.
If we see the documentation about this function, we have a description and a list of parameters that we could pass to find pictures on the Flcikr data base.
By now we gonna go to the end of the page and Explore the API (API Explorer : flickr.photos.search)
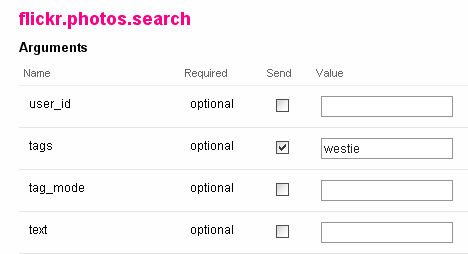
In here we gonna find a common html form, pretty basic. The item we concern is tags, we gonna fill the tags field with any word:
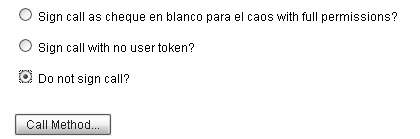
Go to the end of the page and first select Don’t sign the call, so we could see the full url of the call, and make the call:
And there you go, here’s the data Flickr returns us with this call, we are calling to the page http://api.flickr.com/services/rest/
and passing this variables:
- method=flickr.photos.search
- api_key=45e88791aa46e06efe64fea743f3868c
- tags=westie
The api key in here is a test api key used just for test purpose, the key change every day, so you better use your own key.
As you could notice, Flickr return us an XML with some data

There’s two important things in here, the stat that tells us if the service is running (ok) of if it’s offline (error), all that you can check it on the documentation.
The second one is the data flickr returns us about the photos, the XML provide us data about:
- The page number where we are
- The number of pages according with the number of photos per page call
- The total number of pics we call, the default is 100
- The total number of photos with this tag
And then the Photos data, giving us info about
- Photo id
- Owner Flickr code
- The secret
- The server where the pic is located
- The farm where is located
- The Photo title
- If the photo is public
Step 4
Now with all this new knowledge, we could go to Flash and make our own Flickr search engine.
First we start with a new Flash file (actionScript 3);
Step 5
Start with an actions layer, and our search layer.
Our flash file gonna have 2 keyframes, one for the search, and the second to display the images, called “search”
Step 6
First we create an empty movieclip and we call it “search_mc”, put it on the first frame of the search layer.
The instance name of our input textfield must be “tags_txt” and the instance name of the button must be “search_btn”
Inside of our search movieclip we have an input field and a search button, it could looks like this

Now we could add some code to our first frame on the main time line.
First we set the tag variables
Then we add a mouse event to our search button, if the input field is empty, nothing happens, but if we entered a tag, flash goes to the second frame, the “search” frame.
stop();

//===================================
// get the tag to search
//===================================

var tag:String;

search_mc.search_btn.addEventListener(MouseEvent.CLICK, searchListener);
function searchListener(e:MouseEvent):void
{
	if(search_mc.tags_txt.text != "")
	{
		tag = search_mc.tags_txt.text;
		gotoAndStop("search");
	}
}
Step 6
Oki, so now we are passing our tag from the frame 1 to our search frame.
In here we gonna have an empty movieclip, in our display layer, we gonna call it “container_mc”, and inside this movieclip we gonna load our photos.
Now we gonna create our square holder, it must be a square of 75px width and 75px height, that’s the image size of the thumbnails on flickr.
Inside the square, we have an invisible button, called “go_btn”, this is the button that gonna take us to the flickr photo page, and it’s located on the 0x,0y of the square holder.
it also contains an empty movieclip called “holder_mc”, where we gonna load the photo, and it’s located, like the “go_btn” on the 0x,0y of the square holder.

Cool! So, we could add some code on the first frame of the square holder, to load the image comming from the Flickr XML.
To make a cool load we gonna use Caurina transitions tweener, an used to create tweenings and other transitions via ActionScript code for projects built on the Flash platform. It’s released and maintained for these versions:
- ActionScript 2.0, for Flash 7+ and Flash Lite 2.0+
- ActionScript 2.0, for Flash 8+
- ActionSctipt 3.0, for Flash 9+
And you can download the last version here: http://code.google.com/p/tweener/
Ok, so let’s start with the image loader:
first import the classes
//first we import the necessary class to work
import flash.display.*;
import flash.net.URLRequest;
import flash.events.*;
import caurina.transitions.*;
Now, let’s make the load class:
We pass the image source to the function, the function creates a new Loader, to load that image on the
holder_mc movieclip, the we set the alpha of the holder_mc to 0 so we could make a nice alpha transition from 0 to 100 with the caurina class.
I’m not setting a preloader, but with the progressListener you could set up your own easily.
function loadImage(img_src:String)
{
	var loader:Loader = new Loader();
	var img_url:String = img_src;
	var request_url:URLRequest = new URLRequest(img_url);
	loader.load(request_url);
	loader.contentLoaderInfo.addEventListener(ProgressEvent.PROGRESS, progressListener);
	loader.contentLoaderInfo.addEventListener(Event.COMPLETE, completeListener);

	function progressListener(e:ProgressEvent)
	{
		var bl:int = e.bytesLoaded;
		var bt:int = e.bytesTotal;
		var percent:int = Math.ceil((bl*100)/bt);
	}
	function completeListener(e:Event)
	{
		holder_mc.addChild(loader.content);
		holder_mc.alpha = 0;
		Tweener.addTween(holder_mc, {alpha:1, time:1, transition:"linear"});
	}
}
Step 7
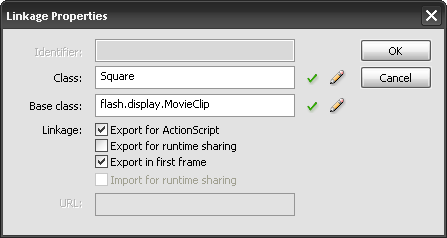
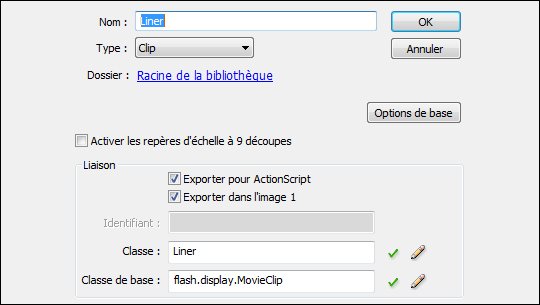
Now, we linkage the square that we gonna load the pictures, as the class Square:
Now we could add some code in our search frame, so we could connect with the Flickr data base, but first we have to know how call that pics:
In this url http://www.flickr.com/services/api/misc.urls.html, you gonna found how format the data flickr provide to call a picture.
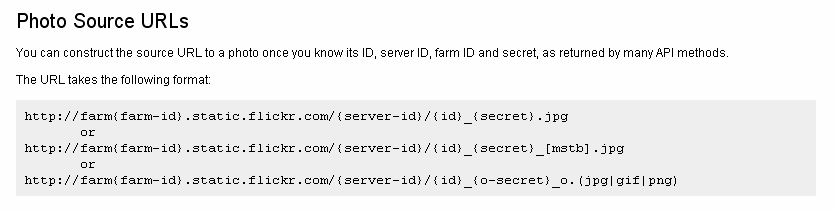
We gonna use the url http://farm{farm-id}.static.flickr.com/{server-id}/{id}_{secret}_t.jpg to call the thumbnails.
Step 8
On our search frame, in our main timeline:
//=================
//import the neccesary classes
//=================
import flash.display.*;
import flash.events.*;
import flash.net.*;
//=================
//allow domains
//=================
Security.allowDomain("*", "api.flickr.com");
Now we set the ini variables that we gonna need:
- xpos: the ini x pos of the squares
- ypos: the ini y pos of the squares
- dif: the difference between an square and the other
- totalCols: the total number of columns
- count: the count so we could know how much columns we are having
- i: the counter
- squares_arr: the array that’s gonna holds the square duplications names
//=================
//ini variables
//=================
var xpos:Number = 0;
var ypos:Number = 0;
var dif:Number = 75;
var totalCols:int = 10;
var count:int = 1;
var i:int = 0;
var squares_arr:Array = [];
Now we set the flickr ini variables, like your flickr api key:
In here we construct the function url using the variables and the tag provided on the first frame. We start with the page 1 and we gonna load just 50 images.
//=================
//flickr variable
//=================
var key:String = ""; //your flickr api key
var per_page:int = 50;
var page:int = 1;
var xml_url:String = "http://api.flickr.com/services/rest/?method=flickr.photos.search&api_key="+key+"&tags="+tag+"&per_page="+per_page+"&page="+page;
And we read the result just like any other XML data, we gonna use the ini variables to make a return while FLash populate the Squares inside the “container_mc”
As you can see in the code, we use the data provided by the Flickr XML to construct the image source and load it using the function on the Square movieclip
//=================
//XML
//=================
var pics:XML = new XML();
var pics_url:URLRequest = new URLRequest(xml_url);
var picsLoader:URLLoader = new URLLoader(pics_url);
picsLoader.addEventListener(Event.COMPLETE, picsLoaded);
function picsLoaded(e:Event):void
{
	pics = XML(picsLoader.data);

	var stat:String = [email protected]();
	var totalPages:int = pics.photos.@pages;
	var totalPics:int = pics.photos.@total;

	/*
	trace("status: "+stat);
	trace("Total pages: "+totalPages);
	trace("Total pics: "+totalPics);
	trace("-=-=-=-=-=-=-=-=-=-=-=");
	*/

	var allPics:XMLList = pics.photos.*;
	for each (var photo:XML in allPics)
	{
		var pic_src:String = "http://farm"+photo.@farm+".static.flickr.com/"+photo.@server+"/"+photo.@id+"_"+photo.@secret+"_s.jpg";
		/*
		trace("title: "+photo.@title+" owner: "+photo.@owner);
		trace("Source: "+pic_src);
		trace("-=-=-=-=-=-=-=-=-=-=-=");
		*/
		//
		var newName:String = "square_"+i;
		var my_square:Square = new Square();
		my_square.name = newName;
		my_square.x = xpos;
		my_square.y = ypos;
		my_square.loadImage(pic_src);
		//
		my_square.photo_id = photo.@id;
		my_square.photo_owner = photo.@owner;
		//
		squares_arr.push(my_square);
		container_mc.addChild(my_square);
		//
		if (count < totalCols)
		{
			xpos += dif;
			count++;
		}
		else
		{
			xpos = 0;
			ypos += dif;
			count = 1;
		}
		i++;
	}
}
Step 9
the last thing to do is pass the owner and the photo id to our photo holder, so we could set the right url to go
If you see this two lines in our previous code:
my_square.photo_id = photo.@id;
my_square.photo_owner = photo.@owner;
We already passed the variables to our holder.
Now on our photo holder, we set the necessary variables and add the event to our “go_btn”
//================================
// flickr photo page
//================================
var photo_id:String;
var photo_owner:String;
var photo_url:String = "http://www.flickr.com/photos/";
//================================
//add evento to the button
//================================
go_btn.addEventListener(MouseEvent.CLICK, goListener);
function goListener(e:MouseEvent):void
{
	var url:String = photo_url+"/"+photo_owner+"/"+photo_id;
	var req:URLRequest = new URLRequest(url);
	navigateToURL(req, "_blank");
}
Step 10
Now you are ready to ctrl+enter and see how it works.
On the source files you gonna find that I set the first search as “westie”, it’s my favorite dog, but you could leave it blank if you want.
At the end you should have something like this:
Feel free to explore the flickr api service and look all the cool stuff yahoo! is sharing with all of us.
Here’s some cool examples and resources:
- Picnik – edit photos the easy way, online in your browser
- Flickr Related Tag Browser
- TiltViewer is a free, customizable 3D Flash image viewing application
- stunning nikon – dslr
- Flickr Tools on Flickrbits » The definitive collection of Flickr tools, plugins and API applications
- The Flickr library is an ActionScript 3.0 API for the online photo sharing application, Flickr. It provides access to the entire Flickr API
Related posts

Effects / by - 14 January, 2012 5:55 pm
Learn Digital Painting in Photoshop
It’s impossible for everyone to become an artist, but many of them have a will to become an artist, to draw beautiful paintings but again due to lack of command…

Effects / by - 28 December, 2011 2:28 pm
How to Make a New Year Greeting Card in Photoshop
This is so much easy to go in a market and by paying some bucks; purchasing a New Year Greeting Card or any other festival card for your loving person…

Flash / by - 10 August, 2011 4:13 pm
Creating a Gallery in Flash Using the Moto CMS Component
In this tutorial we will create a gallery with the help of the Moto CMS Component. I think many of you have heard about (or even worked with) Moto Flash…

3D / by - 24 July, 2011 5:21 pm
Visualize Your Web Page in 3D
Ever wondered if you could visualize your website in 3D? Well, here’s one such Firefox extension that allows you to do so. Tilt is a Firefox add-on that lets you visualize any web page DOM and provides the relationship between various parts of a website in 3D.

Interfaces / by - 1 March, 2011 2:18 pm
Beginners Guide To User Interface Design in C#
User Interface Design in C# Windows Form Application From Scratch In this C Sharp tutorial you will learn user interface design in C# application. This step-by-step tutorial will help you deeply understand…
Effects / by - 1 December, 2010 2:34 pm
Create an intelligent XML image Gallery & Slideshow in Flash CS4 (+PHP) – Part II/II
In this second part article you will learn how to build an image gallery that will load images from a web server. I decide to call it “Intelligent” because you don’t need to configure any XML or flash file. Just put the Flash movie and the images on a server and they will be loaded automatically. Nice ah?
Flex / by - 29 May, 2010 2:56 pm
Connecting Flex Calendar With Database Using AMF-PHP
Connecting Flex Calendar with Database using AMF-PHP Part I: Create a Dynamic Event Calendar in Flex Builder 3 with Actionscript 3.0 This is Part II of Create a Dynamic Event…
Server Side / by - 13 April, 2010 2:39 pm
CodeIgniter Tutorial – CodeIgniter Explained
Hello everyone, and welcome to the first CodeIgniter tutorial. What will you learn? 1. What is a PHP Framework? 2. What is CodeIgniter? 3. What is MVC? 4. MVC Pattern…

3D / by - 20 March, 2010 10:00 am
Away3D Shoot’em’Up Tutorial – Powerups
In this article we add some powerups to the game.

3D / by - 15 February, 2010 3:59 pm
Away3D Shoot’em’Up Tutorial – Sound Effects
In this article we add some sound effects to the game.
3D / by - 28 July, 2009 1:00 pm
Create from Scratch a Away3D Shoot’em’Up Game: Part 4
Now that we have the player and some enemies we need for them to be able to interact. This is done through collision detection which you will learn in this fourth part.

Effects / by - 21 July, 2009 1:00 pm
Getting Started With BetweenAS3
There are many popular open source tweening engines in the Flash community today. Numbered among these are Tweener, TweenLite/Tweenmax, Tweensy, and GTween. This is a short look at the capabilities of newcomer to the scene: BetweenAS3. BetweenAS3 is the tweening engine brainchild of Yoshihiro (yossy) Shindo and is available as part of the Spark project (i.e. it is brought to us by one of the same group that brought the world the FLARToolkit for Augmented Reality in Flash and countless other goodies).
3D / by - 15 July, 2009 12:50 pm
Create from Scratch a Away3D Shoot’em’Up Game: Part 3
After you have created the 3D level, in the part 3 of this Away3D series, we will show you how to add the player spacecraft and enemies.
Effects / by - 13 July, 2009 12:30 pm
Create an intelligent XML image Gallery & Slideshow in Flash CS4 (+PHP) – Part I/II
In this article you will learn how to build an image gallery that will load images from a web server. I decide to call it “Intelligent” because you don’t need to configure any XML or flash file. Just put the Flash movie and the images on a server and they will be loaded automatically. Nice ah?
3D / by - 8 July, 2009 1:45 pm
Create from Scratch a Away3D Shoot’em’Up Game: Part 2
In the part 1 of these tutorial series articles we created a framework that we could build off to start making the actual game. Now it’s time to create a 3D level for the player to fly through.
3D / by - 6 July, 2009 12:50 pm
Create from Scratch a Away3D Shoot’em’Up Game: Part 1
Today we start a 9 part tutorial series on creating a Shoot’em’Up game. We will cover all the necessary topics to create it from scratch, which will help you to understand and apply these guidelines to other projects. Ath this first part. we look at getting the Away3D engine up and running by creating a UIComponent that will contain and initialize the necessary Away3D components.
Effects / by - 1 July, 2009 1:00 pm
Build a Creative “Swirl Animated Menu” with Flash CS4
Flash it’s a powerful application and can be really complex, but even beginners can create a cool menu for demonstration or for use in a personal site. The menu that we will create is simple, but the swirl animation is something that you don’t see everywhere, for that I’ve decided to explain one way to make an animation of growing swirls without any Action Script code.You will also learn how to import artwork from illustrator where I’ve pre-made the graphics, the work is very simple and the result will be very cool.
Flash / by - 29 June, 2009 12:00 pm
SWFObject and Best Practice Implementation
With more and more full screen Flash web sites appearing on the internet, it’s important to understand how to properly embed the Flash movie in the browser window.
In this tutorial we will cover best practice embedding of SWF movies using SWFObject with a custom function for adding browser scrollbars for smaller browser windows.
3D / by - 24 June, 2009 12:30 pm
Create a 3D Bowling Game with JiglibFlash and Papervision 3D
Possibly the hottest thing to hit the Flash community since the advent of several excellent 3D engines is the recent debut of 3D physics engines. Here we’ll examine a way of using one of the more popular 3D engines, JiglibFlash, in conjunction with the prominent 3D engine Papervision3D to create a bowling game.
Flex / by - 22 June, 2009 1:00 pm
Create a Dynamic Event Calendar in Flex Builder 3 with Actionscript 3.0
This tutorial will allow readers to create an Event Calendar application using Flex. The final user will be able to plan over a daily, weekly or monthly plan.
You will learn on this step by step Flex tutorial, to create from scratch those Graphic User Interfaces, integrate them, and create a complete Rich Internet Application with a professional look.


