How to create a simple Flash/PHP mail contact form with Actionscript 3.0 and MySQL
by 31 March, 2009 12:30 pm38
Welcome to the second PHP tutorial on TheTechLabs.com. In this tutorial I’m gonna show you how to improve our simple php, sending the info by mail and saving it on a MySQL DataBase using a custom MySQL class that we could reuse anytime and phpMailer, an open source class to send mails. And, of course, we gonna use a flash form to send the form instead of the html form. Hope you enjoy the tutorial.
Requirements
- A text editor to edit php, it’s not necessary a professional editor, with NotePad or NotePad++ it’s ok
- A PC with XAMPP or other web server with PHP support installed, or access to a PHP web server
- Access to the phpMyAdmin
- Access to a MySQL data base
- Flash Contact Form Source Files
This is the demo of the form we are going to build.
Pre-Requesites
- Basic PHP knowledge
Folders structure
It’s a good idea have an order with the different folders, this will help us when our application grows. For this tutorial we gonna have a structure like this:

My main folder contains the index.php that holds the SWF file, the contact.php, that connect to the data base through the mysql class, save the data and send the email, and a folder called classes where I save all the classes used to save the data and send the email.
The MySQL class
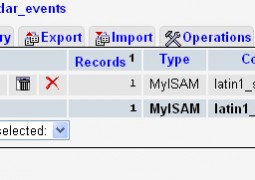
We gonna work with our previous MySQL data base structure.
PHP5 brings some substantial improvements comparing to the PHP4 OOP implementation, so it’s easier to work OOP in PHP now.
So, basically our MySQL class have 3 parts:
- The constructor where we set the hostname, the username, the password and the database we gonna use
- The query function to make the quries to the data base
- Additional functions to work with the query, like return the number of rows, display the result as object, array or an associate matrix
If you have a lil bit knowledge about OOP in Flash, it’s the same way in PHP. The Class is a collection of methods that helps us to achieve objectives, and we could reuse it anytime we want and apply it in different places, not only in our project but in different projects, and we have the same kind of fields as in ActionScript, public and private, and objects are created in the same way with the new keyword.
Create the class
So, our first step is create the class. First we create a new empty document in Notepad++, and we call it class.mysql.php, and we save it on the classes folder. In our class.mysql.php file we could create the class:
class Mysql{
}
And that’s it, we created our first php class, pretty easy right.
Define the variables
So, we have to declare the variables to connect to the data base, and we have:
- The Host, 99% of the time is localhost
- The mysql user name to connect to the mysql server and data base
- The user password to connect to the mysql server and data base
- The name of the data base
We declare all this variables as private, so they could be accessed just inside the class.
private $host;			//the server host 90% of being localhost
private $user;			//the username
private $password;		//the password
private $db;			//the database to select
The constructor
In our construct function, the one who initialize our class, we put the data about the server, the username, the password and the data base and set it to our previous variables
function __construct(){
	$this->host = "localhost";
	$this->user = "username";
	$this->password = "password";
	$this->db = "database";
}
The query function
So, by now we have set the necessary data to connect with the data base, now we create the query function that gonna lets us make queries to the data base.
With this function we gonna:
- Pass a query as a variable
- Connect to the MySQL server
- Connect to the data base
- Make a query
- return a result to insert datra or handle it later to display data
function query($sql_query){
	//we try to connect to the mysql server
	$link = @mysql_connect($this->host, $this->user, $this->password);
	//if the connection failed, we stop the application and return an error
	if(!$link) die("Could not connect to the MySQL server: " . @mysql_error());
	//we try to connect with the database
	$sel_db = @mysql_select_db($this->db, $link);
	//if fail, we stop the application and return an error
	if(!$sel_db) die("Could not connect to the data base: " . @mysql_error());
	//if everything goes fine till here, we make the query
	$query = @mysql_query($sql_query, $link);
	//if the query fail, we return an error
	if(!$query) die("Error: " . @mysql_error());
	//we colse the mysql connection
	@mysql_close($link);
	//now we return the result
	return $query;
}
The number of rows
A useful data when we work with databases it’s the number of rows. This number gives us the total number of results returned from a query, pretty useful for pagination and other stuff.
function numRows($result)
{
	$num_rows = @mysql_num_rows($result);
	return $num_rows;
}
Notice that we pass the result from a query, not a query.
The result as an object
We have different ways to retrieve the information, I’m gonna explain 3 basics, the first is have the result as an object:
function fetchObject($result)
{
	$row = @mysql_fetch_object($result);
	return $row;
}
and we retrieve the data as $row->field_name;
The result as an enumerated array
We could retrieve the data as an enumerated array too:
function fetchRow($result)
{
	$row = @mysql_fetch_row($result);
	return $row;
}
and we retrieve the data as $row[0], $row[1] and so on.
The result as an enumerated array and/or an associative array
function fetchArray($result)
{
	$row = @mysql_fetch_array($result);
	return $row;
}
and we retrieve the data as $row[0] or $row[‘field_name’], both are valid.
The result as an associative array
function fetchAssoc($result)
{
	$row = @mysql_fetch_assoc($result);
	return $row;
}
and we retrieve the data as $row[‘field_name’].
I really prefer the object approach, but the 3 are valid, and you have the 3 options, some prefer the Associative array approach other the Array approach, all depends on what make you feel more comfortable.
Test our class
So, if everything goes fine till now, we could make a little php file to test our class before program the html form. For this example we must have some data on our database, we could insert some test data from the phpmyadmin
We create a test.php file and save it on our folder. We gonna make a query to retrieve all the data from our table contacts and show the name, and the comment of each row.
First we include our mysql class
//we include the mysql class
require_once('classes/class.mysql.php');
//we start the mysql class
$connection = new Mysql();
//make the query
$query = "SELECT * FROM contacts ORDER BY id ASC";
//pass the query to the new mysql class object
$result = $connection->query($query);
//retrieve the total items
$total_items = $connection->numRows($result);
//print the total number on screen
echo "Total contacts: ".$total_items;
Now we could use a while loop to print the data on screen
while($row_contact = $connection->fetchAssoc($result)){
echo "

Name:".$row_contact['name']."
";
echo "Comment:".$row_contact['comment']."

";
echo "
";
If we point our browser to the test.php file we gonna have something like this

Implementing our class in the HTML contact form
With the contact form from our last tutorial, we make little changes to make it work with our new mysql class:
//include the mysql class and the phpmailer class
require_once('classes/class.mysql.php');
require_once('classes/class.phpmailer.php');

if(isset($_POST['action']) && $_POST['action'] == 'submitform')
{
	//new mysql object

	$connection = new Mysql;

	//recieve the variables

	$name = $_POST['name'];
	$email = $_POST['email'];
	$url = $_POST['url'];
	$comment = $_POST['comment'];
	$ip = gethostbyname($_SERVER['REMOTE_ADDR']);

	//save the data on the DB

	$insert_query = sprintf("INSERT INTO contacts (name, email, url, comment, date, ip) VALUES (%s, %s, %s, %s, NOW(), %s)",
							sanitize($name, "text"),
							sanitize($email, "text"),
							sanitize($url, "text"),
							sanitize($comment, "text"),
							sanitize($ip, "text"));

	$result = $connection->query($insert_query);

	if($result)
	{
		//send the email

		$mail = new PHPMailer();
		$mail->IsSMTP(); // telling the class to use SMTP
		$mail->Host = "smtp.domain.com"; // SMTP server
		$mail->From = "[email protected]";
		$mail->FromName = "Website";
		$mail->Subject = "New contact from the website";

		//message body

		$body = "New contact
";
		$body .= "Name: ".$name."
";
		$body .= "Email: ".$email."
";
		$body .= "Comment: ".$comment."
";
		$body .= "IP: ".$ip."
";

		$mail->MsgHTML($body);
		$mail->AddAddress("[email protected]", "your name");

		if(!$mail->Send()) {
		  echo "An error has occurred";
		} else {
		  echo "Your message has been sent";
		}
	}
}
It looks the same, but with the difference that we implement our mysql class and the php mailer class to send the email.
The Flash contact form
Now, we could make our flash form. For this we gonna use URLRequest, URLVariables and URLLoader to send the data via post.
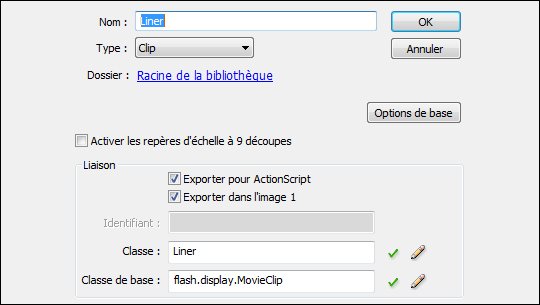
So we start making 4 input fields called:
- name_txt
- email_txt
- website_txt
- comment_txt
and the send button, called send_btn
So, now we could set everything on flash to send our comments and stored on our data base.
import flash.events.Event;
import flash.net.*;

stop();

var contact_url:String = "contact.php"; //the name of our php file to contact the data base
var contactRequest:URLRequest = new URLRequest(contact_url);
var contactLoader:URLLoader = new URLLoader();
var contactVariables:URLVariables = new URLVariables();

send_btn.addEventListener(MouseEvent.CLICK, sendForm);

function sendForm(evt:MouseEvent):void
{
	// add the variables to our URLVariables
	contactVariables.action = "submitform";
	contactVariables.name = name_txt.text;
	contactVariables.email = email_txt.text;
	contactVariables.url = website_txt.text;
	contactVariables.comment = comment_txt.text;
	// send data via post
	contactRequest.method = URLRequestMethod.POST;
	contactRequest.data = contactVariables;
	// add listener
	contactLoader.addEventListener(Event.COMPLETE, onLoaded);
	contactLoader.addEventListener(IOErrorEvent.IO_ERROR, ioErrorHandler);
	//send data
	contactLoader.load(contactRequest);
	//show sending message
	trace("sending");
}

function onLoaded(evt:Event):void
{
	var result_data:String = String(contactLoader.data);
	if (result_data == "ok")
	{
		trace("sended");
	}
	else if (result_data == "error")
	{
		trace("error");
	}
}

function ioErrorHandler(event:IOErrorEvent):void
{
	trace("ioErrorHandler: " + event);
}
And in our php file contact.php it’s the same as contact_form.php but without the html header and the form:
require_once('classes/class.mysql.php');
require_once('classes/class.phpmailer.php');

if(isset($_POST['action']) && $_POST['action'] == 'submitform')
{
	//new mysql

	$connection = new Mysql;

	//recieve the variables

	$name = $_POST['name'];
	$email = $_POST['email'];
	$url = $_POST['url'];
	$comment = $_POST['comment'];
	$ip = gethostbyname($_SERVER['REMOTE_ADDR']);

	//save the data on the DB

	$insert_query = sprintf("INSERT INTO contacts (name, email, url, comment, date, ip) VALUES (%s, %s, %s, %s, NOW(), %s)",
							sanitize($name, "text"),
							sanitize($email, "text"),
							sanitize($url, "text"),
							sanitize($comment, "text"),
							sanitize($ip, "text"));

	$result = $connection->query($insert_query);

	if($result)
	{
		//send the email

		$mail = new PHPMailer();
		$mail->IsSMTP(); // telling the class to use SMTP
		$mail->Host = "smtp.domain.com"; // SMTP server
		$mail->From = "[email protected]";
		$mail->FromName = "Website";
		$mail->Subject = "New contact from the website";

		//message body

		$body = "New contact
";
		$body .= "Name: ".$name."
";
		$body .= "Email: ".$email."
";
		$body .= "Comment: ".$comment."
";
		$body .= "IP: ".$ip."
";

		$mail->MsgHTML($body);
		$mail->AddAddress("[email protected]", "your name");

		if(!$mail->Send()) {
		  echo "error";
		} else {
		  echo "ok";
		}
	}
}

function sanitize($value, $type)
{
  $value = (!get_magic_quotes_gpc()) ? addslashes($value) : $value;

  switch ($type) {
    case "text":
      $value = ($value != "") ? "'" . $value . "'" : "NULL";
      break;
    case "long":
    case "int":
      $value = ($value != "") ? intval($value) : "NULL";
      break;
    case "double":
      $value = ($value != "") ? "'" . doubleval($value) . "'" : "NULL";
      break;
    case "date":
      $value = ($value != "") ? "'" . $value . "'" : "NULL";
      break;
  }

  return $value;
}
Before test it, don’t forget to change the data used in the phpmailer so you could ber able to send email. For more information on the phpmailer, don’t forget to read the examples and tutorials
You could test your php code without flash using the same form in an html file and making the action=”contact.php”, so you could debug it.
Related posts

Effects / by - 14 January, 2012 5:55 pm
Learn Digital Painting in Photoshop
It’s impossible for everyone to become an artist, but many of them have a will to become an artist, to draw beautiful paintings but again due to lack of command…

Effects / by - 28 December, 2011 2:28 pm
How to Make a New Year Greeting Card in Photoshop
This is so much easy to go in a market and by paying some bucks; purchasing a New Year Greeting Card or any other festival card for your loving person…

Flash / by - 10 August, 2011 4:13 pm
Creating a Gallery in Flash Using the Moto CMS Component
In this tutorial we will create a gallery with the help of the Moto CMS Component. I think many of you have heard about (or even worked with) Moto Flash…

3D / by - 24 July, 2011 5:21 pm
Visualize Your Web Page in 3D
Ever wondered if you could visualize your website in 3D? Well, here’s one such Firefox extension that allows you to do so. Tilt is a Firefox add-on that lets you visualize any web page DOM and provides the relationship between various parts of a website in 3D.

Interfaces / by - 1 March, 2011 2:18 pm
Beginners Guide To User Interface Design in C#
User Interface Design in C# Windows Form Application From Scratch In this C Sharp tutorial you will learn user interface design in C# application. This step-by-step tutorial will help you deeply understand…
Effects / by - 1 December, 2010 2:34 pm
Create an intelligent XML image Gallery & Slideshow in Flash CS4 (+PHP) – Part II/II
In this second part article you will learn how to build an image gallery that will load images from a web server. I decide to call it “Intelligent” because you don’t need to configure any XML or flash file. Just put the Flash movie and the images on a server and they will be loaded automatically. Nice ah?
Flex / by - 29 May, 2010 2:56 pm
Connecting Flex Calendar With Database Using AMF-PHP
Connecting Flex Calendar with Database using AMF-PHP Part I: Create a Dynamic Event Calendar in Flex Builder 3 with Actionscript 3.0 This is Part II of Create a Dynamic Event…
Server Side / by - 13 April, 2010 2:39 pm
CodeIgniter Tutorial – CodeIgniter Explained
Hello everyone, and welcome to the first CodeIgniter tutorial. What will you learn? 1. What is a PHP Framework? 2. What is CodeIgniter? 3. What is MVC? 4. MVC Pattern…

3D / by - 20 March, 2010 10:00 am
Away3D Shoot’em’Up Tutorial – Powerups
In this article we add some powerups to the game.

3D / by - 15 February, 2010 3:59 pm
Away3D Shoot’em’Up Tutorial – Sound Effects
In this article we add some sound effects to the game.
3D / by - 28 July, 2009 1:00 pm
Create from Scratch a Away3D Shoot’em’Up Game: Part 4
Now that we have the player and some enemies we need for them to be able to interact. This is done through collision detection which you will learn in this fourth part.

Effects / by - 21 July, 2009 1:00 pm
Getting Started With BetweenAS3
There are many popular open source tweening engines in the Flash community today. Numbered among these are Tweener, TweenLite/Tweenmax, Tweensy, and GTween. This is a short look at the capabilities of newcomer to the scene: BetweenAS3. BetweenAS3 is the tweening engine brainchild of Yoshihiro (yossy) Shindo and is available as part of the Spark project (i.e. it is brought to us by one of the same group that brought the world the FLARToolkit for Augmented Reality in Flash and countless other goodies).
3D / by - 15 July, 2009 12:50 pm
Create from Scratch a Away3D Shoot’em’Up Game: Part 3
After you have created the 3D level, in the part 3 of this Away3D series, we will show you how to add the player spacecraft and enemies.
Effects / by - 13 July, 2009 12:30 pm
Create an intelligent XML image Gallery & Slideshow in Flash CS4 (+PHP) – Part I/II
In this article you will learn how to build an image gallery that will load images from a web server. I decide to call it “Intelligent” because you don’t need to configure any XML or flash file. Just put the Flash movie and the images on a server and they will be loaded automatically. Nice ah?
3D / by - 8 July, 2009 1:45 pm
Create from Scratch a Away3D Shoot’em’Up Game: Part 2
In the part 1 of these tutorial series articles we created a framework that we could build off to start making the actual game. Now it’s time to create a 3D level for the player to fly through.
3D / by - 6 July, 2009 12:50 pm
Create from Scratch a Away3D Shoot’em’Up Game: Part 1
Today we start a 9 part tutorial series on creating a Shoot’em’Up game. We will cover all the necessary topics to create it from scratch, which will help you to understand and apply these guidelines to other projects. Ath this first part. we look at getting the Away3D engine up and running by creating a UIComponent that will contain and initialize the necessary Away3D components.
Effects / by - 1 July, 2009 1:00 pm
Build a Creative “Swirl Animated Menu” with Flash CS4
Flash it’s a powerful application and can be really complex, but even beginners can create a cool menu for demonstration or for use in a personal site. The menu that we will create is simple, but the swirl animation is something that you don’t see everywhere, for that I’ve decided to explain one way to make an animation of growing swirls without any Action Script code.You will also learn how to import artwork from illustrator where I’ve pre-made the graphics, the work is very simple and the result will be very cool.
Flash / by - 29 June, 2009 12:00 pm
SWFObject and Best Practice Implementation
With more and more full screen Flash web sites appearing on the internet, it’s important to understand how to properly embed the Flash movie in the browser window.
In this tutorial we will cover best practice embedding of SWF movies using SWFObject with a custom function for adding browser scrollbars for smaller browser windows.
3D / by - 24 June, 2009 12:30 pm
Create a 3D Bowling Game with JiglibFlash and Papervision 3D
Possibly the hottest thing to hit the Flash community since the advent of several excellent 3D engines is the recent debut of 3D physics engines. Here we’ll examine a way of using one of the more popular 3D engines, JiglibFlash, in conjunction with the prominent 3D engine Papervision3D to create a bowling game.
Flex / by - 22 June, 2009 1:00 pm
Create a Dynamic Event Calendar in Flex Builder 3 with Actionscript 3.0
This tutorial will allow readers to create an Event Calendar application using Flex. The final user will be able to plan over a daily, weekly or monthly plan.
You will learn on this step by step Flex tutorial, to create from scratch those Graphic User Interfaces, integrate them, and create a complete Rich Internet Application with a professional look.


