Create an intelligent XML image Gallery & Slideshow in Flash CS4 (+PHP) – Part I/II
by 13 July, 2009 12:30 pm30

In this article you will learn how to build an image gallery that will load images from a web server. I decide to call it “Intelligent” because you don’t need to configure any XML or flash file. Just put the Flash movie and the images on a server and they will be loaded automatically. Nice ah?
So, why the XML term in title? Easy, the gallery will work also with a xml if you want to, just change two lines of code and it is working with a XML file.
And the PHP? If you want the gallery to auto load and discover the photos, you will need to have two simple php files on any web/local server (php support is mandatory). One of this files will automatically discover the images in folder and create the XML with them, when this creation is done it informs flash of it’s location.
Final Result:
This gallery will have some cool final result features, lets take a brief look:
- Auto find images in folder (works with PNG,JPEG,JPG)
- Write an XML file automatically
- Can work only with a XML file and without php
- Have a full screen option
- Fit’s automatically the screen center.
- Can customize the speed of slideshow.
- Automatically generate thumbnails of images in folder *
- Spread the thumbnails automatically on the screen *
- Make the slideshow static (only open’s in thumbnail click) *
- Can be configured without any XML (with flash vars) *
This project will be divided into two parts, on the first we will focus the first 6 topics, and on the second part the other ones.
Requirements.
- Have Flash CS4
- A amp server (or similar like wampserver), any online hosting with php support works to.
- The TweenLite engine that you can download here
Pre Requirements
- Know a little of PHP
- Understand the concept of constraint layout in flash (auto position content)
- A good knowledge of Flash, especially Action Script 3
Getting started
Keep in mind that this is a complex tutorial and you will need to pay some attention to details, so… if you are following this tutorial or if you got the source and have any doubts you should not ignore any step… follow them carefully.
Step 1 – Setting up PHP
Make sure you got an installed php server, go to your web server root (if local and using wamp server, something like c:/wamp/www) and create a folder called gallery, inside it create two php files named discover.php and imageHandler.php these files will handle any request from flash, discover the image files in folder, create a images.xml file and output his name to flash.
Write down this code on imageHandler.php:
<?php

  class imageHandler {
  	public function getImageList($path="") {
	  		if(file_exists($path))
	  		{
			  $i1="jpg";
			  $i2="png";
			  $i3="jpeg";
			  foreach(array_diff(scandir($path),array('.','..')) as $f) {
				  if(is_file($path.'/'.$f) && (($i1)?ereg($i1.'$',$f):1) ||
					(($i2)?ereg($i2.'$',$f):1) || (($i3)?ereg($i3.'$',$f):1) ) $l[]=$f;
				 }
			  return $l;
		   }
		  else return "Path do not Exists!";
		}

		public function ary2xml($arr, $d=0, $forcetag='', $file_name='') {

		  $data="<?xml version="1.0" encoding="utf-8"?>rn";
		  $data.="<images>rn";
		  for($h=0; $h<count($arr); $h++) {
			  $data.="<image nameI="".$arr[$h]."" thumb="".$arr[$h]."" />rn";
		  }
		  $data.="</images>";

		  if($file_name!='') {
			  @unlink($file_name);
			  $myFile = $file_name;
			  $fh = fopen($myFile, 'w');
			  fwrite($fh, $data);
			  fclose($fh);
			  return $file_name;
		  }
		  else return $data;
   	}
  }
?>
This PHP Class has two different functions, one is to discover all the JPG, JPEG and PNG files and output them in an array, the second one is a function to create an images.xml file, that will output a XML file something like this:
<images>
	<image nameI="adv2.jpg" thumb="adv2.jpg" />
	<image nameI="logo-trans.png" thumb="logo-trans.png" />
	<image nameI="logo.png" thumb="logo.png" />
	<image nameI="preview.jpg" thumb="preview.jpg" />
	<image nameI="pub.png" thumb="pub.png" />
	<image nameI="stocks-20090608.jpg" thumb="stocks-20090608.jpg" />
	<image nameI="ttl_contributer.png" thumb="ttl_contributer.png" />
</images>
On the second part of this tutorial we will change a little the php class to create and write down the images thumbnails in here, for now only the structure.
On the other php document, discover.php, write this down:
<?php
  include_once("imageHandler.php");

  $tm=new imageHandler();

  $data=$tm->getImageList("./");

  echo($tm->ary2xml($data,0,'',"images.xml"));
?>
This will call the getImageList function, then with the images array we call the function to write down the images.xml, this last function returns the filename when done: images.xml.
That’s all, just put some pictures in this folder, we will need them to continue in flash.
Step 2 – Creating a new project in Flash

This is quite simple, create a new project and define his stage size 850x470px. The stage size is not important because our flash gallery will automatically fetch the stage area, so you do not need to respect this size…but make it similar…
On our timeline, create 4 layers, name the top one “actions”, the second “masker”, the third masker and the bottom one “imageLoader”. This is all that we need. After creating this layers, you should have something link this:

These layers disposition is very important, in the controls layer we will put a custom preloader, and a movieclip with two icons to control the normal/full screen mode and the speed of our slideshow. In the masker layer, we will simply put a movieclip to mask the imageLoader (to create the mask effect). On the imageLoader we will put a movieclip that will hold the loader to load our images and on the actions layer we will write down our code.
First of all lets create the preloader, the mask and the imageLoader movieClip’s.
Save your file.
Step 3 – Creating the image preloader
The image preloader is very simple, just create a new empty movieclip and name it preloader (Menu Insert->New Symbol or CTRL+F8), After this on our movieclip create 3 layers, name the top one “Loader” the middle one “Mask” and the bottom one “Bar”. On the “Loader” layer create a static text and write “Loading…” And on the mask layer create a rectangle with 104×15, and color like #CCCCCC then put it behind the Loading Text.. size the loading text field to fit this rectangle…
On the last layer, the Bar, create another rectangle, color it #999999 and put it on the left side of the loading text and convert it into a symbol (name it masker_bar), after these steps you must have the things like this:

Now, extend the 3 layers till the frame 100 (click on each layer frame 100 and right-click->Insert key frame). This will allow us to make a animation from 0 to 100, creating the loading effect.
On the bottom layer, the bar one, right click on frame 10/15 and select Create Classic Tween, then select the frame 100 of this layer, then select the Left masker_bar symbol and put it over the loading area, make sure it covers it all, something like this:

This will create a smooth move animation, the final part is to put some stop actions on the start and end frames, click on frame one of the Mask layer, then click F9 (actions) and write stop(); do the same on layer 100. Then mask the bar: Right-click on the mask layer and then select Mask.
We have finished our image preloader:

Time to save your project.
Step 4 – Creating the image loader
The image loader is quite simple, if still inside the preloader, go back main stage, select menu Insert->New Symbol then name it “imageLoader”. After this, do nothing inside the imageLoader, leave it empty… we need this that was so we can add a loader into it as child, that will load our image.
Go back to main stage.
Step 5 – Creating a mask movieClip.
Do the same steps to create a new movieClip, but name this one “masker” and inside him, on the first layer and frame simply draw a small rectangle…10x15px is enough. This rectangle movieCLip will be used as mask, we will resize it according to each image size, so it masks the image correctly.
Step 6 – Creating the animation lines
Another very simple step. Insert a new movieClip, name it Liner but this time export it to action script, we will need this to call the lines into Action Script code, the MovieClip properties should be like this (it’s in French, but you will easy understand when looking at the options):

Then in this movieClip select the line tool and make a long horizontal line, with +- 2500px, make sure it starts on the x=0 and y=0 coordinates, like this:

This is done, save it and go back to main stage.
Step 7 – Creating the control buttons
For this step, you will need my images that can be downloaded here, take those two png images (max.png and speed2.png) and import them into flash; File->Import to stage, and select those two images. On the stage, just put the two images side-by-side and then convert them into a “slideControls” movieClip.

Open this movieclip and here we need to do some stuff.
Click on the arrows image, and then convert it onto a movieClip named “fullScreen”, and do the same to the other left icon and name it “speed”. On the properties of each movieClip on the instance name write down “fullscreen” for the fullScreen button and “speedBtn” for the speed button. This will allow us to identify this clips in action script.
Now, double Click on the speed button, we will make a static image click able on the small arrows, for this inside the speed button, create a new layer, name it backBtns, and on this one create a small rectangle, color it #CCCCCC and with +- the size of each small arrow, then convert it into a backBtn movieClip. Copy a new instance of it from library and put them over the small arrows, like this:

Name the top instance on properties panel of “up” and the bottom one “down”. Go to right panel, choose style, and alpha property equal to 0.
This is now ready to receive some code.
Now, create a new Layer above the existent, name it actions and go to panel actions to write this down:
	up.useHandCursor=true;
  up.buttonMode=true;
  up.addEventListener(MouseEvent.CLICK, onClick);
	down.useHandCursor=true;
  down.buttonMode=true;
  down.addEventListener(MouseEvent.CLICK, onClick);

	function onClick(evt:MouseEvent):void {
	  if(evt.target.name.toString()=="up") {
  	//go up
		  dispatchEvent(new Event("speedUp"));
  	}
  	else {
  	//go down
  	dispatchEvent(new Event("speedDown"));
  	}
 }

stop();
This will dispatch two custom events that we will listen on main stage to perform the speed change action. The events names are “speedUp” when user clicks to increase speed and “speedDown” to decrease.
Go back inside the slideControls movieClip, add a new layer on top, name it “actions” and in the panel actions write this down:
	fullScreen.buttonMode=true;
  fullScreen.useHandCursor=true;
  fullScreen.addEventListener(MouseEvent.CLICK, onFullMouse);
  fullScreen.addEventListener(MouseEvent.MOUSE_OVER, onFullMouse);
  fullScreen.addEventListener(MouseEvent.MOUSE_OUT, onFullMouse);

	function onFullMouse(evt:MouseEvent):void {
	  if(evt.type==MouseEvent.CLICK) {
  	(stage.displayState==StageDisplayState.NORMAL) ?
		stage.displayState=StageDisplayState.FULL_SCREEN :
		stage.displayState=StageDisplayState.NORMAL;
	  }
   else if(evt.type==MouseEvent.MOUSE_OVER)
		{
  	fullScreen.alpha=0.5;
  	}
  else {
		fullScreen.alpha=1;
  }
}
This will make our fullScreen image behave as a button, and add 3 listeners on it. In this case i use only one function to handle the 3 events, because they have something in common, the argument is on the 3 cases a MouseEvent, so i use only one function and compare the event type. If it’s a CLICK the flash checks if the displayState is in full screen and turn it on normal state or do the inverse.
The stage.displayState = StageDisplayState.FULL_SCREEN transform flash in full screen, but only if we make a small transformation on the publishing argument “allowFullScreen” of the HTML to true. We will see this later.
Well, save your project again.
Step 8 – Place movieClip’s on stage.
It’s now time to put all things on our stage. Because all of our stuff will be automatically sized and placed on stage, we do not really need to concern about the position of elements, just make sure you set up the good instance names and put them on the correct layers.
So, go to main stage, click on the layer “controls” and drag and drop the “preloader” and “slideControls” movieClip’s from the library into the stage, the place does not matters. Click now on the preloader movieclip and name it’s instance “preloader”, do the same on slideControls movieClip and name it’s instance to “galControls”.
Click now on layer masker, and drag the masker movieClip from library into stage, name it’s instance “masker”.
Finally click on “imageLoader” layer and drag the “imageLoader” movieclip into stage (because it’s an empty movieClip pay some attention to the place and the small round circle, this is where your imageLoader is) and name the instance as “imageLoader”.
Note: Naming these instances is very important, or you will get some errors while accessing to the movieClip’s from Action Script.
Now you just need to mask the layer mask; Right-click on it and select Mask.
You should get something like this…

Well… we are almost done, now is time to code… but before…
Step 9 – Understanding stage constraint
When, the things might be a little confusing, but this image will help you out, we will have a image (box) on screen and we need to center it, easy, but if the stage size changes (when going to full screen) the center of the stage changes, so we need to reset it’s position. We simply add an event to listen resizeEvents on stage to reposition the box on screen center, so.. look at the following image, it will help you out on the code.
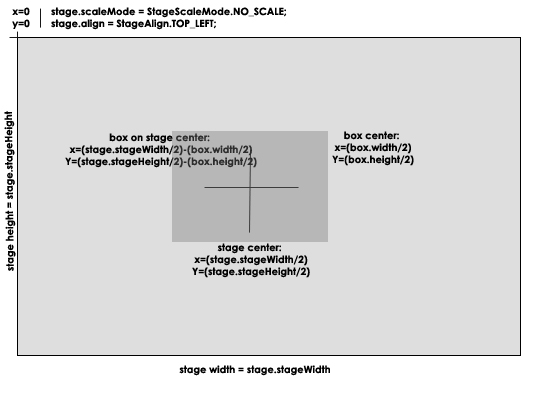
So, now that we learn a little more about the layout, lets take a quick view on the tasks we have to make (from top to bottom order):
- Setup elements positions on screen.
- Call the discover service (discover.php) and wait for it’s response.
- Read the xml file returned from the discover service.
- Transform the xml data to an array.
- Preload first photo
- Animate and show first photo, load the timer to loa next photos
These are the main things we have to do in Action Script, so lets begin.
Step 10 – Declare all the variables and imports
So, click the actions layer and on frame one actions write this down and make sure you got the gs folder of TweenLite in the same folder of your flash file:
import gs.TweenLite; //tween classes
import gs.plugins.*; //tweenlite sizePlugin

  //variables
  var HOST:String="http://www.msdevstudio.com/mywork/gallery/"; //gallery host
  var CUR_PHOTO:int=-1; //actual photo
  var FIRST_RUN:Boolean=true; //first run
  var IMAGE_LOADED:Boolean=false; //is there a loaded image?
  var IMAGES:Array = new Array(); //images array
  var SPEED:Number=3000;

	var timex:Timer = new Timer(SPEED); //timer to change photos
  var LT:Liner = new Liner(); //our lines
  var LB:Liner = new Liner();

	var ldr:Loader = new Loader(); //our image loader
  var PhpLoader:URLLoader = new URLLoader(); //the php loader / discover service
  var XmlLoader:URLLoader = new URLLoader(); //xml loader

	//file loaders, discover.php and the XML result file
	PhpLoader.addEventListener(Event.COMPLETE, onPhpComplete); //php discover
  XmlLoader.addEventListener(Event.COMPLETE, onXmlComplete); //php loader

 	//stage properties, align left and no scale
  stage.scaleMode = StageScaleMode.NO_SCALE;
  stage.align = StageAlign.TOP_LEFT;

	//activate the tweenLite setSize() plugin
  TweenPlugin.activate([SetSizePlugin]);

	//add the loader to imageLoader and set his alpha to 0;
  imageLoader.addChild(ldr);
  imageLoader.alpha=0;

	//galLoader events
  galControls.speedBtn.addEventListener("speedUp", changeSpeed);
  galControls.speedBtn.addEventListener("speedDown", changeSpeed);

  //out image loader listeners
  ldr.contentLoaderInfo.addEventListener(Event.COMPLETE, onImageComplete)
  ldr.contentLoaderInfo.addEventListener(ProgressEvent.PROGRESS, onProgress);

  //Add Resize listener
  stage.addEventListener(Event.RESIZE, onResizeS);

  //timer event for image transitions
  timex.addEventListener(TimerEvent.TIMER, onTime);
The main declarations are many, you will find comments on code that will help you out, you just have to change the path for your server on the HOST variable (make sure to add a ending slash.) If you want, you can leave it like that… well, at least it will work on your localhost.
Now we need to create the functions to handle all this stuff…
Step 11 – Create handling functions
These are the functions that will handle all the events and requests of our code, you will get comments on each one, and what for it’s used.
Write this next to previous step code:
/*** function to increase/decrease speed ***/

function changeSpeed(evt:Event):void {
	if(evt.type.toString()=="speedUp") {
		SPEED+=1000; //+1 second
	}
	else SPEED-=1000;
	if(SPEED<1000) SPEED=1000; //minimum speed;
	timex.delay=SPEED; //change our timer speed
}

/*** image load progress, used to set the preloader animation state ***/
function onProgress(evt:ProgressEvent):void {
	var percentLoadede:Number = evt.bytesLoaded/evt.bytesTotal;
	var percent:Number = Math.round(percentLoadede * 100); //percentage loaded
	preloader.gotoAndStop(percent); //set the correct frame of preloader anim.
	if(percent==100) preloader.gotoAndStop(1); //if complete, goto to first frame
}

/****************Setup the lines at screen center ********************/
function setLines():void {
	LT.width=stage.stageWidth; //total screen size
	LT.y=(stage.stageHeight/2)-7.5; //middle - 7.5px the loader has 15px height
	LT.x=0; //at 0

	LB.width=stage.stageWidth;
	LB.y=(stage.stageHeight/2)+7.5;
	LB.x=0;

	addChild(LT); //add lines as stage childs.
	addChild(LB);
}

/*****called when image loading process is complete ********************/
function onImageComplete(evt:Event):void {
	TweenLite.to(preloader,1,{alpha:0}); //hide the preloader with smooth alpha effect

  imageLoader.height=ldr.height; //change size of the imageloader according to image size
  imageLoader.width=ldr.width;

  imageLoader.x=(stage.stageWidth/2)-(imageLoader.width/2); //imageLoader on center x
  imageLoader.y=(stage.stageHeight/2)-(imageLoader.height/2); //imageLoader on center y

  imageLoader.alpha=1; //show the imageLoader MC
  IMAGE_LOADED=true; //the image is loaded
  CUR_PHOTO++; //increese photo loaded;

  if(FIRST_RUN==true) { //if is the first run
  	timex.start(); //if it's first run, activate the timer to load next images.
 		FIRST_RUN=false; //now it's not the first run
  }
  AnimateToImage(); //animate the mask and lines to make the appear effect
}

/*********** function to reset imageLoader to orignial screen center position ****/
function fixLoader():void {
	imageLoader.height=ldr.height; //fetch the imageloader size to image size
	imageLoader.width=ldr.width;

	imageLoader.x=(stage.stageWidth/2)-(imageLoader.width/2); //imageLoader center x
	imageLoader.y=(stage.stageHeight/2)-(imageLoader.height/2); //imageLoader center y
	masker.width=stage.stageWidth;
	masker.x=0;
	masker.y=(stage.stageHeight/2)-(imageLoader.height/2);
	masker.height=(imageLoader.height/2);
}

/******************* function to load separated images *********************/
function loadImage(img:String=null):void {
	setPreload(); //set the preloader original position
	TweenLite.to(preloader,1,{alpha:1}); //make it appear
	ldr.load(new URLRequest(img)); //laod the requested image
}

/***** Animate the lines and mask to show the image loaded *******/
function AnimateToImage():void {

  TweenLite.to(imageLoader, 1, {alpha:1}); //alpha the imageLoader
  TweenLite.to(masker, 1, {setSize:{height:imageLoader.height}, y:masker.y-(imageLoader.height/2)+7.5}); //resize the mask
	//make lines close the image to original position
  TweenLite.to(LT, 1, {y:imageLoader.y, setSize:{width:stage.stageWidth, height:1}});
  TweenLite.to(LB, 1, {y:imageLoader.y+imageLoader.height, setSize:{width:stage.stageWidth, height:1}});
  //animation is done, so lets start the timer again
  timex.start();
 }

/*** put preloader at center position *********/
  function setPreload():void {
      preloader.x=(stage.stageWidth/2)+4;
  	preloader.y=(stage.stageHeight/2)+7.5;
 }

/****** set the controls on bottom ****/
  function setControls():void {
	    galControls.x=stage.stageWidth-(galControls.width+20);
  	galControls.y=stage.stageHeight-(galControls.height+20);
 }

/*** Set mask original position ****/
  function setMasker():void {
  	masker.width=stage.stageWidth;
  	masker.x=0;
  	masker.y=(stage.stageHeight/2)-7.5;
  	masker.height=15;
 }

/*** Set the imageLoader original position **/
  function setLoader():void {
  	imageLoader.width=stage.stageWidth;
  	imageLoader.x=0;
  	imageLoader.y=(stage.stageHeight/2)-7.5;
  	imageLoader.height=15;
}

/*********** Called on Resize, reset the lines at center screen **/
function ReloadLines():void {
	//if the is an image loaded
	if(IMAGE_LOADED==true)
	{
		//position the lines to center screen
		TweenLite.to(LT, 1, {y:(stage.stageHeight/2)-(imageLoader.height/2), setSize:{width:stage.stageWidth, height:1}, overwrite:0});
		TweenLite.to(LB, 1, {y:(stage.stageHeight/2)+(imageLoader.height/2), setSize:{width:stage.stageWidth, height:1}, overwrite:0});
		TweenLite.to(imageLoader,1,{x:(stage.stageWidth/2)-(imageLoader.width/2), y:(stage.stageHeight/2)-(imageLoader.height/2), overwrite:0})
		TweenLite.to(masker,1,{x:0, y:(stage.stageHeight/2)-(masker.height/2),overwrite:0, setSize:{width:stage.stageWidth}})
	}
	else
	{
		//Kill existing tween, if a tween is running, force stop at the end of effect
		TweenLite.killTweensOf(LT, true);
	 	TweenLite.killTweensOf(LB, true);
		TweenLite.killTweensOf(imageLoader, true);
		TweenLite.killTweensOf(masker, true);
	 	//animate the lines to original "closed" position
		TweenLite.to(LT, 1, {y:(stage.stageHeight/2)-7.7, setSize:{width:stage.stageWidth, height:1},overwrite:0});
		TweenLite.to(LB, 1, {y:(stage.stageHeight/2)+7.5, setSize:{width:stage.stageWidth, height:1},overwrite:0});
		TweenLite.to(masker, 1, {x:0, y:(stage.stageHeight/2)-7.5, setSize:{width:stage.stageWidth, height:15},overwrite:0});
		TweenLite.to(imageLoader, 1, {y:(stage.stageHeight/2)-7.5, setSize:{width:stage.stageWidth, height:15},overwrite:0});
		//we run this to fix a bug founded when passing to fullscreen during a transition.. this resets all this to original position;
		//do not ask me why this happens, but it happens some times, maybe because a tweenlite bug!
		TweenLite.killTweensOf(LT, true);
	 	TweenLite.killTweensOf(LB, true);
		TweenLite.killTweensOf(imageLoader, true);
		TweenLite.killTweensOf(masker, true);
	}
	//move controls and loader to new position.
	TweenLite.to(galControls,1,{x:stage.stageWidth-(galControls.width+20), y:stage.stageHeight-(galControls.height+20), overwrite:0})
	TweenLite.to(preloader,1,{x:(stage.stageWidth/2)+4,y:(stage.stageHeight/2)+7.5, overwrite:0})
}

/******* on screen resize ***/
function onResizeS(evt:Event):void {
	ReloadLines();
}

/**** send lines back to original position, close effect ****/
  function resetLines(loadNext:String=null):void {
		TweenLite.to(imageLoader, 1, {alpha:0});
  	TweenLite.to(masker, 1, {setSize:{height:15}, y:(stage.stageHeight/2)-7.5});

		setPreload();

		TweenLite.to(LT, 1, {y:(stage.stageHeight/2)-7.5, setSize:{width:stage.stageWidth, height:1}});
		TweenLite.to(LB, 1, {y:(stage.stageHeight/2)+7.5, setSize:{width:stage.stageWidth, height:1}});

	 if(loadNext!=null) {
  	TweenLite.to(preloader, 1, {alpha:1, onComplete:loadImage, onCompleteParams:[HOST+"/"+IMAGES[CUR_PHOTO+1].imageName]});
  }
  else  TweenLite.to(preloader, 1, {alpha:1});
}

/******* On time function, load next image ***/
function onTime(evt:TimerEvent):void {
	timex.stop(); //stop the timer so images don't load befor that previous load is complete
	if((CUR_PHOTO+1)>(IMAGES.length-1)) CUR_PHOTO=-1; //if it's the final photo, load next

	if(IMAGE_LOADED==true) { //if it is loaded, reset the lines and load photo after that
		IMAGE_LOADED=false;
		resetLines(HOST+"/"+IMAGES[CUR_PHOTO+1].imageName); //load image after reseting lines
	}
	else {
		loadImage(HOST+"/"+IMAGES[CUR_PHOTO+1].imageName);
	}
}

/*** on php discover response ****/
function onPhpComplete(evt:Event):void {
 	 XmlLoader.load(new URLRequest(HOST+"/"+PhpLoader.data))
}

/*** on xml loaded, build images array ***/
function onXmlComplete(evt:Event):void {
  IMAGES = xml2Array(evt.target.data); //load images into array
  onTime(new TimerEvent(TimerEvent.TIMER)); //load first;
}

/*** tranform xml response into array ****/
function xml2Array(dados:String):Array {
			var menuXML:XML = new XML(dados);
			//just in case
			menuXML.ignoreWhitespace = true;
			//get XML item's entrys
			var XMLItems = menuXML.descendants("image");
			//load all items into an array
			var itemsArray:Array = new Array();
			var itemObj:Object;
			for(var i in XMLItems)
			{
				itemObj=new Object();
				itemObj.imageName=XMLItems[i].@nameI; //save image path into imageName
				itemObj.imageThumb=XMLItems[i].@thumb; //save image thumb path
				itemObj.itemID="image-"+i;
				itemsArray.push(itemObj);
			}
		return itemsArray;
}
Almost done! The main function are all done, we just need to initialize the things up.
Step 12 – Writing initialization code
Just add this after all this code:
setLines();
setControls();
setPreload();
setMasker();
setLoader();

var req:URLRequest = new URLRequest(HOST+"discover.php");
PhpLoader.load(req);
stop();
This will start all the slide and gallery process, you should not get any errors, but if you find some one just say.
Save your file and run your movie.
Step 13 – Allowing fullScreen on HTML
Full screen will into work, we need to make some changes into the published HTML, first of all Publish your project; File->Publish
After this, you will get an HTML file with the same name of your project, you just need to browse the source code of that HTML file, and find (usually) the 3 “allowFullScreen” parameters in the embed code, set all these 3 to “true”;
Save your HTML File, and load it on a browser! Now you have full screen mode available, just click in the arrow’s on bottom.
Final Notes
The first part of this tutorial is now complete, you will have some time to understand the code and why not suggest improvements, some things could be simplified, maybe… but this is up to you. Want to test with your own pictures? Just change the HOST path, and put some pictures on that folder.
If you want the slideshow to read the XML instead auto-discovering the images, just go to the end of the code, and replace this:
var req:URLRequest = new URLRequest(HOST+"discover.php");
req.method = URLRequestMethod.GET;
PhpLoader.load(req);
by this:
var req:URLRequest = new URLRequest(HOST+"images.xml");
XmlLoader.load(req);
And make sure you have the same structure that i have on the XML file. (Step 1).
Create an intelligent XML image Gallery & Slideshow in Flash CS4 (+PHP) – Part II/II
Here is the second part: Create an intelligent XML image Gallery & Slideshow in Flash CS4 (+PHP) – Part II/II

