Create a Card Flip Effect For Flash Player 10 using ActionScript 3
by 11 June, 2008 5:53 pm23
It surprises me that one of the most commented upon and downloaded classes from my blog is a card flipping effect. With that in mind, I thought it might be an interesting exercise to recreate this effect targeting Flash Player 10. As of the writing of this article, Flash Player 10 Beta (Astro) and the corresponding API documentation have been released. This article will step you through the classes used to achieve a card flipping effect using the new rotationY property that exists in Flash Player 10.
Requirements
TextMate or Your Choice of text editor
Flash Player 10
Sample files:
Prerequisites
Before you get started you will need a means by which to publish Flash 10 SWF files. This process involves downloading a nightly build of the Flex 3 SDK. Lee Brimelow of gotoAndLearn.com has a great video tutorial You will also need to make sure that you have the Flash Player 10 Beta installed on your machine. This article also assumes a basic understanding of ActionScript 3. which steps you through the process of downloading and publishing your Flash 10 SWFs.
Getting Started
Let’s take a look at what we are going to be building before we dive into the code. Click on the image below to see the card flip effect (requires Flash Player 10):
Once you have Flash Player 10 installed and have your system setup to publish using the Flex 3 SDK you can get started writing the CardFlip class. Getting started with the class should be easy for those of you familiar with writing ActionScript 3 classes. This article will detail a simple card flip using external image files and external SWF files. To start, we will create the class using image files and then cover the changes that are made to use an external SWF in their place.
First let’s take a look at the classes we will be using in our package:
package{
	import flash.display.Sprite;
	import flash.display.StageQuality;
	import flash.display.Bitmap;
	import flash.events.*;
	import flash.geom.PerspectiveProjection;
	import flash.geom.Point;
	import flash.filters.DropShadowFilter;
	import gs.TweenMax;
As you can see we import a number of classes that will be leveraged to make our class function. Most of these are native classes that you have probably used before with the exception of PerspectiveProject and TweenMax. PerspectiveProject is a class that is new to Flash Player 10, we will get into its usage later.TweenMax is an excellent class which provides easy and efficient tweening for DisplayObject properties and filters. More about TweenMax is available at GreenSock.
Setting up the SWF for the Flex 3 SDK
If you are new to Flex or have not used the Flex SDK you may not have ever worked with Flex Meta Tags. The following code is pretty self-explanatory and is used to setup the stage for our SWF since we are not creating this content in FlexBuilder or the Flash IDE.
[SWF(width="600",height="400",backgroundColor="#FFFFFF",framerate="30")]
Creating the Class
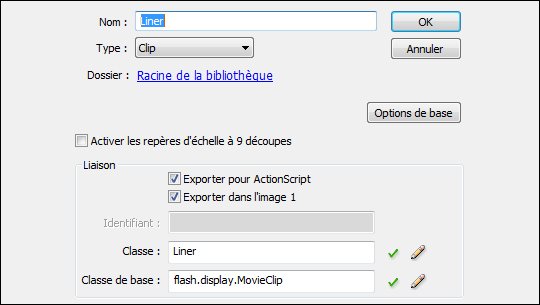
Now that our stage has been setup we can start writing the class and defining our variables. In the example below you will see that I am using additional Flex Meta Tags. In this case I am using the Embed Meta Tag.This will allow me to import external assets into my SWF at compile time. In the example below I import front.jpg and back.jpg. On the line following each of the Embed Meta Tags I create a variable to hold a reference to the external assets. As you can see, the variables defined, CardFrontBitmap and CardBackBitmap are data typed as Class. This will allow me to easily create new instances of these items from within my class. In the code below you will also see variables defined to hold our images, drop shadow, rotation values and which side of the card is being viewed.
public class CardFlip extends Sprite{
[Embed(source='front.jpg')]
	public var CardFrontBitmap:Class;
	[Embed(source='back.jpg')]
	public var CardBackBitmap:Class;

	private var card:Sprite;
	private var cardFront:Sprite;
	private var cardBack:Sprite;
	private var cfb:Bitmap;
	private var cbb:Bitmap;

	private var ds:DropShadowFilter;

	private var cardRotationFront:Number = 0;
	private var cardRotationBack:Number = 45;
	private var side:String = "front";
Creating the Constructor
Now that our variables are out of the way we can setup the constructor for the class. Initially we setup our stage to keep our content from scaling. Next, we create a new DropShadowFilter to be used on our card to help achieve the effect of the card flipping. I also create a new Sprite named card, it will be used to hold all of the Sprites and external images that we will be using in the class.
public function CardFlip(){
	stage.quality = StageQuality.BEST;
	stage.scaleMode = "noScale";
	stage.showDefaultContextMenu = false;
	stage.align = "TL";

	ds = new DropShadowFilter(10, 45, 0x000000, 0.5, 5, 5, 1, 3, false, false, false);

	card = new Sprite();
	card.filters = [ds];
Remember the variables we set when we created our Embed Meta Tags? Now is the time to use them. Here I assign the variables cfb (which I made stand for “Card Front Bitmap”) and cbb (“Card Back Bitmap”) to new instances of our CardFrontBitmap and CardBackBitmap class. The cfb and cbb variables are bitmaps so that they are able to easily load in my external image files.
I want my card to have its registration point in the middle of itself instead of having a 0x and 0y registration.In order to do that I offset the position of cfb and cbb by half of their width and height. You will also notice that I set the scaleX property of the cbb to -1. This flips the image horizontally so that the back of the card appears correctly when the card is flipped. Had I not set the scaleX property here, the back of the card would appear flipped horizontally and the text would be backwards reading from right to left.
Once all of my properties are set I add cfb and cbb to two Sprite containers. I named the sprites cardFront and cardBack. I add these Sprites to the card Sprite I created earlier. You will also notice that I then initially set the visibility to false for the back of the card since we don’t need to see that yet.
cfb = new CardFrontBitmap();
	cfb.x = (cfb.width/2)*-1
	cfb.y = (cfb.height/2)*-1

	cardFront = new Sprite();
	cardFront.addChild(cfb);
	card.addChild(cardFront);

	cbb = new CardBackBitmap();
	cbb.scaleX = -1;
	cbb.x = (cbb.width/2);
	cbb.y = (cbb.height/2)*-1

	cardBack = new Sprite();
	cardBack.addChild(cbb);
	cardBack.visible = false;
	card.addChild(cardBack);
Now that we have our external images created and card face Sprites created and added to our card Sprite, we can add the card Sprite to the Display List. I pushed the x and y properties to 200 just to get my card away from the edge of the stage a bit. I also update the initial rotation of the card to my cardRotationFront variable that I defined.
addChild(card);
	card.x = 200;
	card.y = 200;

card.rotation = cardRotationFront;
Setting the PerspectiveProjection
PerspectiveProjection is new in Flash Player 10. Basically it works somewhat like a 3D camera. It will control the perspective in which we are looking at a give object. PersepectiveProjection defaults to the origin of the parent container. If we did not change our PerspectiveProjection projectionCenter, the card would not appear to be flipped when we set the rotationY property to 180. In order to make sure that we are looking dead center on the card from the front we set the perspectiveProjection projectionCenter to 200x and 200y so that it matches the location to which we have moved the card Sprite to on the stage. You can learn more about PerspectiveProjection by reading the Flash Player 10 API Documentation.
this.transform.perspectiveProjection.projectionCenter = new Point(200,200);
this.transform.perspectiveProjection.fieldOfView = 45;
Creating and Assigning the Flip
To finish off the constructor I add an event to the card Sprite that will call the flip method whenever the card is clicked.
card.addEventListener(MouseEvent.MOUSE_DOWN,flip)
}
Now that we have the flip method being called we can create the flip method itself. The flip method is a pretty basic function. It contains a basic switch statement which checks to see which side of the card we are currently viewing. Once that is determined, it uses the TweenMax class to handle several property changes.The beautiful thing about TweenMax is that it allows us to update multiple properties and filters in one call.If you are unfamiliar with the usage of TweenMax you can rad up on it at GreenSock.
In the flip method below, you will see that for flipping to the back we set the new rotationY property to 180, rotate the card to the specified rotation and modify the drop shadow. The same logic applies in the case of flipping the card from the back to the front again.
In addition to changing the properties mentioned above, we also created a parameter called onUpdate. This allows us to call a function every time the property values have been changed through the cycle of the tween. In this case, we call the setSideVisibility method which we will discuss next.
public function flip(e:MouseEvent):void{
			switch(side){
				case "front":
				side = "back";
				TweenMax.to(card, 1, {rotationY:180,rotation:cardRotationBack,onUpdate:setSideVisibility,dropShadowFilter:{blurX:5, blurY:5, alpha:0.5, distance:-10}});
				break;
				case "back":
				side = "front";
				TweenMax.to(card, 1, {rotationY:0,rotation:cardRotationFront,onUpdate:setSideVisibility,dropShadowFilter:{blurX:5, blurY:5, alpha:0.5, distance:10}});
				break;
			}
		}
Determining Which Side of the Card to Make Visible:
At this point all of the heavy lifting is done. All we need to do is determine which side of the card to show at any given point. This could be done any number of ways; I choose to keep it simple and change the visibility of the card face whenever the very edge of the card is being viewed. In the code below I look for a 90 degree angle in the tween cycle and use that opportunity to swap the visibility of my card faces.
private function setSideVisibility():void{
			if(card.rotationY >= 90){
				cardBack.visible = true;
			}else if(card.rotationY < 90){
				cardBack.visible = false;
			}
		}
	}
}
Wrapping Up and Using External SWFs
So, for the most part this is a pretty simple class to write and implement. It could easily be modified to suit whatever need you may have. To wrap up I thought it might be useful to show you a quick example of how you would use external SWF files in the card flip and use an object other than the card itself to call the flip method. The full class for this example is in the resources zip file for this article so I will only go into some of the basic modifications to the class above that I made.
Really, only two simple changes allow me to import external SWF files for use in the card flip. Take a look at the result below and scroll down to see the changes made:
The first change was a simple one, we simply need to change the source our oEmbed Meta Tags to load the SWFs:
[Embed(source='helloCardFront.swf')]
		public var CardFrontSWF:Class;
		[Embed(source='helloCardBack.swf')]
		public var CardBackSWF:Class;
		[Embed(source='flipButton.swf')]
		public var FlipButton:Class;
The next change is just as simple, we just need change cfb and cbb to Sprites instead of Bitmaps:
private var cfb:Sprite;
private var cbb:Sprite;
Again, the full version of the card flip using both SWFs and images is available in the resources zip for this article. It will be much easier to view them in your text editor in their full glory.
Conclusion
Well, that pretty much sums it up. Flash Player 10 looks like it is going to provide developers with a lot of new toys! As always, I would love to see any updates or creations you make using this class! Please shoot me a comment to show me your experiments and findings!
Related posts

Effects / by - 14 January, 2012 5:55 pm
Learn Digital Painting in Photoshop
It’s impossible for everyone to become an artist, but many of them have a will to become an artist, to draw beautiful paintings but again due to lack of command…

Effects / by - 28 December, 2011 2:28 pm
How to Make a New Year Greeting Card in Photoshop
This is so much easy to go in a market and by paying some bucks; purchasing a New Year Greeting Card or any other festival card for your loving person…

Flash / by - 10 August, 2011 4:13 pm
Creating a Gallery in Flash Using the Moto CMS Component
In this tutorial we will create a gallery with the help of the Moto CMS Component. I think many of you have heard about (or even worked with) Moto Flash…

3D / by - 24 July, 2011 5:21 pm
Visualize Your Web Page in 3D
Ever wondered if you could visualize your website in 3D? Well, here’s one such Firefox extension that allows you to do so. Tilt is a Firefox add-on that lets you visualize any web page DOM and provides the relationship between various parts of a website in 3D.

Interfaces / by - 1 March, 2011 2:18 pm
Beginners Guide To User Interface Design in C#
User Interface Design in C# Windows Form Application From Scratch In this C Sharp tutorial you will learn user interface design in C# application. This step-by-step tutorial will help you deeply understand…
Effects / by - 1 December, 2010 2:34 pm
Create an intelligent XML image Gallery & Slideshow in Flash CS4 (+PHP) – Part II/II
In this second part article you will learn how to build an image gallery that will load images from a web server. I decide to call it “Intelligent” because you don’t need to configure any XML or flash file. Just put the Flash movie and the images on a server and they will be loaded automatically. Nice ah?
Flex / by - 29 May, 2010 2:56 pm
Connecting Flex Calendar With Database Using AMF-PHP
Connecting Flex Calendar with Database using AMF-PHP Part I: Create a Dynamic Event Calendar in Flex Builder 3 with Actionscript 3.0 This is Part II of Create a Dynamic Event…
Server Side / by - 13 April, 2010 2:39 pm
CodeIgniter Tutorial – CodeIgniter Explained
Hello everyone, and welcome to the first CodeIgniter tutorial. What will you learn? 1. What is a PHP Framework? 2. What is CodeIgniter? 3. What is MVC? 4. MVC Pattern…

3D / by - 20 March, 2010 10:00 am
Away3D Shoot’em’Up Tutorial – Powerups
In this article we add some powerups to the game.

3D / by - 15 February, 2010 3:59 pm
Away3D Shoot’em’Up Tutorial – Sound Effects
In this article we add some sound effects to the game.
3D / by - 28 July, 2009 1:00 pm
Create from Scratch a Away3D Shoot’em’Up Game: Part 4
Now that we have the player and some enemies we need for them to be able to interact. This is done through collision detection which you will learn in this fourth part.

Effects / by - 21 July, 2009 1:00 pm
Getting Started With BetweenAS3
There are many popular open source tweening engines in the Flash community today. Numbered among these are Tweener, TweenLite/Tweenmax, Tweensy, and GTween. This is a short look at the capabilities of newcomer to the scene: BetweenAS3. BetweenAS3 is the tweening engine brainchild of Yoshihiro (yossy) Shindo and is available as part of the Spark project (i.e. it is brought to us by one of the same group that brought the world the FLARToolkit for Augmented Reality in Flash and countless other goodies).
3D / by - 15 July, 2009 12:50 pm
Create from Scratch a Away3D Shoot’em’Up Game: Part 3
After you have created the 3D level, in the part 3 of this Away3D series, we will show you how to add the player spacecraft and enemies.
Effects / by - 13 July, 2009 12:30 pm
Create an intelligent XML image Gallery & Slideshow in Flash CS4 (+PHP) – Part I/II
In this article you will learn how to build an image gallery that will load images from a web server. I decide to call it “Intelligent” because you don’t need to configure any XML or flash file. Just put the Flash movie and the images on a server and they will be loaded automatically. Nice ah?
3D / by - 8 July, 2009 1:45 pm
Create from Scratch a Away3D Shoot’em’Up Game: Part 2
In the part 1 of these tutorial series articles we created a framework that we could build off to start making the actual game. Now it’s time to create a 3D level for the player to fly through.
3D / by - 6 July, 2009 12:50 pm
Create from Scratch a Away3D Shoot’em’Up Game: Part 1
Today we start a 9 part tutorial series on creating a Shoot’em’Up game. We will cover all the necessary topics to create it from scratch, which will help you to understand and apply these guidelines to other projects. Ath this first part. we look at getting the Away3D engine up and running by creating a UIComponent that will contain and initialize the necessary Away3D components.
Effects / by - 1 July, 2009 1:00 pm
Build a Creative “Swirl Animated Menu” with Flash CS4
Flash it’s a powerful application and can be really complex, but even beginners can create a cool menu for demonstration or for use in a personal site. The menu that we will create is simple, but the swirl animation is something that you don’t see everywhere, for that I’ve decided to explain one way to make an animation of growing swirls without any Action Script code.You will also learn how to import artwork from illustrator where I’ve pre-made the graphics, the work is very simple and the result will be very cool.
Flash / by - 29 June, 2009 12:00 pm
SWFObject and Best Practice Implementation
With more and more full screen Flash web sites appearing on the internet, it’s important to understand how to properly embed the Flash movie in the browser window.
In this tutorial we will cover best practice embedding of SWF movies using SWFObject with a custom function for adding browser scrollbars for smaller browser windows.
3D / by - 24 June, 2009 12:30 pm
Create a 3D Bowling Game with JiglibFlash and Papervision 3D
Possibly the hottest thing to hit the Flash community since the advent of several excellent 3D engines is the recent debut of 3D physics engines. Here we’ll examine a way of using one of the more popular 3D engines, JiglibFlash, in conjunction with the prominent 3D engine Papervision3D to create a bowling game.
Flex / by - 22 June, 2009 1:00 pm
Create a Dynamic Event Calendar in Flex Builder 3 with Actionscript 3.0
This tutorial will allow readers to create an Event Calendar application using Flex. The final user will be able to plan over a daily, weekly or monthly plan.
You will learn on this step by step Flex tutorial, to create from scratch those Graphic User Interfaces, integrate them, and create a complete Rich Internet Application with a professional look.


