Learn How-to Create Flash Components using Actionscript 3.0, XML and Flickr API
by 22 April, 2009 1:30 pm44
This tutorial will allow you to learn to create custom Flash Components using Actionscript 3.0. I have opted an image gallery component where we would show thumbnails of various images and user could see respective enlarged image by clicking any of the thumbnail. I have used FlickR image search to show various images using this component.
Requirements


Pre-Requisites
This tutorial assumes that you have fair knowledge of OOPs, Flash, Actionscript 3 and flash authoring framework. You know basic concept of writing a Class file which could use inheritance, polymorphism etc.
Step1: Getting Started
Before starting with the tutorial have a look what we are going to achieve from this tutorial, click on the View Demo button.
Lets start with the creating basic movieclip which will be used for making the Image Gallery component. At the very start you need to just follow below steps for creating various movieclips:-
- In Flash CS3, open a new blank file and save it as “CustomImageGallery.fla” to your desired location.
- Create a empty movieclip and name it “CustomImageGallery”.
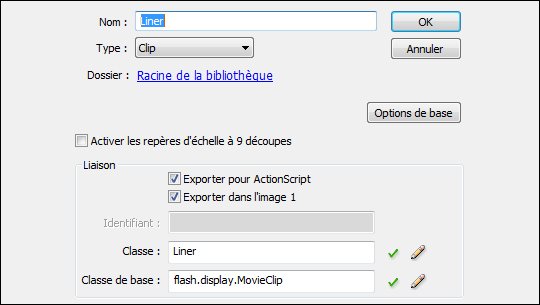
- Open Library panel and select “CustomImageGallery” do right click on selected symbol and select “Linkage” from the drop down menu.
- In “Linkage Properties” panel select “Export for ActionScript” and “Export in first frame” checkboxes.
- Type “CustomImageGallery” in Class and “flash.display.MovieClip” in Base Class hence it would look like below screen-shot:
- Click OK.
- Now lets start with the next step which is writing a class for this component and link this class to “CustomImageGallery” movieclip.

Figure 1.2: Linkage Properties Panel
Step 2: Start writing a Class file for the component
Create a new Class file and save it as “CustomImageGallery.as”, you have to save this file in the same folder where you saved your FLA file. Below is the code of starting with class file which I assume everybody knows to how to declare a class.
package
{
	public class CustomImageGallery extends MovieClip
	{
		public function CustomImageGallery() :void
		{
		}
	}
}
Step3: Adding Metadata to the Class
Something about metadata tags
You can add component metadata tags in your external ActionScript class files to tell the compiler about component parameters, data binding properties, and events. Metadata tags are used in the Flash authoring environment for a variety of purposes but in our case we will use it only for defining component’s parameters.
In the following example, the Inspectable tags apply to the Width parameter of the component:
[Inspectable(name="Width", type=Number, defaultValue=100)]

public var intWidth:Number;
In the Property inspector and the Parameters tab of the Component inspector, Flash displays all of above parameters as type Number. When we associate this class with our component, the component parameter box should look like below image.

Figure 3.1: Component Parameters Panel
Lets learn something about getter and setter properties
A getter is a function with a return value depending on what we return. In our example we return a string. A setter has always one parameter, since we give a variable a new value through the parameter. That means getter/setter could be accessed like we access public variables but in addition to that we could have use them as a function where could have more than a single line of code get executed whenever a property of class is accessed. Below example will help you to understand it properly
// setter property

public function set dataProvider(_dataProvider:Array)
{

}

// getter property

public function get dataProvider():Array
{

}
We will use these getter/setter properties as parameters for our component that means we need to add Inspectable tag in the class file for these properties.
Lets add metadata tags to our class
We will add three metadata tags to our class which will allow component to display them in the parameters panel of the component but prior to that we need to declare required variables in the Class file these variables will be used by component’s parameters.
private var m_intImageCount:int = 3;
private var m_intThumbWidth:int = 100;
private var m_intThumbHeight:int = 100;
I have provided default values to these variables because these values will be used in core logic of the component. Now lets put some Inspectable tags along with getter/setter properties to our class
public function set dataProvider(_dataProvider:Array)
{
	m_dataProvider = _dataProvider;
	generateGallery();
}

public function get dataProvider():Array
{
	return m_dataProvider;
}

[Inspectable(name="Paging Size", type= Number, defaultValue= 3)]
public function set imgCount(_imgcCount:int)
{
	m_intImageCount = _imgcCount;
}

public function get imgCount():int
{
	return m_intImageCount;
}

[Inspectable(name="Thumbnail Width", type= Number, defaultValue= 100)]
public function set thumbWidth(_thumbWidth:int)
{
	m_intThumbWidth = _thumbWidth;
}

public function get thumbWidth():int
{
	return m_intThumbWidth;
}

[Inspectable(name="Thumbnail Height", type= Number, defaultValue= 100)]
public function set thumbHeight(_thumbHeight:int)
{
	m_intThumbHeight = _thumbHeight;
}

public function get thumbHeight():int
{
	return m_intThumbHeight;
}
Step 4: Link the Class file with component so all parameters will be visible in Parameter panel
Till now we have added only parameters in Class file so they will display not display in Flash inside component parameters panel. To make it happen we have to link the Class file with the component using component’s definition panel but before that lets have a final look at the Class as your class should look like below code as per whatever we have added to it till now
package
{
	public class CustomImageGallery extends MovieClip
	{
		private var m_dataProvider:Array;
		private var m_intImageCount:int = 3;
		private var m_intThumbWidth:int = 100;
		private var m_intThumbHeight:int = 100;

		public function CustomImageGallery() :void
		{

		}

		private function generateGallery() :void
		{

		}

		/**
		 * Class Properties
		 */
		public function set dataProvider(_dataProvider:Array)
		{
			m_dataProvider = _dataProvider;
			generateGallery();
		}

		public function get dataProvider():Array
		{
			return m_dataProvider;
		}

		[Inspectable(name="Paging Size", type= Number, defaultValue= 3)]
		public function set imgCount(_imgcCount:int)
		{
			m_intImageCount = _imgcCount;
		}

		public function get imgCount():int
		{
			return m_intImageCount;
		}

		[Inspectable(name="Thumbnail Width", type= Number, defaultValue= 100)]
		public function set thumbWidth(_thumbWidth:int)
		{
			m_intThumbWidth = _thumbWidth;
		}

		public function get thumbWidth():int
		{
			return m_intThumbWidth;
		}

		[Inspectable(name="Thumbnail Height", type= Number, defaultValue= 100)]
		public function set thumbHeight(_thumbHeight:int)
		{
			m_intThumbHeight = _thumbHeight;
		}

		public function get thumbHeight():int
		{
			return m_intThumbHeight;
		}
	}
}
To link it with the component select component from the Library panel and do right click on it then select “Component Definition” from the drop down menu you would have following screen shot

Figure 4.1: Component Definition Panel (with no parameters)
In Class textbox write the name of your Class file in our case this text should be “CustomImageGallery”. Click OK. Once again open “Component Definition” panel using right click drop down menu you would see a similar screen like below image.

Figure 4.2: Component Definition Panel (with parameters)
Now we are ready to write a logical code for achieving our mission of populating the component with image based gallery.
Step 5: Add design elements and preloader in component
I have created three movieclips:
- An animated preloader which will be shown while loading an image this movieclip has a linkage with the name of “mcLoaderAnim” and
- A simple arrow button which will be used for loading next or previous set of images. This movieclip has a linkage with the name of “mcArrowButton”.
- A preview graphic which will be hidden when we publish the component, this graphic is used to show something when a user place component on the stage so he/she would have idea about the placement of the component. This movieclip has an instance named defined as “mcPreview”.
I included first 2 movieclips on timeline of the component on 2nd frame and 3rd movieclip on the 1st frame of the component. We included all these movieclips in the component so whenever this component is used in any other file in that case these graphics should travel as part of the component. In addition we have written “stop();” on 1st frame of timeline so component will always stays on first frame and never will show design elements placed on 2nd frame.
Step 6: Add core logic of populating images in the component
Assuming that you know about coding logic’s and structure here the core code which will read “dataProvider” property and generates image gallery.
private function generateGallery() :void
{
	if(dataProvider != null)
	{
		removeChildren (this);
		var bigImageContainer:MovieClip = new MovieClip ();
		var imgBox:Sprite = new Sprite ();
		var imgLoaderAnim:MovieClip = new mcLoaderAnim ();
		var imgContainer:Loader = new Loader ();
		var txtPageNumber:TextField = new TextField ();
		m_thumbnailsHolder = new MovieClip ();
		m_mcLeftArrow = new mcArrowButton ();
		m_mcRightArrow = new mcArrowButton ();

		var filter:BitmapFilter = getBitmapGlowFilter();
		var arrGlowFilter:Array = new Array();

		this.addChild (bigImageContainer);
		this.addChild (m_mcLeftArrow);
		this.addChild (m_mcRightArrow);
		this.addChild (m_thumbnailsHolder);
		this.addChild (txtPageNumber);

		bigImageContainer.addChild (imgBox);
		bigImageContainer.addChild (imgContainer);
		bigImageContainer.addChild (imgLoaderAnim);

		imgLoaderAnim.visible = false;

		bigImageContainer.x = thumbWidth + 20;

		imgBox.graphics.beginFill (m_intBaseColor, 1);
		imgBox.graphics.drawRect (0, 0, (m_intBigImageBaseWidth), (m_intBigImageBaseHeight));
		imgBox.graphics.endFill ();

		arrGlowFilter.push (filter);
		imgBox.filters = arrGlowFilter;

		imgLoaderAnim.x 		= (bigImageContainer.width / 2) - (imgLoaderAnim.width / 2);
		imgLoaderAnim.y 		= (bigImageContainer.height / 2) - (imgLoaderAnim.height / 2);

		imgContainer.contentLoaderInfo.addEventListener (Event.COMPLETE, onBigImageLoadComplete);
		imgContainer.contentLoaderInfo.addEventListener (IOErrorEvent.IO_ERROR, onBigImageLoadError);

		m_mcLeftArrow.y = ((thumbHeight + m_intExtraThumbSpace + m_intSpaceBetweenThumbs) * imgCount) + 5;
		m_mcLeftArrow.x = m_mcLeftArrow.width;
		m_mcLeftArrow.rotation = 180;
		m_mcLeftArrow.buttonMode = true;
		m_mcLeftArrow.addEventListener (MouseEvent.CLICK, onLeftArrowClick);

		m_mcRightArrow.y = ((thumbHeight + m_intExtraThumbSpace  + m_intSpaceBetweenThumbs) * imgCount) + 5;
		m_mcRightArrow.x = (thumbWidth  + m_intExtraThumbSpace) - m_mcRightArrow.width;
		m_mcRightArrow.buttonMode = true;
		m_mcRightArrow.addEventListener (MouseEvent.CLICK, onRightArrowClick);

		txtPageNumber.x = m_mcLeftArrow.x;
		txtPageNumber.width = m_mcRightArrow.x - m_mcLeftArrow.width;
		txtPageNumber.height = m_intTextCounterheight;
		txtPageNumber.y = m_mcRightArrow.y - m_mcRightArrow.height / 2;

		createThumbNails (0);
		m_intCurrentImageCount = 0;
	}
}
private function createThumbNails(_intStartCounter:int) :void
{
	var intThumbnailYPos:int = 0;
	var bigImageContainer:MovieClip = new MovieClip();
	var imgBox:Sprite = new Sprite ();
	var imgLoaderAnim:MovieClip = new mcLoaderAnim ();
	var imgContainer:Loader = new Loader ();
	var filter:BitmapFilter = getBitmapGlowFilter();
	var arrGlowFilter:Array = new Array ();
	arrGlowFilter.push (filter);
	removeChildren (m_thumbnailsHolder);
	for(var i:int = _intStartCounter; i < (_intStartCounter +  imgCount); i++)
	{
		if(typeof(dataProvider[i]) == "object" && i < dataProvider.length)
		{
			var thumbContainer:MovieClip = new MovieClip ();
			var objURLRequest:URLRequest = new URLRequest (dataProvider[i].url);
			imgLoaderAnim = new mcLoaderAnim ();
			imgContainer = new Loader ();
			imgBox = new Sprite ();

			m_thumbnailsHolder.addChild (thumbContainer);
			thumbContainer.addChild (imgBox);
			thumbContainer.addChild (imgContainer);
			thumbContainer.addChild (imgLoaderAnim);

			imgBox.graphics.beginFill (m_intBaseColor, 1);
			imgBox.graphics.drawRect (0, 0, (thumbWidth + m_intExtraThumbSpace), (thumbHeight  + m_intExtraThumbSpace));
			imgBox.graphics.endFill ();

			imgBox.filters = arrGlowFilter;

			thumbContainer.y 		= intThumbnailYPos;
			imgLoaderAnim.x 		= (thumbContainer.width / 2) - (imgLoaderAnim.width / 2);
			imgLoaderAnim.y 		= (thumbContainer.height / 2) - (imgLoaderAnim.height / 2);

			intThumbnailYPos 	+= (thumbContainer.height + m_intSpaceBetweenThumbs);

			thumbContainer.data = dataProvider[i];
			thumbContainer.buttonMode = true;
			imgContainer.addEventListener (MouseEvent.CLICK, onImageClick);
			imgContainer.contentLoaderInfo.addEventListener (Event.COMPLETE, onImageLoadComplete);
			imgContainer.contentLoaderInfo.addEventListener (IOErrorEvent.IO_ERROR, onImageLoadError);

			imgContainer.load (objURLRequest);
		}
	}

	resetButtonStates ();
	setPageCount ();
}
private function getBitmapGlowFilter ():BitmapFilter
{
	var color:Number = m_intGlowColor;
	var alpha:Number = 0.8;
	var blurX:Number = 7;
	var blurY:Number = 7;
	var strength:Number = 2;
	var inner:Boolean = false;
	var knockout:Boolean = false;
	var quality:Number = BitmapFilterQuality.HIGH;

	return new GlowFilter(color,
						  alpha,
						  blurX,
						  blurY,
						  strength,
						  quality,
						  inner,
						  knockout);
}

private function removeChildren(_mcContainer:MovieClip) :void
{
	for (var i:int = 0; i < _mcContainer.numChildren; i++ )
	{
		_mcContainer.removeChildAt (i);
	}
}

private function loadBigImage(_objData:Object):void
{
	var objBigImageContainer:MovieClip = MovieClip (this.getChildAt (0));
	var objBigImageLoader:Loader = Loader (objBigImageContainer.getChildAt (1));
	var objBigImageLoaderAnim:MovieClip = MovieClip (objBigImageContainer.getChildAt (2));
	objBigImageLoaderAnim.visible = true;
	objBigImageLoaderAnim.x = (objBigImageContainer.width / 2) - (objBigImageLoaderAnim.width / 2);
	objBigImageLoaderAnim.y = (objBigImageContainer.height / 2) - (objBigImageLoaderAnim.height / 2);
	objBigImageLoader.load (new URLRequest(_objData.bigURL));
}

private function resetButtonStates():void
{
	m_mcLeftArrow.enabled = true;
	m_mcLeftArrow.alpha = 1;

	m_mcRightArrow.enabled = true;
	m_mcRightArrow.alpha = 1;

	if (m_intCurrentImageCount == 0)
	{
		m_mcLeftArrow.enabled = false;
		m_mcLeftArrow.alpha = .5;
	}

	if (m_intCurrentImageCount >= dataProvider.length - imgCount)
	{
		m_mcRightArrow.enabled = false;
		m_mcRightArrow.alpha = .5;
	}
}

private function setPageCount() :void
{
	var txtPageNumber:TextField = TextField (this.getChildAt (4));
	var txtFormat:TextFormat = new TextFormat ();
	var intPageCount:int = m_intCurrentImageCount / imgCount;
	var intTotalPageCount:int = Math.round(dataProvider.length / imgCount);
	txtPageNumber.selectable = false;

	intPageCount++;
	txtPageNumber.text =  intPageCount + " / " + intTotalPageCount;

	txtFormat.align = "center";
	txtFormat.bold = true;
	txtFormat.font = "Arial";
	txtFormat.size = 12;

	txtPageNumber.setTextFormat (txtFormat);
}

/**
 * Event Listeners
 */

private function onImageClick(e:MouseEvent) :void
{
	var objLoader:Loader = Loader (e.target);
	var objThumbContainer:MovieClip = MovieClip (objLoader.parent);

	loadBigImage (objThumbContainer.data);
}

private function onImageLoadComplete(e:Event):void
{
	var objLoader:Loader = Loader (e.target.loader);
	var objThumbContainer:MovieClip = MovieClip (objLoader.parent);
	var imgLoaderAnim:* = objThumbContainer.getChildAt (2);
	imgLoaderAnim.visible = false;

	objLoader.width = thumbWidth;
	objLoader.height = thumbHeight;

	objLoader.x = (objThumbContainer.width / 2) - (objLoader.width / 2);
	objLoader.y = (objThumbContainer.height / 2) - (objLoader.height / 2);
}

private function onImageLoadError(e:IOErrorEvent) :void
{

}

private function onBigImageLoadComplete(e:Event):void
{
	var objLoader:Loader = Loader (e.target.loader);
	var objImageContainer:MovieClip = MovieClip (objLoader.parent);
	var objBaseImage:* = objImageContainer.getChildAt (0);
	var imgLoaderAnim:* = objImageContainer.getChildAt (2);
	imgLoaderAnim.visible = false;

	objBaseImage.width = objLoader.width + m_intExtraThumbSpace;
	objBaseImage.height = objLoader.height + m_intExtraThumbSpace;

	objLoader.x = (objImageContainer.width / 2) - (objLoader.width / 2);
	objLoader.y = (objImageContainer.height / 2) - (objLoader.height / 2);
}

private function onBigImageLoadError(e:IOErrorEvent) :void
{

}

private function onLeftArrowClick(e:MouseEvent) :void
{
	if (e.target.enabled)
	{
		m_intCurrentImageCount -= imgCount;
		createThumbNails (m_intCurrentImageCount);
	}
}

private function onRightArrowClick (e:MouseEvent):void
{
	if (e.target.enabled)
	{
		m_intCurrentImageCount += imgCount;
		createThumbNails (m_intCurrentImageCount);
	}
}
Step 7: Lets try our component by pulling out some images from FlickR and provide them as dataProvider to the component
To connect with FlickR first of all your would require a API key which you could get here.Now drag the component on the stage and lets put instance name as “compImageGallery”, use below code to connect with FlickR and provide a dataProvider to the component. Keep in mind you have to put your API key against to “apiKey” variable.
// search method for connecting FlickR
var method:String = "flickr.photos.search";

// API key, you must provide it to connect with FlickR
var apiKey:String = "Your API Key";

// which keyword you want to search on FlickR
var keyword:String = "new york night";

var arrImageData:Array = new Array();
var xmlFlickR:XML = new XML();
var strURL:String = "http://api.flickr.com/services/rest/?method=" + method + "&api_key=" + apiKey + " &tags=" + keyword;
var objFlickrURL:URLRequest = new URLRequest(strURL);
var objLoader:URLLoader = new URLLoader(objFlickrURL);
objLoader.addEventListener(Event.COMPLETE, onDataLoadComplete);

function onDataLoadComplete(e:Event):void
{
	xmlFlickR = XML(objLoader.data);
	var xmlImages:XMLList = xmlFlickR.photos.*;
	for(var i:int=0; i < xmlImages.length(); i++)
	{
		var objImg:XML = xmlImages[i];
		var imgPath:String = "http://farm"+objImg.@farm+".static.flickr.com/"+objImg.@server+"/"+objImg.@id+"_"+objImg.@secret+"_s.jpg";
		var imgBigPath:String = "http://farm"+objImg.@farm+".static.flickr.com/"+objImg.@server+"/"+objImg.@id+"_"+objImg.@secret+".jpg";

		arrImageData.push({label: objImg.@title, url: imgPath, bigURL: imgBigPath});
	}
	compImageGallery.dataProvider = arrImageData;
}
Conclusion
Well, I am sure that now you have the knowledge about “How to create a Flash Components” in actionscript 3.0. There are some advance topic related to Flash Components like providing a “Live Preview”, “Adding events through metadata” and more but I think to learn those you must try it by yourself and if you would require some help from me you could always contact me through my website http://www.ankur-arora.com or shoot me a comment.
Related posts

Effects / by - 14 January, 2012 5:55 pm
Learn Digital Painting in Photoshop
It’s impossible for everyone to become an artist, but many of them have a will to become an artist, to draw beautiful paintings but again due to lack of command…

Effects / by - 28 December, 2011 2:28 pm
How to Make a New Year Greeting Card in Photoshop
This is so much easy to go in a market and by paying some bucks; purchasing a New Year Greeting Card or any other festival card for your loving person…

Flash / by - 10 August, 2011 4:13 pm
Creating a Gallery in Flash Using the Moto CMS Component
In this tutorial we will create a gallery with the help of the Moto CMS Component. I think many of you have heard about (or even worked with) Moto Flash…

3D / by - 24 July, 2011 5:21 pm
Visualize Your Web Page in 3D
Ever wondered if you could visualize your website in 3D? Well, here’s one such Firefox extension that allows you to do so. Tilt is a Firefox add-on that lets you visualize any web page DOM and provides the relationship between various parts of a website in 3D.

Interfaces / by - 1 March, 2011 2:18 pm
Beginners Guide To User Interface Design in C#
User Interface Design in C# Windows Form Application From Scratch In this C Sharp tutorial you will learn user interface design in C# application. This step-by-step tutorial will help you deeply understand…
Effects / by - 1 December, 2010 2:34 pm
Create an intelligent XML image Gallery & Slideshow in Flash CS4 (+PHP) – Part II/II
In this second part article you will learn how to build an image gallery that will load images from a web server. I decide to call it “Intelligent” because you don’t need to configure any XML or flash file. Just put the Flash movie and the images on a server and they will be loaded automatically. Nice ah?
Flex / by - 29 May, 2010 2:56 pm
Connecting Flex Calendar With Database Using AMF-PHP
Connecting Flex Calendar with Database using AMF-PHP Part I: Create a Dynamic Event Calendar in Flex Builder 3 with Actionscript 3.0 This is Part II of Create a Dynamic Event…
Server Side / by - 13 April, 2010 2:39 pm
CodeIgniter Tutorial – CodeIgniter Explained
Hello everyone, and welcome to the first CodeIgniter tutorial. What will you learn? 1. What is a PHP Framework? 2. What is CodeIgniter? 3. What is MVC? 4. MVC Pattern…

3D / by - 20 March, 2010 10:00 am
Away3D Shoot’em’Up Tutorial – Powerups
In this article we add some powerups to the game.

3D / by - 15 February, 2010 3:59 pm
Away3D Shoot’em’Up Tutorial – Sound Effects
In this article we add some sound effects to the game.
3D / by - 28 July, 2009 1:00 pm
Create from Scratch a Away3D Shoot’em’Up Game: Part 4
Now that we have the player and some enemies we need for them to be able to interact. This is done through collision detection which you will learn in this fourth part.

Effects / by - 21 July, 2009 1:00 pm
Getting Started With BetweenAS3
There are many popular open source tweening engines in the Flash community today. Numbered among these are Tweener, TweenLite/Tweenmax, Tweensy, and GTween. This is a short look at the capabilities of newcomer to the scene: BetweenAS3. BetweenAS3 is the tweening engine brainchild of Yoshihiro (yossy) Shindo and is available as part of the Spark project (i.e. it is brought to us by one of the same group that brought the world the FLARToolkit for Augmented Reality in Flash and countless other goodies).
3D / by - 15 July, 2009 12:50 pm
Create from Scratch a Away3D Shoot’em’Up Game: Part 3
After you have created the 3D level, in the part 3 of this Away3D series, we will show you how to add the player spacecraft and enemies.
Effects / by - 13 July, 2009 12:30 pm
Create an intelligent XML image Gallery & Slideshow in Flash CS4 (+PHP) – Part I/II
In this article you will learn how to build an image gallery that will load images from a web server. I decide to call it “Intelligent” because you don’t need to configure any XML or flash file. Just put the Flash movie and the images on a server and they will be loaded automatically. Nice ah?
3D / by - 8 July, 2009 1:45 pm
Create from Scratch a Away3D Shoot’em’Up Game: Part 2
In the part 1 of these tutorial series articles we created a framework that we could build off to start making the actual game. Now it’s time to create a 3D level for the player to fly through.
3D / by - 6 July, 2009 12:50 pm
Create from Scratch a Away3D Shoot’em’Up Game: Part 1
Today we start a 9 part tutorial series on creating a Shoot’em’Up game. We will cover all the necessary topics to create it from scratch, which will help you to understand and apply these guidelines to other projects. Ath this first part. we look at getting the Away3D engine up and running by creating a UIComponent that will contain and initialize the necessary Away3D components.
Effects / by - 1 July, 2009 1:00 pm
Build a Creative “Swirl Animated Menu” with Flash CS4
Flash it’s a powerful application and can be really complex, but even beginners can create a cool menu for demonstration or for use in a personal site. The menu that we will create is simple, but the swirl animation is something that you don’t see everywhere, for that I’ve decided to explain one way to make an animation of growing swirls without any Action Script code.You will also learn how to import artwork from illustrator where I’ve pre-made the graphics, the work is very simple and the result will be very cool.
Flash / by - 29 June, 2009 12:00 pm
SWFObject and Best Practice Implementation
With more and more full screen Flash web sites appearing on the internet, it’s important to understand how to properly embed the Flash movie in the browser window.
In this tutorial we will cover best practice embedding of SWF movies using SWFObject with a custom function for adding browser scrollbars for smaller browser windows.
3D / by - 24 June, 2009 12:30 pm
Create a 3D Bowling Game with JiglibFlash and Papervision 3D
Possibly the hottest thing to hit the Flash community since the advent of several excellent 3D engines is the recent debut of 3D physics engines. Here we’ll examine a way of using one of the more popular 3D engines, JiglibFlash, in conjunction with the prominent 3D engine Papervision3D to create a bowling game.
Flex / by - 22 June, 2009 1:00 pm
Create a Dynamic Event Calendar in Flex Builder 3 with Actionscript 3.0
This tutorial will allow readers to create an Event Calendar application using Flex. The final user will be able to plan over a daily, weekly or monthly plan.
You will learn on this step by step Flex tutorial, to create from scratch those Graphic User Interfaces, integrate them, and create a complete Rich Internet Application with a professional look.


