Create a Dynamic Event Calendar in Flex Builder 3 with Actionscript 3.0
by 22 June, 2009 1:00 pm67
This tutorial will allow readers to create an Event Calendar application using Flex. The final user will be able to plan over a daily, weekly or monthly plan.
You will learn on this step by step Flex tutorial, to create from scratch those Graphic User Interfaces, integrate them, and create a complete Rich Internet Application with a professional look.
Requirements
Flex Builder Try/Buy


Pre-Requisites
This tutorial assumes that you have fair knowledge of OOPs, Flex framework, AIR and Actionscript 3.0
You know basic concept of writing a Class file which could use inheritance, polymorphism etc.
Step1: Getting Started
Before starting with the tutorial have a look what we are going to achieve from this tutorial, click on the View Demo button.
Firstly lets setup a AIR project in Flex Builder, you need to follow below steps to start with:-
- Open Flex Builder.
- Select File > New > Flex Project drop down menu.
- Type “Project name” as “Flex Event Calendar “.
- Choose “Application type” as “Desktop application(runs in Adobe Air)” .
- Click Next.
- Ensure Output folder should be bin-debug.
- Click Next.
- Ensure Main application file is “main.mxml”.
- Click Finish
Graphical walk through of above steps is as follows:
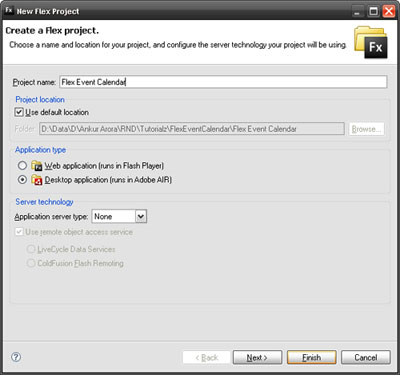
Figure 1.1
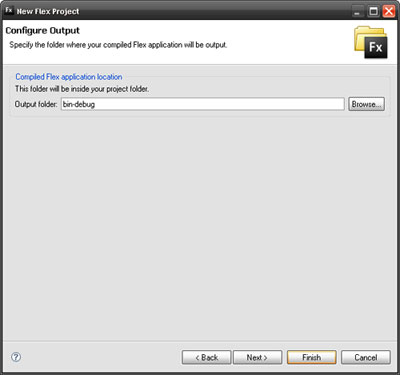
Figure 1.2
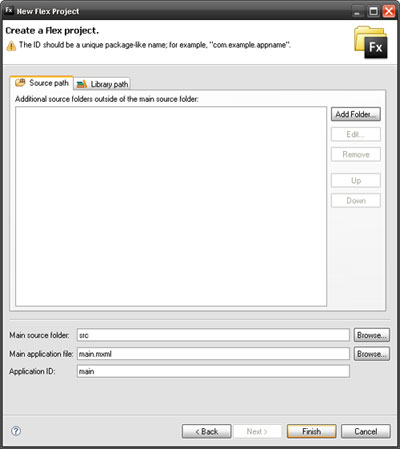
Figure 1.3
Step 2: Define application settings
Before starting with actual code lets do some basic settings which will allow our application to give a define look and feel. So first of all open code view of main.mxml file and write below MXML code in it.
<?xml version="1.0" encoding="utf-8"?>
<mx:WindowedApplication
	xmlns:mx="http://www.adobe.com/2006/mxml" layout="absolute"
	width="1000" height="620"
	horizontalScrollPolicy="off" verticalScrollPolicy="off">
</mx:WindowedApplication>
Now open main-app.xml file to define some settings for AIR application. In this file majority we would define application name and dimension related settings. Below is the code of my main-app.xml which you could simple copy and paste in your xml file.
<?xml version="1.0" encoding="UTF-8"?>
<application xmlns="http://ns.adobe.com/air/application/1.0">

<!-- Adobe AIR Application Descriptor File Template.

	Specifies parameters for identifying, installing, and launching AIR applications.

	xmlns - The Adobe AIR namespace: http://ns.adobe.com/air/application/1.1
			The last segment of the namespace specifies the version
			of the AIR runtime required for this application to run.

	minimumPatchLevel - The minimum patch level of the AIR runtime required to run
			the application. Optional.
-->

	<!-- The application identifier string, unique to this application. Required. -->
	<id>main</id>

	<!-- Used as the filename for the application. Required. -->
	<filename>main</filename>

	<!-- The name that is displayed in the AIR application installer.
	     May have multiple values for each language. See samples or xsd schema file. Optional. -->
	<name>Event Calendar</name>

	<!-- An application version designator (such as "v1", "2.5", or "Alpha 1"). Required. -->
	<version>v1</version>

	<!-- Description, displayed in the AIR application installer.
	     May have multiple values for each language. See samples or xsd schema file. Optional. -->
	<description>Add multiple events in a day.</description>

	<!-- Copyright information. Optional -->
	<!-- <copyright></copyright> -->

	<!-- Settings for the application's initial window. Required. -->
	<initialWindow>
		<!-- The main SWF or HTML file of the application. Required. -->
		<!-- Note: In Flex Builder, the SWF reference is set automatically. -->
		<content>[This value will be overwritten by Flex Builder in the output app.xml]</content>

		<!-- The title of the main window. Optional. -->
		<!-- <title></title> -->

		<!-- The type of system chrome to use (either "standard" or "none"). Optional. Default standard. -->
		<!-- <systemChrome></systemChrome> -->

		<!-- Whether the window is transparent. Only applicable when systemChrome is none. Optional. Default false. -->
		<!-- <transparent></transparent> -->

		<!-- Whether the window is initially visible. Optional. Default false. -->
		<!-- <visible></visible> -->

		<!-- Whether the user can minimize the window. Optional. Default true. -->
		<!-- <minimizable></minimizable> -->

		<!-- Whether the user can maximize the window. Optional. Default true. -->
		<maximizable>false</maximizable>

		<!-- Whether the user can resize the window. Optional. Default true. -->
		<!-- <resizable></resizable> -->

		<!-- The window's initial width. Optional. -->
		<!-- <width></width> -->

		<!-- The window's initial height. Optional. -->
		<!-- <height></height> -->

		<!-- The window's initial x position. Optional. -->
		<!-- <x></x> -->

		<!-- The window's initial y position. Optional. -->
		<!-- <y></y> -->

		<!-- The window's minimum size, specified as a width/height pair, such as "400 200". Optional. -->
		<!-- <minSize></minSize> -->

		<!-- The window's initial maximum size, specified as a width/height pair, such as "1600 1200". Optional. -->
		<!-- <maxSize></maxSize> -->
	</initialWindow>

	<!-- The subpath of the standard default installation location to use. Optional. -->
	<!-- <installFolder></installFolder> -->

	<!-- The subpath of the Windows Start/Programs menu to use. Optional. -->
	<!-- <programMenuFolder></programMenuFolder> -->

	<!-- The icon the system uses for the application. For at least one resolution,
		 specify the path to a PNG file included in the AIR package. Optional. -->
	<!-- <icon>
		<image16x16></image16x16>
		<image32x32></image32x32>
		<image48x48></image48x48>
		<image128x128></image128x128>
	</icon> -->

	<!-- Whether the application handles the update when a user double-clicks an update version
	of the AIR file (true), or the default AIR application installer handles the update (false).
	Optional. Default false. -->
	<!-- <customUpdateUI></customUpdateUI> -->

	<!-- Whether the application can be launched when the user clicks a link in a web browser.
	Optional. Default false. -->
	<!-- <allowBrowserInvocation></allowBrowserInvocation> -->

	<!-- Listing of file types for which the application can register. Optional. -->
	<!-- <fileTypes> -->

		<!-- Defines one file type. Optional. -->
		<!-- <fileType> -->

			<!-- The name that the system displays for the registered file type. Required. -->
			<!-- <name></name> -->

			<!-- The extension to register. Required. -->
			<!-- <extension></extension> -->

			<!-- The description of the file type. Optional. -->
			<!-- <description></description> -->

			<!-- The MIME type. Optional. -->
			<!-- <contentType></contentType> -->

			<!-- The icon to display for the file type. Optional. -->
			<!-- <icon>
				<image16x16></image16x16>
				<image32x32></image32x32>
				<image48x48></image48x48>
				<image128x128></image128x128>
			</icon> -->

		<!-- </fileType> -->
	<!-- </fileTypes> -->

</application>
Step 3: Place required components in main.mxml
Before starting with the core logic of the code we need to place various buttons and other flex components which will allow us to give a feel of first page of our application. To do so we need to write following set of code in main.mxml file.
	<mx:Script>
		<![CDATA[

			/* Current date will be bound all views */
			[Bindable]
			private var m_intCurrentDate:Date;

			/* Function will execute on creation complete of main.mxml */
			private function onApplicationStart():void
			{
				var objDate:Date = new Date();
				dtPicker.selectedDate = objDate;
				onDateChange();
			}

			/* Custom Events */
			private function onDateScroll():void
			{
				onDateChange();
			}

			private function onDateChange():void
			{
				m_intCurrentDate = new Date(dtPicker.displayedYear, dtPicker.displayedMonth, dtPicker.selectedDate.date);
			}

			private function onDayClick():void
			{
				stackViews.selectedIndex = 0;
			}
			private function onWeekClick():void
			{
				stackViews.selectedIndex = 1;
			}
			private function onMonthClick():void
			{
				stackViews.selectedIndex = 2;
			}

		]]>
	</mx:Script>

	<mx:Button x="9" y="10" label="Day" click="onDayClick()"/>
	<mx:Button x="62" y="10" label="Week" click="onWeekClick()"/>
	<mx:Button x="52" y="251" label="Add Event" />
	<mx:Button x="124" y="10" label="Month" click="onMonthClick()"/>
	<mx:DateChooser x="7" y="39" id="dtPicker" scroll="onDateScroll()" change="onDateChange()"  showToday="true" yearNavigationEnabled="true"/>
	<mx:ViewStack x="200" y="0" id="stackViews" width="100%" height="100%">
	</mx:ViewStack>
	<mx:TextArea x="10" y="336" height="104" fontWeight="normal" textAlign="center" borderStyle="none" backgroundAlpha="0.0" selectable="false" editable="false" color="#0367FC" fontSize="12">
		<mx:htmlText><![CDATA[Click on a button in <b>Day or Week</b> view and then click <b>Add Event</b> button to add an event on particular date and time.]]></mx:htmlText>
	</mx:TextArea>
Lets have a look on the output to understand what we achieve till now.
Step 4: Creating different views & mxml components
In this step we will create different views and other mxml components which will be used by these views. These views consist following items:
- Day View
- Week View
- Month View
- Event Form
Day view will further use “hourCell.mxml” and “hourCellLeftStrip.mxml”. Week view will use “hourCell.mxml”, “hourCellLeftStrip.mxml” and “weekCell.mxml”. Whereas Month view will use “monthCell.mxml”. In addition all these views are using “skin.css” file to use various colors and styles. Lets start with creating folders for these files then we will create mxml file and thereafter we would writing code for above views.
To create various folders just open “Flex Navigator” pane do right click on “src” folder and select “New > folder” from the drop down, refer to below Figure 4.1.
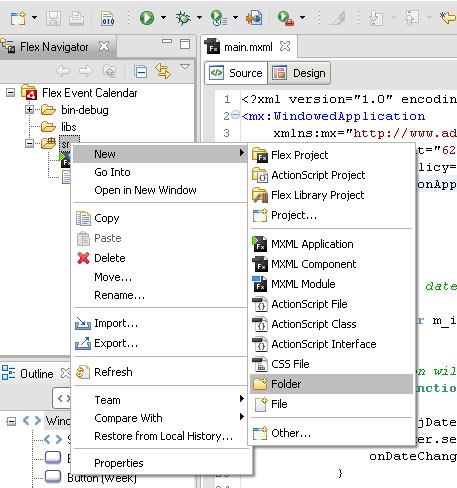
Figure 4.1
Once New Folder window is shown follow below points to create different folders:-
- type “styles” in Folder name and click Finish.
- Again open New folder window and type “mxml_views” in Folder name and click Finish.
- Again open New folder window and type “classes/views” in Folder name and click Finish.
- Again open New folder window and type “classes/utils” in Folder name and click Finish.
- Again open New folder window and type “classes/skins” in Folder name and click Finish.
- Again open New folder window and type “classes/model” in Folder name and click Finish.
- Again open New folder window and type “classes/events” in Folder name and click Finish.
We are now through with folder creation. If I say you to show screen-shot of Flex Navigator at the moment it should be look like below Figure 4.2.
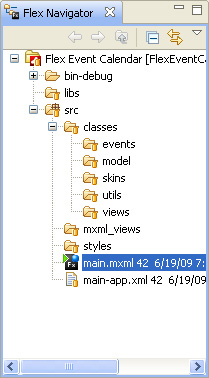
Figure 4.2
Very first class file which we needs to create is ButtonSkin.as. We will use this class in css file of the application, this class allows to create a skin for Flex button component.We will create this class under classes/skins folder, to create it do right click on skins folder and select New > ActionScript Class. Type class name as “ButtonSkin” and Superclass as “mx.skins.ProgrammaticSkin”. Click Finish. Refer to below Figure 4.3 for creating this class.
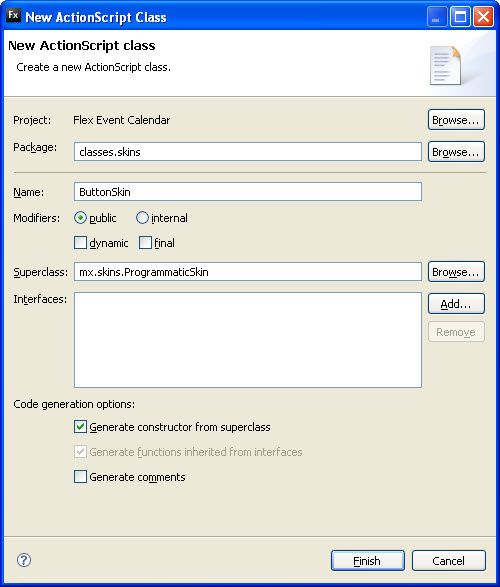
Figure 4.3
ButtonSkin.as: A very small yet useful class which defines the Skin of Flex Button component. This class is being used by “btnDayItems” style defined in skin.css file. Below is the code for the same.
package classes.skins { // Use unnamed package if this skin is not in its own package.

  // Import necessary classes here.
  import flash.display.GradientType;
  import flash.display.Graphics;
  import flash.display.SpreadMethod;
  import flash.geom.Matrix;

  import mx.skins.ProgrammaticSkin;

  public class ButtonSkin extends ProgrammaticSkin {

     public var backgroundFillColor:Number;

     // Constructor.
     public function ButtonSkin() {
        // Set default values.
        backgroundFillColor = 0xFFFFFF;
     }

     override protected function updateDisplayList(w:Number, h:Number):void {
        // Depending on the skin's current name, set values for this skin.

        switch (name) {
           case "upSkin":
            backgroundFillColor = 0xFFFFFF;
            break;
           case "overSkin":
            backgroundFillColor = 0x7fc4ff;
            break;
           case "downSkin":
            backgroundFillColor = 0x7fc4ff;
            break;
           case "disabledSkin":
            backgroundFillColor = 0xCCCCCC;
            break;
        }

        var g:Graphics = graphics;
        g.clear();
        g.beginFill(backgroundFillColor);
        g.drawRect(0, 0, w, h);
        g.endFill();

     }
  }
} // Close unnamed package.
The second file which we needs to create is “skin.css”. To create it right click on styles folder and select New > CSS File from the dropdown menu. Type file name as “skin” and write below code in this file.
skin.css: skin.css defines all styles that are used in Event Calendar application. Copy below code in your skin.css file.
/* CSS file */

/* Textarea used in month view to display event description */
TextArea.txtArea
{
	borderStyle: none;
}

/* Skins for buttons used in week and day view */
Button.btnDayItems
{
	upSkin:ClassReference('classes.skins.ButtonSkin');
    overSkin:ClassReference('classes.skins.ButtonSkin');
    downSkin:ClassReference('classes.skins.ButtonSkin');
    disabledSkin:ClassReference('classes.skins.ButtonSkin');
    selectedUpSkin:ClassReference('classes.skins.ButtonSkin');
    selectedOverSkin:ClassReference('classes.skins.ButtonSkin');
    selectedDownSkin:ClassReference('classes.skins.ButtonSkin');
    selectedDisabledSkin:ClassReference('classes.skins.ButtonSkin');
	textAlign: left;
	paddingBottom: 0;
}

/* title for showing date used in day and week view */
Label.lblViewTitle
{
	fontWeight: bold;
	textAlign: left;
	color: #FFFFFF;
}
/* global button styles */
Button
{
	fillAlphas: 0.6, 0.6, 0.6, 0.6;
	fillColors: #FFFFFF, #CCCCCC;
}

/* Grid styles, used in month view */
Grid.grdMonthView
{
	horizontalGap: 0;
	verticalGap: 0;
}

/*used for showing day's name in week view */
Label.lblDaysNames
{
	fontWeight: bold;
	color: #FFFFFF;
}

/* Global HRule style */
HRule
{
	shadowColor: #004C7C;
}

/* Application controlbar style, used in all 3 views */
ApplicationControlBar.appBarDayCell
{
	fillAlphas: 1.0, 1.0;
	fillColors: #7FC4FF, #52AACA;
	cornerRadius: 0;
	paddingTop: 2;
}

/* Canvas used as base of month cell */
Canvas.canDayCellBase
{
	backgroundColor: #FFFFFF;
	borderStyle: solid;
	borderColor: #88C4EE;
}

/* hours label used in day and week view */
Label.lblHours
{
	color: #FFFFFF;
	fontFamily: Verdana;
	fontSize: 12;
}

/* mins label used in day and week view */
Label.lblMins
{
	color: #FFFFFF;
	fontFamily: Verdana;
	fontSize: 10;
}

/* Embed Verdana font in application */
@font-face
{
	fontFamily: Verdana;
	fontWeight: normal;
	fontStyle: normal;
	src: local("Verdana");
}
@font-face
{
	fontFamily: Verdana;
	fontWeight: Bold;
	fontStyle: normal;
	src: local("Verdana");
}
Now we need to create various MXML components which will be used by different views or by the application. All these MXML files needs to be created in mxml_views folder to do that right click on mxml_views folder and select New > MXML Component.
EventForm.mxml: EventForm defines looks of event form which allow to save an event on the basis of certain parameters like date and time. These values are passed by CommonUtils class which we discuss later in this tutorial. To create do right click on mxml_views folder and select New > MXML Component and then copy below code in the file.
<?xml version="1.0" encoding="utf-8"?>
<mx:Panel xmlns:mx="http://www.adobe.com/2006/mxml"
	horizontalScrollPolicy="off"
	verticalScrollPolicy="off"
	layout="absolute"
	width="200"
	height="318" title="Choose Time & write details">

	<mx:Script>
		<![CDATA[
			import classes.model.DataHolder;

			/* selected index of hour drop down menu */
			[Bindable]
			public var hour:int;

			/* selected index of meridiem drop down menu */
			[Bindable]
			public var meridiem:int;

			/* selected index of minutes drop down menu */
			[Bindable]
			public var mins:int;

			/* current selected date in any of the views */
			[Bindable]
			public var currentDate:Date;

			/* description of the event */
			[Bindable]
			public var description:String = "";

			/* Event for Save button */
			private function onSaveButtonClick():void
			{
				var obj:Object = new Object();
				obj.date = currentDate;
				obj.hour = cmbHours.selectedItem.data;
				obj.meridiem = cmbMeridiem.selectedItem.data;
				obj.mins =  cmbMins.selectedItem.data;
				obj.desc = txtDescription.text;
				DataHolder.getInstance().addEvent(obj);
			}
		]]>
	</mx:Script>
			<mx:Canvas height="119" width="100%" y="7" x="9">
				<mx:Label text="Hours" />
				<mx:ComboBox id="cmbHours" selectedIndex="{hour}" y="19">
					<mx:dataProvider>
						<mx:Array>
							<mx:Object label="12" data="12" />
							<mx:Object label="1" data="1" />
							<mx:Object label="2" data="2" />
							<mx:Object label="3" data="3" />
							<mx:Object label="4" data="4" />
							<mx:Object label="5" data="5" />
							<mx:Object label="6" data="6" />
							<mx:Object label="7" data="7" />
							<mx:Object label="8" data="8" />
							<mx:Object label="9" data="9" />
							<mx:Object label="10" data="10" />
							<mx:Object label="11" data="11" />
						</mx:Array>
					</mx:dataProvider>
				</mx:ComboBox>
				<mx:Label text="AM/PM"  y="57"/>
				<mx:ComboBox id="cmbMeridiem" selectedIndex="{meridiem}" y="78">
					<mx:dataProvider>
						<mx:Array>
							<mx:Object label="AM" data="am" />
							<mx:Object label="PM" data="pm" />
						</mx:Array>
					</mx:dataProvider>
				</mx:ComboBox>
				<mx:Label text="Mins"  x="70" width="47"/>
				<mx:ComboBox id="cmbMins" selectedIndex="{mins}" y="19" x="70">
					<mx:dataProvider>
						<mx:Array>
							<mx:Object label="00" data="0" />
							<mx:Object label="30" data="30" />
						</mx:Array>
					</mx:dataProvider>
				</mx:ComboBox>
			</mx:Canvas>

		<mx:FormItem y="124" label="Description" />
		<mx:TextArea id="txtDescription"  width="100%" height="89" y="146" x="9" text="{description}"/>

		<mx:HBox width="100%" horizontalAlign="center" y="243">
			<mx:Button id="btnSave" label="Save" click="onSaveButtonClick()" />
			<mx:Button id="btnClose" label="Close" click="{this.visible=false;}" />
		</mx:HBox>
</mx:Panel>
hourCell.mxml: hourCell.mxml file allows to show two buttons i.e. first and second half of an hour. This mxml is being used in a loop while generating day and week view. To create do right click on mxml_views folder and select New > MXML Component and then copy below code in the file.
<?xml version="1.0" encoding="utf-8"?>
<!-- Buttons/Child view for showing hour strip used in day view and month view -->
<mx:Canvas xmlns:mx="http://www.adobe.com/2006/mxml"
	width="720"
	height="50"
	backgroundColor="#FFFFFF"
	xmlns:mxmlViews="mxml_views.*">
	<mx:Button x="0" y="0" width="100%" height="50%" styleName="btnDayItems" id="btnFirstHalf"/>
	<mx:Button x="0" width="100%" styleName="btnDayItems" bottom="0" height="25" id="btnSecondHalf"/>
	<mx:HRule x="0" top="25" strokeWidth="1" width="100%" strokeColor="#ECECEC"/>
	<mx:HRule x="0" width="100%" strokeColor="#88C4EE" bottom="0" strokeWidth="1"/>
</mx:Canvas>
hourCellLeftStrip.mxml: This file is also used in day and week view but to show a blue colored strip which shows hour numbers. To create do right click on mxml_views folder and select New > MXML Component and then copy below code in the file.
<?xml version="1.0" encoding="utf-8"?>
<!-- LEFT BKUE SIDE OF DAY AND WEEK VIEW. SHOWS HOURS -->
<mx:Canvas
	xmlns:mx="http://www.adobe.com/2006/mxml"
	x="0"
	y="0"
	width="70"
	height="50"
	backgroundColor="#7FC4FF">
	<mx:Label x="7" y="15" text="24" width="57" height="30" styleName="lblHours" id="lblHours"/>
	<mx:Label x="26" y="6" text="00" width="37" height="30" styleName="lblMins" id="lblMins"/>
	<mx:HRule bottom="0" width="62" strokeColor="#FFFFFF" left="4" strokeWidth="1"/>
	<mx:VRule x="68" y="0" height="100%" strokeColor="#004C7C"/>
</mx:Canvas>
monthCell.mxml: This file is being used in Month view and show square boxes which further allow Month view to show description of an event if exist on a particular day in that month.To create do right click on mxml_views folder and select New > MXML Component and then copy below code in the file.
<?xml version="1.0" encoding="utf-8"?>
<!-- MONTH CELL IS USED IN MONTH VIEW TO SHOW SQUARE BOXES
	DESCRIPTION TEXT IS USED TO SHOW EVENT'S DESCRIPTION
-->
<mx:Canvas
	xmlns:mx="http://www.adobe.com/2006/mxml"
	width="115"
	height="112"
	styleName="canDayCellBase">
	<mx:ApplicationControlBar id="canHeader" x="0" y="-3" height="22" width="100%" styleName="appBarDayCell">
		<mx:Label width="90" height="16" id="lblDate" color="#FFFFFF" fontWeight="bold" styleName="lblHours"/>
	</mx:ApplicationControlBar>
	<mx:TextArea x="3" y="28" width="95%" height="70%" editable="false" selectable="false" id="txtDesc" styleName="txtArea"/>
</mx:Canvas>
weekCell.mxml: weekCell is basically header file for week view which shows day names. It also contains an empty Canvas container which used by Week view to add hour items. To create do right click on mxml_views folder and select New > MXML Component and then copy below code in the file.
<?xml version="1.0" encoding="utf-8"?>
<!-- WEEK CELL IS USED TO DISPLAY BLUE BOXES IN WEEK VIEW,
THESE BLUE BOXES CONTAINS HOUR STRIP JUST LIKE DAY VIEW SHOWS -->
<mx:Canvas
	xmlns:mx="http://www.adobe.com/2006/mxml"
	width="103"
	horizontalScrollPolicy="off" verticalScrollPolicy="off"
	backgroundColor="#7FC4FF">
	<mx:ApplicationControlBar id="canHeader" y="0" height="22" width="100" styleName="appBarDayCell">
		<mx:Label id="lblDate" width="100%" text="asd" styleName="lblViewTitle" textAlign="center"/>
	</mx:ApplicationControlBar>

	<mx:Canvas id="canDayView" width="100" verticalScrollPolicy="off" horizontalScrollPolicy="off" y="22" />
</mx:Canvas>
So, We are gone through all mxml files and now we are left with writing the core classes but before proceeding with those lets have a look at Flex Navigator screen-shot so we stand on a same plain. Please refer to Figure 4.4
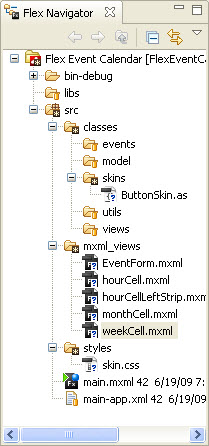
Figure 4.4
Step 5: Writing Core Classes
Lets start writing core classes which will allow to generate actual views. These classes will use above MXML files as well. we will go one by one and create these classes. Very first class which we need to start with is “DataHolder.as”.
DataHolder.as: This class is used as database for Event Calendar application. All views if needs to store any kind of data they will use this class and not for only storing in case they need to check any stored data they only get that data from this class and then uses accordingly. DataHolder resides under classes/model folder. This class also uses EventDispatcher class to dispatch event to Main application file whenever a new Event is added by any of the views. To create this class do right click on model folder and select New > ActionScript Class, use below code to populate this class.
package classes.model
{
	import classes.events.CustomEvents;

	import flash.events.EventDispatcher;

	/**
	 * DataHolder class represent all data which needs to be stored
	 * or needs to be used by any of the classes.
	 * It also dispatches events on adding a new event from any of the views.
	 * It is a singletone class so only single instance will be created through out the application cycle.
	*/
	public class DataHolder extends EventDispatcher
	{
		import flash.events.EventDispatcher;

		public static var objDataHolder:DataHolder;

		private var m_arrEvents:Array;

		public function DataHolder()
		{
			m_arrEvents = new Array();
		}

		// return class instance and if it is not created then create it first and the return.
		public static function getInstance():DataHolder
		{
			if(objDataHolder == null)
			{
				objDataHolder = new DataHolder;
			}

			return objDataHolder;
		}

		// will add any event. used by day view and week view to do so.
		public function addEvent(_obj:Object):void
		{
			m_arrEvents.push(_obj);
			updateViews();
		}

		// dispatch event to main.mxml to update views as per new event added
		private function updateViews():void
		{
			dispatchEvent(new CustomEvents(CustomEvents.ADD_NEW_EVENT));
		}

		// currently not being used but could be used when we need to add a functionality of removing an event
		public function removeEventAt(index:int):void
		{
			m_arrEvents.splice(index, 1);
		}

		// set and get dataprovider, which store all event related data
		public function set dataProvider(_arrEvents:Array):void
		{
			m_arrEvents = _arrEvents;
		}

		public function get dataProvider():Array
		{
			return m_arrEvents;
		}
	}
}
CustomEvents.as: This class is extended to Event class and used to dispatch any event from any of the classes, additionally this class allows to send a object while listening to the event. So in case there is a requirement to send specific data to the listener then this class a great help to do so. To create this class do right click on events folder and select New > ActionScript Class, use below code to populate this class.
package classes.events
{
	import flash.events.Event;

	/**
	 * CUSTOM EVENTS CLASS WILL ALLOWS TO DISPATCH EVENTS
	 * ALONG WITH A OBJECT WHICH SHOULD BE PASSED WHILE DISPATCHING THE EVENT
	 * THIS OBJECT COULD STORE ANY THING AND CAN BE USED WHILE LISTENING TO THE EVENT
	 *
	 * EXTENDS TO EVENT CLASS
	*/
	public class CustomEvents extends Event
	{
		public static const MONTH_VIEW_CLICK:String = "monthViewClick";
		public static const ADD_NEW_EVENT:String = "addNewEvent";

		public var object:Object;

		public function CustomEvents(type:String, obj:Object = null, bubbles:Boolean=false, cancelable:Boolean=false)
		{
			object = obj;
			super(type, bubbles, cancelable);
		}

	}
}
CommonUtils.as: This class resides under classes/utils folder. As per the name it is a common class which is being used by other classes. All functions are public so any class could use that as per the requirement. This class also fire events for buttons in day and week view which allows Event Form to fetch the required data. To create this class do right click on utils folder and select New > ActionScript Class, use below code to populate this class.
package classes.utils
{
	import classes.model.DataHolder;

	import flash.events.MouseEvent;

	import mx.containers.Canvas;
	import mx.controls.Button;
	import mx.utils.ObjectUtil;

	import mxml_views.hourCell;
	import mxml_views.hourCellLeftStrip;

	/**
	 * COMMON UTILS CLASS CONATINS ALL COMMON FUNCTIONS/VARIABLES
	 * WHICH COULD BE USED BY DIFFERENT CLASSES OR VIEWS
	*/

	public class CommonUtils
	{
		// used to send values to Event Form
		[Bindable]
		public static var hour:int

		// used to send values to Event Form
		[Bindable]
		public static var meridiem:int;

		// used to send values to Event Form
		[Bindable]
		public static var mins:int;

		// used to send values to Event Form
		[Bindable]
		public static var description:String;

		// used to send values to Event Form
		[Bindable]
		public static var currentDate:Date;

		// Constructor
		public function CommonUtils()
		{
		}

		/**
		 * returns day name for a particular day number in a week
		 */
		public static function getDayName(_intDayNumber:int):String
		{
			_intDayNumber++;
			switch (_intDayNumber)
			{
				case 1:
					return "Sunday";
					break;
				case 2:
					return "Monday";
					break;
				case 3:
					return "Tuesday";
					break;
				case 4:
					return "Wednesday";
					break;
				case 5:
					return "Thursday";
					break;
				case 6:
					return "Friday";
					break;
				case 7:
					return "Saturday";
					break;
				default:
					return "no day";
			}
		}

		/**
		 * returns day count for a month
		*/
		public static function getDaysCount(_intMonth:int, _intYear:int):int
		{
			_intMonth ++;
			switch (_intMonth)
			{
				case 1:
				case 3:
				case 5:
				case 7:
				case 8:
				case 10:
				case 12:
					return 31;
					break;
				case 4:
				case 6:
				case 9:
				case 11:
					return 30;
					break;
				case 2:
					if((_intYear % 4 == 0 && _intYear % 100 != 0) || _intYear % 400 ==0)
					{
						return 29;
					}
					else
					{
						return 28;
					}
					break;
				default:
					return -1;
			}
		}

		/**
		 * creates blue color strip which shows hours in week and day view
		*/
		public static function createLeftHourStrip(_parent:Canvas):void
		{
			for(var i:int=0; i<24; i++)
			{
				var strLabel:String = "";
				var objLeftStrip:hourCellLeftStrip = new hourCellLeftStrip();
				objLeftStrip.y = objLeftStrip.height * i;
				_parent.addChild(objLeftStrip);

				if(i == 0)
				{
					objLeftStrip.lblMins.text = "am";
				}
				else if(i == 12)
				{
					objLeftStrip.lblMins.text = "pm";
				}
				else
				{
					objLeftStrip.lblMins.text = "00";
				}

				if(i == 0)
				{
					strLabel = "12";
				}
				else if(i>12)
				{
					strLabel = String(i-12);
				}
				else
				{
					strLabel = String(i);
				}

				strLabel = (strLabel.length < 2) ? ("0" + strLabel) : strLabel;

				objLeftStrip.lblHours.text = strLabel;

			}
		}

		/**
		 * creates right strip which shows buttons in week and day view. which allow user to set
		 * some new events on a particular time.
		*/
		public static function createRightHourStrip(_parent:Canvas, _savedDate:Date = null):void
		{

			for(var i:int=0; i<24; i++)
			{
				var strLabel:String;
				var objHourCell:hourCell = new hourCell();
				objHourCell.y = objHourCell.height * i;
				_parent.addChild(objHourCell);

				if(i == 0)
				{
					strLabel = "12";
				}
				else if(i>12)
				{
					strLabel = String(i-12);
				}
				else
				{
					strLabel = String(i);
				}

				strLabel = (strLabel.length < 2) ? ("0" + strLabel) : strLabel;
				var dt:* = _savedDate != null ? new Date(_savedDate.getFullYear(), _savedDate.month, _savedDate.date) : null;
				objHourCell.data = {date: dt, time: strLabel, meridiem: (i < 12? "am" : "pm")};

				// check if event already saved for current time then show its description
				for(var j:int=0; j<DataHolder.getInstance().dataProvider.length; j++)
				{
					var obj:Object = DataHolder.getInstance().dataProvider[j];
					if(ObjectUtil.dateCompare(obj.date, _savedDate) == 0)
					{
						if(obj.hour == strLabel && obj.meridiem == objHourCell.data.meridiem)
						{
							if(obj.mins == 0)
							{
								objHourCell.btnFirstHalf.label = obj.desc;
							}
							else
							{
								objHourCell.btnSecondHalf.label = obj.desc;
							}
						}
					}
				}

				// click event for buttons of first and second half
				objHourCell.btnFirstHalf.addEventListener(MouseEvent.CLICK, onDayViewClick);
				objHourCell.btnSecondHalf.addEventListener(MouseEvent.CLICK, onDayViewClick);
			}
		}

		/**
		 * Click event of buttons of First and Second half of a hour
		 * set various values like hour, meridiem, date
		 * these values are used by Event Form
		*/
		private static function onDayViewClick(event:MouseEvent):void
		{
			var btn:Button = Button(event.target);
			var objHourCell:hourCell = hourCell(btn.parent);
			if(event.target.toString().indexOf("btnFirstHalf") != -1)
			{
				hour = objHourCell.data.time == "12" ? 0 : int(objHourCell.data.time);
				meridiem = objHourCell.data.meridiem == "am"? 0 : 1;
				mins = 0;
			}
			else if(event.target.toString().indexOf("btnSecondHalf") != -1)
			{
				hour = objHourCell.data.time == "12" ? .5 : int(objHourCell.data.time) + .5;
				meridiem = objHourCell.data.meridiem == "am"? 0 : 1;
				mins = 1;
			}
			currentDate = objHourCell.data.date;
			description = btn.label;

		}

	}
}
DayView.as: Out of three important view classes this is the very first view which is responsible for generating Day View in Event Calendar. This class is extended to Canvas class so it could be used in MXML files as well by using mxml tags. This class uses CommonUtils and DataHolder classes for generating view and data reading respectively. To create this class do right click on views folder and select New > ActionScript Class, use below code to populate this class.
package classes.views
{
	import classes.utils.CommonUtils;

	import mx.containers.ApplicationControlBar;
	import mx.containers.Canvas;
	import mx.controls.Label;

	/**
	 * THIS CLASS WILL ALLOW TO GENERATE A LIST OF HOUR CELLS
	 * WHICH WILL BE FROM 00hr. TO 24hr.
	 *
	 * THIS CLASS USES hourCell TO GENERATE THE LIST. IT READ CURRENT DATE TO GENERATE
	 * THE VIEW FOR THAT PARTICULAR DATE.
	 *
	 * ADDITIONALLY IT CONNECTS WITH DATA HOLDER AND CHECK FOR EVENT EXISTENSE FOR A PARTICULAR
	 * DATE AND GENERATE THE VIEW ACCORDINGLY.
	 *
	 * THIS CLASS IS EXTENDED TO CANVAS SO IT COULD BE USED A DISPLAY OBJECT IN MXML FILES AS WELL.
	*/

	public class DayView extends Canvas
	{
		private var m_currentDate:Date;

		public function DayView()
		{
			super();
		}

		// function will generate required view
		private function createIntialChildren():void
		{
			this.removeAllChildren();

			var objAppCtrlBar:ApplicationControlBar = new ApplicationControlBar();
			var objDateDisplayer:Label = new Label();
			var objHourContainer:Canvas = new Canvas();
			var objButtonContainer:Canvas = new Canvas();

			objHourContainer.horizontalScrollPolicy = "off";
			objHourContainer.verticalScrollPolicy = "off";
			objButtonContainer.horizontalScrollPolicy = "off";
			objButtonContainer.verticalScrollPolicy = "off";

			this.addChild(objAppCtrlBar);
			objAppCtrlBar.height = 22;
			objAppCtrlBar.width = this.width;
			objAppCtrlBar.styleName = "appBarDayCell";

			objAppCtrlBar.addChild(objDateDisplayer);

			this.addChild(objHourContainer);
			this.addChild(objButtonContainer);

			objDateDisplayer.text = currentDate.toDateString();
			objDateDisplayer.styleName = "lblViewTitle";
			objDateDisplayer.height = 20;
			objHourContainer.y = objDateDisplayer.height;
			objButtonContainer.y = objDateDisplayer.height;

			// common functions which generate hourCell in a loop and present the required view
			CommonUtils.createLeftHourStrip(objHourContainer);
			CommonUtils.createRightHourStrip(objButtonContainer, currentDate);

			objButtonContainer.x = objHourContainer.getChildAt(0).width;

		}

		// prorperty is being set by main.mxml which allow to generate this view as per received date
		public function set currentDate(_currentDate:Date):void
		{
			if(_currentDate != null)
			{
				m_currentDate = new Date(_currentDate.getFullYear(), _currentDate.month, _currentDate.date);;
				createIntialChildren();
			}

		}

		public function get currentDate():Date
		{
			return m_currentDate;
		}
	}
}
Now lets try import this class and have a look on the output. To use and this class first of all we need to import it using bolded code:
<mx:WindowedApplication
	xmlns:mx="http://www.adobe.com/2006/mxml" layout="absolute"
	width="1000" height="620"
	horizontalScrollPolicy="off" verticalScrollPolicy="off"
	creationComplete="onApplicationStart()"  xmlns:comViews="mxml_views.*"
xmlns:views="classes.views.*">
In our application we need to write below code in the main.mxml file to use DayView.as while keeping in mind that below code has to be written with-in <mx:ViewStack> tag.
<mx:ViewStack x="200" y="0" id="stackViews" width="100%" height="100%">
		<views:DayView id="dayView" label="Day View" width="100%" height="100%" horizontalScrollPolicy="off" currentDate="{m_intCurrentDate}" showEffect="WipeDown" hideEffect="WipeUp" />
	</mx:ViewStack>
WeekView.as: This is second important view class which is responsible for generating Week View of Event Calendar. This class is also extended to Canvas class so it could be used in MXML files as well by using mxml tags. This class uses CommonUtils, DataHolder and weekCell classes for generating view. To create this class do right click on views folder and select New > ActionScript Class, use below code to populate this class.
package classes.views
{
	import classes.utils.CommonUtils;

	import mx.containers.Canvas;

	import mxml_views.weekCell;

	/**
	 * THIS CLASS WILL ALLOW TO GENERATE A LIST OF HOUR CELLS
	 * WHICH WILL BE FROM 00hr. TO 24hr. AND THIS LIST WILL BE GENERATED FOR 7 DAYS IN CURRENT WEEK
	 *
	 * THIS CLASS USES hourCell TO GENERATE THE LIST. IT READ CURRENT DATE TO GENERATE
	 * THE VIEW FOR THAT PARTICULAR WEEK.
	 *
	 * ADDITIONALLY IT CONNECTS WITH DATA HOLDER AND CHECK FOR EVENT EXISTENSE FOR A PARTICULAR
	 * DATE AND GENERATE THE VIEW ACCORDINGLY.
	 *
	 * THIS CLASS IS EXTENDED TO CANVAS SO IT COULD BE USED A DISPLAY OBJECT IN MXML FILES AS WELL.
	*/

	public class WeekView extends Canvas
	{
		private var m_objLastGeneratedDate:Date;
		private var m_intTotalDays:int = 6;
		private var m_currentDate:Date;

		public function WeekView()
		{
			super();
		}

		private function createIntialChildren():void
		{
			var intStartDate:int;
			var intEndDate:int;
			var dt:Date = m_currentDate;
			var dtStart:Date;

			if(m_objLastGeneratedDate != dt && currentDate != null)
			{
				m_objLastGeneratedDate = dt;

				// calculate start date of the current week
				dt.setDate(dt.getDate() - dt.getDay());
				intStartDate = dt.date;
				dtStart = new Date(dt.getFullYear(), dt.month, dt.date);

				// calculate end date of the current week
				dt.setDate(dt.getDate() + (m_intTotalDays - dt.getDay()));
				intEndDate = dt.date;

				// now generate view as per week dates
				this.removeAllChildren();

				var objHourContainer:Canvas = new Canvas();
				objHourContainer.horizontalScrollPolicy = "off";
				objHourContainer.verticalScrollPolicy = "off";
				this.addChild(objHourContainer);
				objHourContainer.y = 22;

				// create left stip which is blue colored strip
				CommonUtils.createLeftHourStrip(objHourContainer);

				var objWeekCellContainer:Canvas = new Canvas();
				this.addChild(objWeekCellContainer);
				objWeekCellContainer.x = objHourContainer.getChildAt(0).width;
				objWeekCellContainer.width = 720;
				objWeekCellContainer.verticalScrollPolicy = "off";
				objWeekCellContainer.horizontalScrollPolicy = "off";

				// generate hour strip for seven daya i.e. number of days in a week
				for(var i:int=0; i<=m_intTotalDays; i++)
				{
					var objWeekCell:weekCell = new weekCell();
					objWeekCellContainer.addChild(objWeekCell);
					objWeekCell.x = objWeekCell.width * i;
					objWeekCell.lblDate.text = String(dtStart.date) + "    " + CommonUtils.getDayName(dtStart.day).substr(0, 3);

					// generate hour strip from common functions
					CommonUtils.createRightHourStrip(objWeekCell.canDayView, dtStart);
					dtStart.date = dtStart.date + 1;
				}
			}

		}

		override protected function updateDisplayList(unscaledWidth:Number,
												  unscaledHeight:Number):void
		{
			super.updateDisplayList(unscaledWidth, unscaledHeight);
		}

		// set current date for week view and thereafter generate the view on the basis of this date
		public function set currentDate(_currentDate:Date):void
		{
			m_currentDate = new Date(_currentDate.getFullYear(), _currentDate.month, _currentDate.date);
			createIntialChildren();
		}

		public function get currentDate():Date
		{
			return m_currentDate;
		}

	}
}
In our application we need to write below code in the main.mxml file to use WeekView.as while keeping in mind that below code has to be written with-in <mx:ViewStack> tag.
<mx:ViewStack x="200" y="0" id="stackViews" width="100%" height="100%">
		<views:DayView id="dayView" label="Day View" width="100%" height="100%" horizontalScrollPolicy="off" currentDate="{m_intCurrentDate}" showEffect="WipeDown" hideEffect="WipeUp" />
		<views:WeekView id="weekView" label="Week View" x="0" y="0" currentDate="{m_intCurrentDate}" horizontalScrollPolicy="off" showEffect="WipeDown" hideEffect="WipeUp" />
	</mx:ViewStack>
Now lets check the next demo to notice the changes. Be sure you click on Week button to check the output of WeekView.as.
MonthView.as: This is third & last important view class which is responsible for generating Month View of Event Calendar. This class is also extended to Canvas class so it could be used in MXML files as well by using mxml tags. This class uses CommonUtils, DataHolder and monthCell classes for generating view. To create this class do right click on views folder and select New > ActionScript Class, use below code to populate this class.
package classes.views
{
	import classes.events.CustomEvents;
	import classes.model.DataHolder;
	import classes.utils.CommonUtils;

	import flash.events.MouseEvent;

	import mx.containers.ApplicationControlBar;
	import mx.containers.Canvas;
	import mx.containers.Grid;
	import mx.containers.GridItem;
	import mx.containers.GridRow;
	import mx.controls.Label;
	import mx.utils.ObjectUtil;

	import mxml_views.monthCell;

	/**
	 * THIS CLASS WILL ALLOW TO GENERATE A GRID OF CURRENT MONTH
	 *
	 * THIS CLASS USES monthCell TO REPRESENT A SINGLE DAY.
	 *
	 * ADDITIONALLY IT CONNECTS WITH DATA HOLDER AND CHECK FOR EVENT EXISTENSE FOR A PARTICULAR
	 * DATE AND GENERATE THE VIEW ACCORDINGLY.
	 *
	 * THIS CLASS IS EXTENDED TO CANVAS SO IT COULD BE USED A DISPLAY OBJECT IN MXML FILES AS WELL.
	*/

	public class MonthView extends Canvas
	{

		private var m_intCurrentMonth:int;
		private var m_intCurrentYear:int;

		private var m_monthViewGrid:Grid;
		private var m_appBar:ApplicationControlBar
		private var m_lblDaysNames:Label;

		public function MonthView()
		{
			super();
			createIntialChildren();
		}

		// function responsible for generating the view
		private function createIntialChildren():void
		{
			// add a new grid
			m_monthViewGrid = new Grid();
			m_monthViewGrid.styleName = "grdMonthView";
			m_monthViewGrid.y = 25;

			// add application bar which will show days name on the top of the view
			m_appBar = new ApplicationControlBar();
			m_appBar.width = 800;
			m_appBar.height = 22;
			m_appBar.styleName = "appBarDayCell";

			m_lblDaysNames = new Label();
			m_lblDaysNames.width = 775;
			m_lblDaysNames.height = 16;
			m_lblDaysNames.styleName = "lblDaysNames";
			m_lblDaysNames.text = "        Sunday                        Monday                       Tuesday                   Wednesday                    Thursday                      Friday                        Saturday";

			this.addChild(m_appBar);
			m_appBar.addChild(m_lblDaysNames);
			this.addChild(m_monthViewGrid);

		}

		override protected function updateDisplayList(unscaledWidth:Number,
												  unscaledHeight:Number):void
		{
			super.updateDisplayList(unscaledWidth, unscaledHeight);
		}

		// create grid of days in current month as per current date provided
		private function createDaysGrid():void
		{
			// always assume that first day of a month will have date as 1
			// currentMonth and currentYear are supplied by main.mxml file
			var objDate:Date = new Date(currentYear, currentMonth, 1);

			// get total days count for currentMonth in currentYear
			var intTotalDaysInMonth:int = CommonUtils.getDaysCount(currentMonth, currentYear);
			var i:int;

			/**
			 * Add Total number of Grid items in a Array
			 *
			**/

			// add empty items in case first day is not Sunday
			// i.e. MonthView always shows 7 coloumns starting from Sunday and ending to Saturday
			// so if it suppose Wednesday is the date 1 of this month that means we need to
			// add 3 empty cells at start
			var arrDays:Array = new Array();
			for(i=0; i<objDate.getDay(); i++)
			{
				arrDays.push(-1);
			}

			// now loop through total number of days in this month and save values in array
			for(i=0; i<intTotalDaysInMonth; i++)
			{
				var objDate1:Date = new Date(currentYear, currentMonth, (i+1));
				var strStartDayName:String = CommonUtils.getDayName(objDate1.getDay());
				arrDays.push({data:i+1, label:strStartDayName});
			}

			// if first day of the month is Friday and it is not a leap year then we need to show 7 rows
			// there could be max 42 items in a calendar grid for a month with 6 rows
			// so add blank values in case still some cells are pending as per count of 7 cols x 6 rows = 42
			if(objDate.getDay() >= 5 && arrDays.length <= 32)
			{
				for(i=arrDays.length; i<42; i++)
				{
					arrDays.push(-1);
				}
			}
			else
			{
				for(i=arrDays.length; i<35; i++)
				{
					arrDays.push(-1);
				}
			}

			m_monthViewGrid.removeAllChildren();

			var objGridRow:GridRow;

			// once array is created now loop through the array and generate the Grid
			for(i=0; i<arrDays.length; i++)
			{
				if(i % 7 == 0)
				{
					objGridRow = new GridRow();
					m_monthViewGrid.addChild(objGridRow);
				}

				var objGridItem:GridItem = new GridItem();
				var objDayCell:monthCell = new monthCell();

				objGridItem.addChild(objDayCell);
				objGridRow.addChild(objGridItem);

				objDayCell.txtDesc.visible = false;

				if(arrDays[i] == -1)
				{
					objDayCell.canHeader.visible = false;
				}
				else
				{
					objDayCell.lblDate.text = arrDays[i].data;
					objDayCell.addEventListener(MouseEvent.CLICK, onDayCellClick);
					objDayCell.data = {date: new Date(currentYear, currentMonth, arrDays[i].data) };

					// check if current date has some event stored in DataHolder
					// if YES then display event description
					for(var j:int=0; j<DataHolder.getInstance().dataProvider.length; j++)
					{
						var obj:Object = DataHolder.getInstance().dataProvider[j];
						if(ObjectUtil.dateCompare(obj.date, objDayCell.data.date) == 0)
						{
							objDayCell.txtDesc.text = obj.desc;
							objDayCell.txtDesc.visible = true;
							break;
						}
					}
				}
			}

		}

		public function redraw():void
		{
			createDaysGrid();
		}

		// click event for a day cell
		// will change the view to Day View and set current date as per cell clicked in the Grid
		private function onDayCellClick(_event:MouseEvent):void
		{
			var objDayCell:monthCell
			if(_event.target.toString().indexOf("txtDesc") == -1)
			{
				objDayCell = monthCell(_event.target);
			}
			else
			{
				objDayCell = monthCell(_event.target.parent.parent);
			}
			dispatchEvent(new CustomEvents(CustomEvents.MONTH_VIEW_CLICK, objDayCell.data));
		}

		/**
		 * Custom Properties
		 *
		**/
		public function set currentMonth(_intCurrentMonth:int):void
		{
			m_intCurrentMonth = _intCurrentMonth;
		}

		public function get currentMonth():int
		{
			return m_intCurrentMonth;
		}

		public function set currentYear(_intCurrentYear:int):void
		{
			m_intCurrentYear = _intCurrentYear;
			createDaysGrid();
		}

		public function get currentYear():int
		{
			return m_intCurrentYear;
		}
	}
}
In our application we need to write below code in the main.mxml file to use MonthView.as while keeping in mind that below code has to be written with-in <mx:ViewStack> tag.
<mx:ViewStack x="200" y="0" id="stackViews" width="100%" height="100%">
		<views:DayView id="dayView" label="Day View" width="100%" height="100%" horizontalScrollPolicy="off" currentDate="{m_intCurrentDate}" showEffect="WipeDown" hideEffect="WipeUp" />
		<views:WeekView id="weekView" label="Week View" x="0" y="0" currentDate="{m_intCurrentDate}" horizontalScrollPolicy="off" showEffect="WipeDown" hideEffect="WipeUp" />
		<views:MonthView id="monthView" label="Month View" x="0" y="0" horizontalScrollPolicy="off" currentMonth="{dtPicker.displayedMonth}" currentYear="{dtPicker.displayedYear}" showEffect="WipeDown" hideEffect="WipeUp" />
	</mx:ViewStack>
Let’s check once more the next demo. Be sure you click on Month button to check the output of MonthView.as.
So, we are through with this step as well. All above classes are very well commented so in case you need to understand any calculation logic just read those comments even then if there is some confusion please send me a comment I’ll try to respond on that soon. Just to cross check please have a look at Figure 5.1 to see whether you have all the required classes in place.
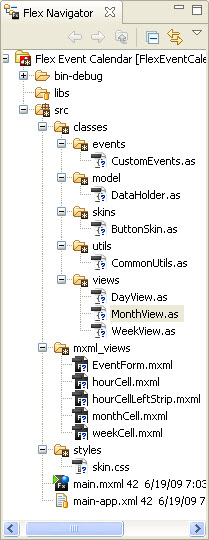
Figure 5.1
I hope all is well till now, take a deep breath as we are through with the crucial part of the application and now we just need to integrate above classes in our final step of Creating Flex Calendar.
Step 6: Integrating all these classes and generating the final output
We have already created main.mxml file which is being used as our main application file. Now what we need to add to our previous version of file is:-
- Import CSS file in MXML.
- Call events on Add Event button.
- Import all views i.e. Day, Week and Month inside ViewStack.
- Import EventForm view.
- Add Events Listeners for these views.
- Bind m_intCurrentDate variable to all views including EventForm.
- Dispatch an Event to update views when a request for adding a new event is received.
Before going further lets ensure that we have imported packages in <mx:WindowedApplication> tag. Import statements are highlighted in bold
<mx:WindowedApplication
	xmlns:mx="http://www.adobe.com/2006/mxml" layout="absolute"
	width="1000" height="620"
	horizontalScrollPolicy="off" verticalScrollPolicy="off"
	creationComplete="onApplicationStart()"
	xmlns:comViews="mxml_views.*"
	xmlns:views="classes.views.*">
Write following code to import CSS file in our main application file and to call events on Add Event button add bolded code to its tag.
<mx:Style source="styles/skin.css"/>
<mx:Button x="52" y="251" label="Add Event" click="{eventForm.visible=true;}" enabled="{eventForm.currentDate != null}" />
Now lets ensure again that following code with-in the <mx:ViewStack> tag to import all calendar views is there.
<mx:ViewStack x="200" y="0" id="stackViews" width="100%" height="100%">
		<views:DayView id="dayView" label="Day View" width="100%" height="100%" horizontalScrollPolicy="off" currentDate="{m_intCurrentDate}" showEffect="WipeDown" hideEffect="WipeUp" />
		<views:WeekView id="weekView" label="Week View" x="0" y="0" currentDate="{m_intCurrentDate}" horizontalScrollPolicy="off" showEffect="WipeDown" hideEffect="WipeUp" />
		<views:MonthView id="monthView" label="Month View" x="0" y="0" horizontalScrollPolicy="off" currentMonth="{dtPicker.displayedMonth}" currentYear="{dtPicker.displayedYear}" showEffect="WipeDown" hideEffect="WipeUp" />
	</mx:ViewStack>
Now add Event Form which allow us to save an event on a selected date. Before adding this tag you must import CommonUtils class in <ms:Script> tag using import classes.utils.CommonUtils; and then write following MXML code
<comViews:EventForm x="0" y="294" id="eventForm" hour="{CommonUtils.hour}" meridiem="{CommonUtils.meridiem}" mins="{CommonUtils.mins}" currentDate="{CommonUtils.currentDate}" description="{CommonUtils.description}" visible="false">
	</comViews:EventForm>
To perform last three steps in above list copy below code and paste it in <mx:Script> tag:-
	<mx:Script>
		<![CDATA[
			import classes.model.DataHolder;
			import classes.events.CustomEvents;
			import classes.views.MonthView;
			import classes.utils.CommonUtils;

			/* Current date will be bound all views */
			[Bindable]
			private var m_intCurrentDate:Date;

			/* Function will execute on creation complete of main.mxml */
			private function onApplicationStart():void
			{
				var objDate:Date = new Date();
				dtPicker.selectedDate = objDate;

				// create events
				monthView.addEventListener(CustomEvents.MONTH_VIEW_CLICK, onMonthViewClick);
				DataHolder.getInstance().addEventListener(CustomEvents.ADD_NEW_EVENT, onNewEventAdded);

				onDateChange();
			}

			/* Custom Events */
			private function onDateScroll():void
			{
				onDateChange();
			}

			private function onDateChange():void
			{
				m_intCurrentDate = new Date(dtPicker.displayedYear, dtPicker.displayedMonth, dtPicker.selectedDate.date);
			}

			private function onDayClick():void
			{
				stackViews.selectedIndex = 0;
			}
			private function onWeekClick():void
			{
				stackViews.selectedIndex = 1;
			}
			private function onMonthClick():void
			{
				stackViews.selectedIndex = 2;
			}

			// function fires when a cell is being clicked from the Month View
			private function onMonthViewClick(_event:CustomEvents):void
			{
				dtPicker.selectedDate = _event.object.date;
				onDateChange();
				stackViews.selectedIndex = 0;
			}

			// function fires when Save button is clicked from Event From to save an event
			private function onNewEventAdded(_event:CustomEvents):void
			{
				onDateChange();
				monthView.redraw();
			}
		]]>
	</mx:Script>
Conclusion
Now just compile and run your application. The final result should be similar to the final demo. You could also take it to further by saving event data in some database and then convert this application to a perfect desktop application including event alerts and other features which generally you see in other desktop applications. In case any help is required to do so or need help on this article feel free to drop a comment. And if you integrate new features on it, be sure to drop a comment showing it.
Related posts

Latest / by - 4 February, 2016 1:04 pm
Some of the more popular alternatives to point of sale checkout
Decades ago we were all used to queueing at the traditional point of sales (POS). The high street cash register was king when it came to paying for purchases, in…
Latest / by - 3 October, 2012 5:32 am
Are You Insured Against Cyber-Attacks?
With a number of high-profile data breaches in the past year, businesses should be making sure their networks are adequately protected. Last year, Sony experienced one of the largest data…

Effects / by - 14 January, 2012 5:55 pm
Learn Digital Painting in Photoshop
It’s impossible for everyone to become an artist, but many of them have a will to become an artist, to draw beautiful paintings but again due to lack of command…

Effects / by - 28 December, 2011 2:28 pm
How to Make a New Year Greeting Card in Photoshop
This is so much easy to go in a market and by paying some bucks; purchasing a New Year Greeting Card or any other festival card for your loving person…
Latest / by - 18 August, 2011 8:55 am
How to Block ETag Cookies in Chrome
Most people don’t even know it exists but the new ETag technology is a serious privacy invasion that places undeletable cookies on your computer. The analytics provider KISSmetrics was the…

Flash / by - 10 August, 2011 4:13 pm
Creating a Gallery in Flash Using the Moto CMS Component
In this tutorial we will create a gallery with the help of the Moto CMS Component. I think many of you have heard about (or even worked with) Moto Flash…

3D / by - 24 July, 2011 5:21 pm
Visualize Your Web Page in 3D
Ever wondered if you could visualize your website in 3D? Well, here’s one such Firefox extension that allows you to do so. Tilt is a Firefox add-on that lets you visualize any web page DOM and provides the relationship between various parts of a website in 3D.
Latest / by - 17 June, 2011 9:26 am
Are TechCrunch Hypocrites? The Groupon Series
TechCrunch have commissioned and been running posts (So Far a 4 part series) about how Groupon is the devil and certain of collapse… In the most recent article published 2…

Gaming News / by - 8 March, 2011 1:28 pm
Effects of Violent Video Games Proved By Research Study
Effects of Violent Video Games A research study on the effects of violent video games has shown an increase of aggression. This is caused by playing a violent video game,…

Interfaces / by - 1 March, 2011 2:18 pm
Beginners Guide To User Interface Design in C#
User Interface Design in C# Windows Form Application From Scratch In this C Sharp tutorial you will learn user interface design in C# application. This step-by-step tutorial will help you deeply understand…
Effects / by - 1 December, 2010 2:34 pm
Create an intelligent XML image Gallery & Slideshow in Flash CS4 (+PHP) – Part II/II
In this second part article you will learn how to build an image gallery that will load images from a web server. I decide to call it “Intelligent” because you don’t need to configure any XML or flash file. Just put the Flash movie and the images on a server and they will be loaded automatically. Nice ah?
Flex / by - 29 May, 2010 2:56 pm
Connecting Flex Calendar With Database Using AMF-PHP
Connecting Flex Calendar with Database using AMF-PHP Part I: Create a Dynamic Event Calendar in Flex Builder 3 with Actionscript 3.0 This is Part II of Create a Dynamic Event…
Server Side / by - 13 April, 2010 2:39 pm
CodeIgniter Tutorial – CodeIgniter Explained
Hello everyone, and welcome to the first CodeIgniter tutorial. What will you learn? 1. What is a PHP Framework? 2. What is CodeIgniter? 3. What is MVC? 4. MVC Pattern…

3D / by - 20 March, 2010 10:00 am
Away3D Shoot’em’Up Tutorial – Powerups
In this article we add some powerups to the game.

3D / by - 15 February, 2010 3:59 pm
Away3D Shoot’em’Up Tutorial – Sound Effects
In this article we add some sound effects to the game.
3D / by - 28 July, 2009 1:00 pm
Create from Scratch a Away3D Shoot’em’Up Game: Part 4
Now that we have the player and some enemies we need for them to be able to interact. This is done through collision detection which you will learn in this fourth part.

Effects / by - 21 July, 2009 1:00 pm
Getting Started With BetweenAS3
There are many popular open source tweening engines in the Flash community today. Numbered among these are Tweener, TweenLite/Tweenmax, Tweensy, and GTween. This is a short look at the capabilities of newcomer to the scene: BetweenAS3. BetweenAS3 is the tweening engine brainchild of Yoshihiro (yossy) Shindo and is available as part of the Spark project (i.e. it is brought to us by one of the same group that brought the world the FLARToolkit for Augmented Reality in Flash and countless other goodies).
Latest / by - 17 July, 2009 12:45 pm
Web Roundups: 7 Free Flash CMS
A Flash CMS is a good option to deliver projects to your clients when they want to manage and change the content easly, without programming knowledge and avoiding to edit the flash files. Today, we show you the free available options which you should bear in mind before decide to go on Premium Products.
3D / by - 15 July, 2009 12:50 pm
Create from Scratch a Away3D Shoot’em’Up Game: Part 3
After you have created the 3D level, in the part 3 of this Away3D series, we will show you how to add the player spacecraft and enemies.
Effects / by - 13 July, 2009 12:30 pm
Create an intelligent XML image Gallery & Slideshow in Flash CS4 (+PHP) – Part I/II
In this article you will learn how to build an image gallery that will load images from a web server. I decide to call it “Intelligent” because you don’t need to configure any XML or flash file. Just put the Flash movie and the images on a server and they will be loaded automatically. Nice ah?


